UK-6
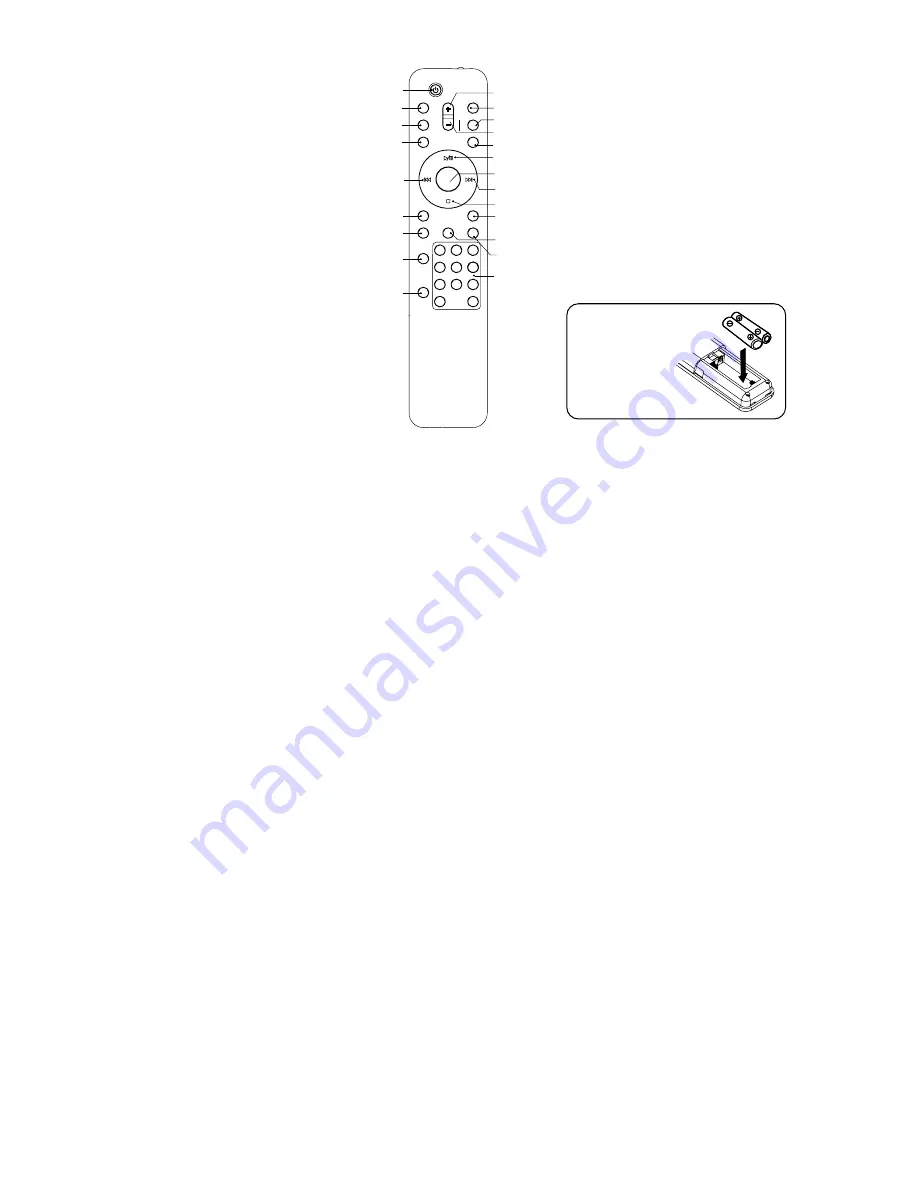
REMOTE CONTROL
1. STANDBY BUTTON
2. MUTE BUTTON
3. CD DOOR OPEN/CLOSEBUTTON
4. TIMER BUTTON
5. SKIP/TUNE SEARCH DOWN BUTTON
6. RANDOM BUTTON
7. SLEEP BUTTON
8. CLOCK/DISPLAY BUTTON
9. EQ BUTTON
10.VOLUME UP BUTTON
11.CD/iPod BUTTON
12.USB/CARD/AUX BUTTON
13.VOLUME DOWN BUTTON
14.FM/DAB BUTTON
15.PLAY/PAUSE BUTTON
16.SELECT/REPEAT BUTTON
17.SKIP/TUNE SEARCH UP BUTTON
18.STOP/MENU/MONO/ST. BUTTON
19.PRESET/FOLDER UP BUTTON
20.MEMORY BUTTON
21.PRESET/FOLDER DOWN BUTTON
22.NUMBER SEARCH BUTTON
1
2
3
4
5
6
7
8
9
10
12
11
13
14
15
16
17
18
19
20
21
22
OPERATING THE UNIT
POWER/STANDBY
1. Press the STANDBY/ON button on the unit (or remote control) to switch the unit on.
2. Select the sound source (CD, iPod), (USB, CARD, AUX) and (DAB or TUNER) by press the (CD, iPod),
(USB, CARD, AUX) and(DAB or TUNER) button on the unit (or remote control). The corresponding
display will light up.
3. Adjust the volume with the VOLUME (UP or DOWN) button on the unit (or remote control).
4. Press the STANDBY button on the unit (or remote control) again to turn off the unit.
Note:
1. If there is no signal under the CD/USB DEVICES/SD & MMC CARD/iPod mode, the main unit will be
switched off within 15 minutes automatically.
2. During in the iPod mode, there is not insert the iPod Player on the iPod docking bracket. The main unit will
also turn off within15 minute automatically.
3. Please turn the main switch off to save energy, when you do not use the unit.
CLOCK SETTING
Manual clock setting
When you first put the unit electric plug into the AC outlet, and then switch the power to "ON" position on the
rear of the subwoofer.
1. The subwoofer and the main unit will be in standby mode, the both of the STANDBY indicators will change
to red color.
2. Press the STANDBY/ON button on the main unit (or on the remote control) to power the main unit "ON".
3. The standby indicator of the subwoofer will be changed to green color and the standby indicator of the
main unit will be change to light off.
Note:
Pull the AC plug out of the wall socket that to switch off the whole products completely.
The clock will be automatically synchronised to the DAB clock if you can receive DAB signals in your
location. If you can only receive FM, then you have to set the clock manually. The manual clock setting must
be done in standby mode.
1. When the unit is first connected to the AC mains outlet, it will be in standby mode, and the display will
show “00:00” and flash.
2. During standby, press and hold the CLOCK/DISPLAY button on the remote control/unit the hour digits
flash in the display, press the SKIP/TUNE SEARCH (UP or DOWN) button on the unit main or the remote
control to set to the correct hour, then press the CLOCK/DISPLAY button on the remote control/unit again
to confirm.(F1)
3. After the hour is set, the minute digits will then flash, press the SKIP/TUNE SEARCH (UP or DOWN)
button (or remote control) to set to the correct minute.(F2)
4. When the display shows the correct time, press the CLOCK/DISPLAY button on the remote control/unit
again to confirm, the manual clock setting is now completed.
Synchronise the clock/ON to DAB local time
1. Press the STANDBY button on the unit (or remote control) once to switch the unit on.
2. Press the FM/DAB button (or remote control) to select DAB mode.
3. Tune to a DAB station and the clock will be automatically synchronized to the DAB local time.
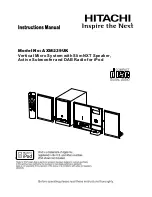
PUTTING THE BATTERIES INTO
THE REMOTE CONTROL UNIT
Press down the compartment cover, and
slide the cover off to open the compartment.
Place the two (UM4), (AAA), (R03) batteries
in the remote control according to the
polarity markings ("+" and " - ") inside the
compartment and on the batteries. Place
the cover over the compartment, press down
lightly, and push it upward until it snaps on.
Note:
Remove the batteries from the remote
control if not in use for long period of
the time. Do not mix normal batteries with
rechargeable batteries, when the batteries
become weak, remote control will not
function and replace with new batteries.
**BATTERIES NOT
INCLUDED**


