background image

CUSTOMIZE

47

CUSTOMIZE

CUSTOMIZE

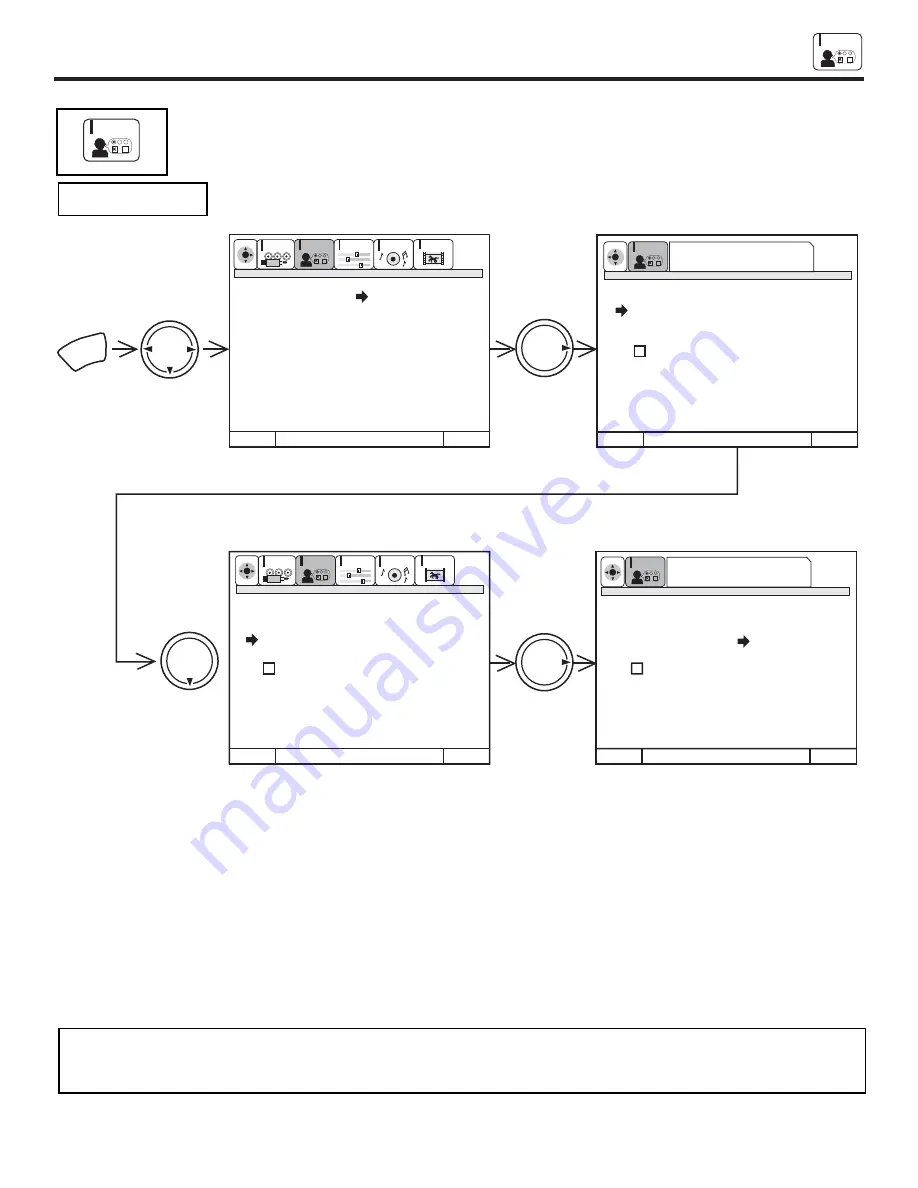
This selection contains advanced features which will make TV viewing easier and more enjoyable.

Use this feature to give up to 20 channels a name when ANTENNA signal source is selected and up to 60
channels a name when CATV signal source is selected.

Press THUMB STICK 

to highlight CHANNEL NAMES.

Press THUMB STICK 

to select preset CHANNEL NAMES.

Press THUMB STICK

to scroll through the preset CHANNEL NAMES.

Press down on THUMB STICK to select desired CHANNEL NAME.

To customize CHANNEL NAMES, select CUSTOM NAME.
Press THUMB STICK 


or 

to select letter.

Press THUMB STICK 


or 

to change character position.

(

*

) represents a blank space.

Press CHANNEL


or 


and the number buttons to label additional channels.

Press EXIT to quit menu or THUMB STICK 


to return to previous menu when the CURSOR is in the first position.

Select RESET to erase a CHANNEL NAMES.

NOTES:

1.

If ANT A and ANT B are in the same ANTENNA/CABLE mode (see page 37), the CHANNEL NAMES for both antenna
inputs will be the same.  

2.

CHANNEL NAMES will be displayed only when channel is displayed as main picture.

NAME THE CHANNEL

M e n u         T o   M e n u   B a r

T o   Q u i t

E x i t

M e n u         T o   M e n u   B a r

T o   Q u i t

E x i t

M e n u         T o   M e n u   B a r

T o   Q u i t

E x i t

M e n u         T o   M e n u   B a r

T o   Q u i t

E x i t

MENU

THUMB

STICK

THUMB

STICK

THUMB

STICK

THUMB

STICK

CUSTOMIZE

SETUP

VIDEO

AUDIO

THEATER

SEL

CUSTOMIZE

SETUP

VIDEO

AUDIO

THEATER

SEL

N a m e   t h e   C h a n n e l

C h   2 2
C h a n n e l   N a m e s
C u s t o m   N a m e

R e s e t

N e x t   C h
C h  

  C h  

O r   #   K e y s

N a m e   t h e   C h a n n e l

N a m e   t h e   I n p u t s
S e t   F a v o r i t e   C h .
S e t   P a r e n t a l   L o c k s
S e t   P r o g r a m   T i m e r
V i d e o   I n p u t   S e n s o r
C l o s e d   C a p t i o n
M e n u   B a c k g r o u n d

N a m e   t h e   C h a n n e l

C h   2 2

C h a n n e l   N a m e s

A & E

C u s t o m   N a m e

A B C

R e s e t

A M C

A P

N e x t   C h

B E T

C h  

  C h  

B R V O

O r   #   K e y s

N a m e   t h e   C h a n n e l

C h   2 2

C h a n n e l   N a m e s

A & E

C u s t o m   N a m e

A B C

R e s e t

A M C

A P

N e x t   C h

B E T

C h  

  C h  

B R V O

O r   #   K e y s

Scroll to a channel
name and press select

SEL

CUSTOMIZE

Change the channel using
CH+, CH- or the number keys

SEL

CUSTOMIZE

Summary of Contents for 43FDX10B

Page 1: ...IONS 2 4 FIRST TIME USE 5 19 THE GENIUS REMOTE CONTROL ULTRATEC BIT MAP ON SCREEN DISPLAY USEFUL INFORMATION INDEX 61 67 33 60 20 32 CUSTOMIZE SETUP VIDEO AUDIO THEATER SEL As an ENERGY STAR Partner Hitachi Ltd has determined that this product meets the ENERGY STAR guidelines for energy efficiency ...

Page 2: ...nded for use in a computer room POWER SOURCE This projection television is designed to operate on 120 Volts 60Hz AC current Insert power cord into a 120 Volt 60Hz outlet TO PREVENT ELECTRIC SHOCK DO NOT USE THE TELEVISION S POLARIZED PLUG WITH AN EXTENSION CORD RECEPTACLE OR OTHER OUTLET UNLESS THE BLADES AND GROUND TERMINAL CAN BE FULLY INSERTED TO PREVENT BLADE EXPOSURE NEVER CONNECT THE TELEVIS...

Page 3: ...units To help you operate these products properly this section illustrates safety tips which will be of benefit to you Please read it carefully and apply the knowledge you obtain from it to the proper operation of your HITACHI television Please fill out your warranty card and mail it to HITACHI This will enable HITACHI to notify you promptly in the improbable event that a safety problem should be ...

Page 4: ... contact with them might be fatal 18 For added protection for the television during a lightning storm or when it is unused for long periods of time unplug it from the wall outlet and disconnect antenna This will prevent damage due to lightning and power line surges EXAMPLE OF ANTENNA GROUNDING AS PER NATIONAL ELECTRICAL CODE INSTRUCTIONS 19 This television should be operated only from the type of ...

Page 5: ...ELEVISION STAND SP 43H Not included order separately OPTIONAL H530047 CUSTOM HITACHI TELEVISION STAND Excellent for VCR and video tape storage Special features include smoked glass doors and an adjustable shelf Available in shark grey CAUTION Television stand model SP 43H is designed for use with a 43 inch or smaller television set Use of a smaller stand a non Hitachi recommended stand or a generi...

Page 6: ...ample in direct sunlight or near a heating appliance etc VIEWING The major benefit of the HITACHI Projection Television is its large viewing screen To see this large screen at its best test various locations in the room to find the optimum spot for viewing The best picture is seen by sitting directly in front of the TV and about 10 to 18 feet from the screen Picture brightness decreases as the vie...

Page 7: ...e television S VIDEO Super Video Connector This connector is used on camcorders VCRs and laserdisc players with an S VIDEO feature in place of the standard video cable to produce a high quality picture ANTENNA CONNECTIONS TO REAR JACK PANEL VHF 75 Ohm antenna CATV Cable TV When using a 75 Ohm coaxial cable system connect the outdoor antenna or CATV coaxial cable to the ANT A 75 Ohm terminal If you...

Page 8: ...ht corner of the screen This button also serves as the EXIT button when in MENU mode CHANNEL selector Press these buttons until the desired channel appears in the top right corner of the TV screen These buttons also serve as the cursor down and up buttons when in MENU mode VOLUME level Press these buttons for your desired sound level The volume level will be displayed on the TV screen These button...

Page 9: ...selecting channels adjusting volume etc DIGITAL ARRAY Model 43FDX10B 43FDX11B MAGIC FOCUS Models 53UDX10 61UDX10B Use this button to adjust your picture quality to optimum performance see pages 42 and 43 FRONT INPUT JACKS for VIDEO 3 Use these audio video jacks for a quick hook up from a camcorder or VCR to instantly view your favorite show or new recording Press the INPUT button until VIDEO 3 app...

Page 10: ...connection cord plugs when connecting to front panel jacks If you do not the played back picture may be abnormal 2 If you have a S VHS VCR use the S INPUT cable in place of the standard video cable 3 If you have a mono VCR insert the audio cable into the left audio jack of your TV MAGIC FOCUS OUTPUT V L R S VHS Back of VCR S INPUT Optional see note INPUT 3 AUDIO S VIDEO VIDEO L MONO R INPUT OUTPUT...

Page 11: ...dio cable into the left audio jack MONITOR OUT These jacks provide fixed audio and video signals which are used for recording Use the S VIDEO Output for high quality video output AUDIO TO HI FI Output These jacks provide variable audio output to a separate stereo amplifier With this connection the audio to the stereo can be controlled by the television s main volume S VIDEO Inputs 1 and 2 Inputs 1...

Page 12: ...nts R Y output to the TV s PR input 2 Your component outputs may be labeled Y CBCR In this case connect the component CB output to the TV s PB input and the component CR output to the TV s PR input 3 It may be necessary to adjust TINT to obtain optimum picture quality when using the Y PBPR inputs See pages 53 and 54 4 To ensure no copyright infringement the MONITOR OUT output will be abnormal when...

Page 13: ...R 2 Cable TV Box Optional see tips on page 15 VCR 1 Outside antenna or cable TV coaxial cable 2 Way signal splitter Optional see tips on page 15 OUTPUT Y PB PR L R HDTV Set Top Box V L R OUTPUT S VIDEO ANT IN OUTPUT S VIDEO V L R OUTPUT Y PB CB PR CR L R L R INPUT Optional see tips on page 15 V L R INPUT S VIDEO INPUT OUTPUT REAR PANEL CONNECTIONS 13 NOTE 1 Connect only 1 component to each input j...

Page 14: ...nect to Input 1 or Input 2 but only one of these may be used at a time Connect only 1 component VCR DVD player camcorder etc to each input jack COMPONENT Y PBPR Input 4 5 connections are provided for high performance components such as DVD players and set top boxes Use these connections in place of the standard video connection if your device has this feature Your component outputs may be labeled ...

Page 15: ... TO CONVERTER ANT B R L INPUT Stereo System Amplifier To Audio Input Terminal of External Amplifier CONNECTING EXTERNAL AUDIO AMPLIFIER To control the audio level of an external audio amplifier with the remote control connect the system as shown below NOTE To prevent damage to the speaker and distorted sound set the volume control of the audio amplifier lower and adjust the sound using the remote ...

Page 16: ... INPUT VID1 ANT Ant A Video 1 VID1 CONNECTING A MONAURAL AUDIO SOURCE TO INPUT1 INPUT5 1 Connect the cable from the VIDEO OUT of the VCR or the laserdisc player to the INPUT VIDEO jack as shown on the TV set below 2 Connect the cable from the AUDIO OUT of the VCR or the laserdisc player to the INPUT MONO L AUDIO jack 3 Press the VID1 VID5 button to view the program from the VCR or the laserdisc pl...

Page 17: ...ght seconds 5 Press the ANT button to return to the previous channel PB PR AUDIO TO HI FI PB PR MONITOR OUT INPUT 1 AUDIO MONO L R AUDIO L R S VIDEO S VIDEO VIDEO VIDEO AUDIO L R MONO S VIDEO VIDEO Y VIDEO R L AUDIO L R L R Y VIDEO AUDIO INPUT 2 INPUT 4 INPUT 5 MONO MONO ANT A TO CONVERTER ANT B Hitachi Model or Similar Model Back of VCR V L R VCR OUTPUT NOTES 1 Completely insert the connection co...

Page 18: ...n to return to the previous channel PB PR AUDIO TO HI FI PB PR MONITOR OUT INPUT 1 AUDIO MONO L R AUDIO L R S VIDEO S VIDEO VIDEO VIDEO AUDIO L R MONO S VIDEO VIDEO Y VIDEO R L AUDIO L R L R Y VIDEO AUDIO INPUT 2 INPUT 4 INPUT 5 MONO MONO ANT A TO CONVERTER ANT B Hitachi Model or Similar Model Rear Panel of Television VCR or Laserdisc Player V L R OUTPUT S VIDEO See tips on Page 14 NOTES 1 Complet...

Page 19: ...Press the VID4 VID5 button to view the program from the Laserdisc DVD player or HDTV set top box The VIDEO icon disappears automatically after approximately eight seconds 7 Press the ANT button to return to the previous channel PB PR AUDIO TO HI FI PB PR MONITOR OUT INPUT 1 AUDIO MONO L R AUDIO L R S VIDEO S VIDEO VIDEO VIDEO AUDIO L R MONO S VIDEO VIDEO Y VIDEO R L AUDIO L R L R Y VIDEO AUDIO INP...

Page 20: ... video equipment point the remote at the remote sensor of the component you wish to control and press the AV1 AV2 or AV3 button This button will blink indicating that the remote will now control the desired component See page 31 for instructions on how to program the remote to control additional Audio Video equipment These buttons allow the remote to control your TV VCR cable box satellite receive...

Page 21: ...s in STB mode see page 29 If you have a Satellite receiver use this button to program your Satellite receiver see page 29 DVD button When the DVD button is pressed it will blink to indicate the remote is in DVD mode see page 30 POWER TV VCR CBL DVD 1 2 4 5 6 3 7 8 9 0 LAST CH SLEEP HELP EXIT MENU CH VOL MUTE PIP PIP CH SWAP FREEZE PIP MODE PIP ACCESS PROG TV VCR SLOW SOURCE WIZARD REC SELECT ASPEC...

Page 22: ...the number buttons Channel selection may also be performed by pressing CH up or down NOTE The TV may not receive some channels if you are not in the correct ANTENNA CABLE mode see page 37 Ant B 28 Ant A 10 ANT Ant A 10 Ant A 39 LAST CH C C button Press this button to quickly turn the Closed Caption feature on off and auto see page 52 for more information HELP button Press this button when a menu i...

Page 23: ...ived the picture source if the channel has stereo ST or second audio program SAP the time CHANNEL ID and if the SLEEP timer is set PICTURE IN PICTURE buttons See separate section on pages 24 and 25 for a description PIP CH button Use the PIP CH button to select between main picture and sub picture tuning The channel number which is highlighted indicates what channel is being controlled VID1 VID5 W...

Page 24: ...e When the lower channel display is highlighted channel tuning is for the PIP sub picture The Picture in Picture feature is convenient when you want to watch more than one program at the same time You can watch a TV program while viewing other programs from the ANT A source or any of the video inputs Use above connection to view VCR program as a sub picture while viewing another program as main pi...

Page 25: ...b picture PICTURE IN PICTURE CONT SURF MODE PIP This feature will automatically scan all active channel numbers those set in memory and display them as PIP sub pictures along the right edge of the screen Press the PIP button a second time to remove the sub pictures from the screen SWAP button If you wish to switch what is being shown on the main picture to the sub picture press the SWAP button Ant...

Page 26: ...urn may develop if the sub picture is left in the same corner permanently If the PIP feature is used frequently occasionally MOVE the sub picture using the THUMB STICK or NOTES Each freeze frame is delayed about 0 1 1 10 second NOTE The FREEZE function will only operate when SINGLE PIP mode is chosen Hot Springs Clay Mask C O John Doe Run Spa Retreat P O Box 55512 Any Town USA 98765 Check or Money...

Page 27: ...ntrol will remember the codes you have programmed until the batteries are removed from the remote control After replacing the batteries repeat the entire programming procedure as stated above 4 The MENU button will act as the VCR MENU button for HITACHI VCRs 5 The LAST CH button will act as your VCR ENTER button if required 6 The SLEEP button will act as your VCR 100 button if required VCR Button ...

Page 28: ...se consult your cable box operating guide 3 The remote control will remember the codes you have programmed until the batteries are removed from the remote control After replacing the batteries repeat the entire programming procedure as stated above 4 The LAST CH button will act as the cable box ENTER button if required 5 The SLEEP button will act as your cable box 100 button if required 6 The ANT ...

Page 29: ...has not been precoded into the remote 2 In the unlikely event that your set top box satellite receiver cannot be operated after performing the above procedures please consult your set top box satellite receiver operating guide 3 The remote control will remember the codes you have programmed until the batteries are removed from the remote control After replacing the batteries repeat the entire prog...

Page 30: ...e remote 2 In the unlikely event that your DVD player cannot be operated after performing the above procedures please consult your DVD player operating guide 3 The remote control will remember the codes you have programmed until the batteries are removed from the remote control After replacing the batteries repeat the entire programming procedure as stated above DVD Button This button allows the r...

Page 31: ...am your Audio Video components as follow for best performance Use AV1 to program your CD brand Use AV2 to program your TAPE brand and use AV3 to program your AMPLIFIER RECEIVER brand 2 If your Audio Video component cannot be operated after performing the above procedures your Audio Video component s code has not been precoded into the remote 3 In the unlikely event that your Audio Video component ...

Page 32: ...Sony 02 Toshiba 05 Yamaha 08 Zenith 05 11 CABLE BRAND CODE ABC 01 07 08 17 18 20 36 37 49 Antronix 39 Archer 11 24 39 Belcor 32 Cable Star 32 Century 11 Citizen 11 Colour Voice 30 42 Comtronics 25 28 Contec 21 Dae Ryung 20 Eastern 14 Electricord 31 Everquest 51 Focus 52 Garrard 11 GC Electronics 32 39 Gemini 05 38 43 51 General Instrument 01 12 Goldstar 10 25 Hamlin 04 13 22 23 Hitachi 01 Hytex 36...

Page 33: ...on the remote control when a menu is displayed and text will appear giving a description of that menu HELP EXIT MENU SELECT This part of the screen shows what selections are available This part of the screen shows which remote control buttons to use To Quit Exit CUSTOMIZE SETUP VIDEO AUDIO THEATER SEL Set Menu Language Plug Play Set Antenna Cable Set Channel Memory Edit Channel Memory View Channel...

Page 34: ...ame The Inputs Label video inputs VCR1 DVD1 etc Set Favorite Ch Allows you to set and view favorite channels Set Parental Locks Block channel picture and sound Set Program Timer Turn TV on and off once daily or weekly Video Input Sensor Automatically turn TV on to VIDEO 4 input Closed Caption Feature to display dialogue text Menu Background Select from two types of backgrounds Contrast Adjust cont...

Page 35: ...it menu or THUMB STICK to return to previous menu SET MENU LANGUAGE Exit THUMB STICK THUMB STICK Exit CUSTOMIZE SETUP VIDEO AUDIO THEATER SEL Press select to set SETUP SEL Set Menu Language English Plug Play Francais Set Antenna Cable Español Set Channel Memory Edit Channel Memory View Channel List Set The Clock Magic Focus Picture Formats Menu To Menu Bar To Quit Set Menu Language English Plug Pl...

Page 36: ...ut Cable Box B Cable Box C Satellite Receiver D Satellite Receiver With Cable Box Press To Select Press Select To Enter Question 2 I Want To Connect A VCR DVD To My System A Yes B No Press To Select Press Select To Enter Question 3 I Want To Connect A Set Top Box To My System A Yes B No Press To Select Press Select To Enter Menu To Menu Bar To Exit Quit Menu To Menu Bar To Exit Quit Menu To Menu B...

Page 37: ...ess select to set SETUP SEL Press select to set SETUP SEL Set Menu Language Plug Play Set Antenna Cable Antenna Set Channel Memory Catv 1 Edit Channel Memory Catv 2 View Channel List Set The Clock Magic Focus Picture Formats Set Menu Language Plug Play Set Antenna Cable Antenna Set Channel Memory Catv 1 Edit Channel Memory Catv 2 View Channel List Set The Clock Magic Focus Picture Formats Set Menu...

Page 38: ... MEMORY See EDIT CHANNEL MEMORY to add or to erase additional channels SET CHANNEL MEMORY Menu To Menu Bar To Quit Exit Menu To Menu Bar To Quit Exit Menu To Menu Bar To Quit Exit Set Channel Memory Set Menu Language Plug Play Set Antenna Cable Set Channel Memory Begin Edit Channel Memory View Channel List Set The Clock Magic Focus Picture Formats THUMB STICK THUMB STICK SELECT CUSTOMIZE SETUP VID...

Page 39: ...keys Picture Formats Menu To Menu Bar To Quit Exit Set Menu Language Plug Play Set Antenna Cable Channel 3 Set Channel Memory Add Edit Channel Memory Erase View Channel List Set The Clock Magic Focus Picture Formats THUMB STICK Menu To Menu Bar To Quit Exit THUMB STICK THUMB STICK SELECT CUSTOMIZE SETUP VIDEO AUDIO THEATER SEL Press select to set SETUP SEL Press select to set SETUP SEL Press selec...

Page 40: ... ON 5 6 CNN ON 7 COM ON ON 8 ESP2 ON View Channel List Ant A Ch Id Scan Lock 9 HBO ON 10 HGTV ON 11 FOX ON 12 BET ON 13 AMC ON 14 HSN ON ON 15 16 FAM ON Menu To Menu Bar To Quit Exit Menu To Menu Bar To Quit Exit Menu To Menu Bar To Quit Exit THUMB STICK THUMB STICK CUSTOMIZE SETUP VIDEO AUDIO THEATER SEL CUSTOMIZE SETUP VIDEO AUDIO THEATER SEL CUSTOMIZE SETUP VIDEO AUDIO THEATER SEL Set Menu Lang...

Page 41: ...URSOR is in the first position SET THE CLOCK Set The Clock Am Jan 01 2001 Set The Clock 12 00 Pm May 10 2001 Menu To Menu Bar To Quit Exit Menu To Menu Bar To Quit Exit THUMB STICK Menu To Menu Bar To Quit Exit CUSTOMIZE SETUP VIDEO AUDIO THEATER SEL Set Menu Language Plug Play Set Antenna Cable Set Channel Memory Edit Channel Memory View Channel List Set The Clock Magic Focus Picture Formats THUM...

Page 42: ...f the three color tubes The output of the green tube is stationary The outputs of the red and blue tubes can be adjusted When properly aligned the outputs of all three tubes should be directly over each other to produce the white lines To simplify convergence HITACHI incorporates a function called MAGIC FOCUS located on the front control panel which allows the TV to self adjust Press this MAGIC FO...

Page 43: ...ound objects in the picture you may want to converge align the colors Properly converged the lines appear white which is actually a combination of the outputs of the three color tubes The output of the green tube is stationary The outputs of the red and blue tubes can be adjusted When properly aligned the outputs of all three tubes should be directly over each other to produce the white lines To s...

Page 44: ...Exit THUMB STICK Press Select To Set Press Select To Set SETUP SEL SETUP SEL CUSTOMIZE SETUP VIDEO AUDIO THEATER SEL Picture Formats Ant A 6 Aspect Style Aspect 1 Aspect 2 Aspect 3 Aspect 4 Aspect 5 V Position 5 Comp Color Type HDTV SDTV DVD Video Display 1080i 540P Set Menu Language Plug Play Set Antenna Cable Set Channel Memory Edit Channel Memory View Channel List Set The Clock Magic Focus Pict...

Page 45: ...4 Aspect Style Aspect 1 Aspect 2 Aspect 3 Aspect 4 Aspect 5 V Position 5 Comp Color Type HDTV SDTV DVD Video Display 1080i 540P Menu To Menu Bar To Quit Exit Press Select To Set SETUP SEL Picture Formats Y PBPR 4 Aspect Style Aspect 1 Aspect 2 Aspect 3 Aspect 4 Aspect 5 V Position 5 Comp Color Type HDTV SDTV DVD Video Display 1080i 540P Menu To Menu Bar To Quit Exit Press Select To Set SETUP SEL P...

Page 46: ...play 1080i 540P Menu To Menu Bar To Quit Exit Comp Color Type The Comp Color Type function allows you to automatically change tint and color coordinate for DTV Programs HDTV High Definition Television Use for High Vision Signal Y PBPR from HDTV Set Top Box SDTV DVD Standard Definition Television or Digital Video Disc Y CBCR such as DVD Digital Video Disc Player Video Display The Video Display feat...

Page 47: ...to erase a CHANNEL NAMES NOTES 1 If ANT A and ANT B are in the same ANTENNA CABLE mode see page 37 the CHANNEL NAMES for both antenna inputs will be the same 2 CHANNEL NAMES will be displayed only when channel is displayed as main picture NAME THE CHANNEL Menu To Menu Bar To Quit Exit Menu To Menu Bar To Quit Exit Menu To Menu Bar To Quit Exit Menu To Menu Bar To Quit Exit MENU THUMB STICK THUMB S...

Page 48: ...et INPUT NAMES to original condition NOTE INPUT NAME will be displayed only when video INPUT is displayed as main picture NAME THE INPUTS Menu To Menu Bar To Quit Exit Menu To Menu Bar To Quit Exit Menu To Menu Bar To Quit Exit Menu To Menu Bar To Quit Exit THUMB STICK THUMB STICK THUMB STICK CUSTOMIZE SETUP VIDEO AUDIO THEATER SEL Name the Inputs Vid 1 Vid 2 Vid 3 Vid 4 Vid 5 Input Name List Cust...

Page 49: ...e screen Enter channel 00 to erase a favorite channel To reset categories and channels back to original factory preset press STATUS while you are renaming a category SET FAVORITE CHANNELS Menu To Menu Bar To Quit Exit Menu To Menu Bar To Quit Exit Menu To Menu Bar To Quit Exit THUMB STICK THUMB STICK Up Down To Change Letter SEL Set Favorite Ch Ch 3 MOVIES SPORTS NEWS 3 12 33 6 15 45 8 21 11 28 12...

Page 50: ...XIT to remove FAVORITE CHANNELS OSD from the screen NOTE 1 If a category has some blank channel entries these channels will appear as black sub pictures 2 Each category contains 2 groups of 3 channels Pressing the MENU button will display only 1 group per category depending on which group you select 3 When CLOSED CAPTION is set to AUTO and MUTE is ON FAVORITE CHANNEL can not be accessed FAVORITE C...

Page 51: ...ice MOVIE RATINGS LOCK TV RATINGS LOCK and CANADIAN RATINGS are explained in detail in the Parental Control Movie TV Ratings Reference Guide To change the secret code number select CHANGE SECRET CODE Enter a new four digit key number you prefer If you forget your secret code use the factory code 7777 to erase your key number This will reset the secret code number back to the factory preset 0000 Pr...

Page 52: ...er will only activate if the TV was turned on or tuned with the ON Timer and no channel selection was made after this time If you change the channel after the ON Timer has been activated the OFF Timer will deactivate 2 If no remote control button is pressed after ON Timer is activated the TV will automatically turn off after three hours CAUTION Do not use your TV as a deterrent when away from home...

Page 53: ... the TV has been turned on using the VIDEO INPUT SENSOR feature it must be reset before VIDEO INPUT SENSOR is used again To do this turn your VCR laserdisc or DVD player OFF This feature is now reset and will turn on your TV as described above 2 When using REMOTE mode any remote control button will substitute for your video input device play button However intended operation is for use with your V...

Page 54: ...o set SEL Name the Channel Name the Inputs Set Favorite Ch Set Parental Locks Set Program Timer Video Input Sensor Closed Caption Menu Background Closed Caption Display Off On Auto Mode C C Text Channel 1 2 CUSTOMIZE This function allows you to choose from two menu backgrounds Use THUMB STICK or to highlight MENU BACKGROUND setting and press down on THUMB STICK to select setting Press EXIT to quit...

Page 55: ...to adjust overall picture brightness When RESET is selected press down on THUMB STICK to return video adjustments to factory preset conditions CONTRAST COLOR BRIGHTNESS RESET Menu To Menu Bar To Quit Exit Menu To Menu Bar To Quit Exit 100 50 50 50 MENU THUMB STICK THUMB STICK 100 CUSTOMIZE SETUP VIDEO AUDIO THEATER SEL Contrast Contrast Brightness Color Tint Sharpness Reset Advanced Settings NOTE ...

Page 56: ...es It also maintains natural flesh tones while preserving fidelity of background colors This function will automatically set to on and cannot be turned off when the PERFECT PICTURE function is ON NOISE REDUCTION The NOISE REDUCTION function automatically reduces conspicuous noise in the picture without degrading picture quality This function will automatically be set to on and cannot be turned off...

Page 57: ... low frequency audio to all speakers Use THUMB STICK or to highlight the function to be adjusted Press THUMB STICK or to adjust the function Press EXIT to quit MENU NOTE If BASS is selected you are adjusting BASS The additional menu items TREBLE and BALANCE can be selected and adjusted in the same manner This function controls the high frequency audio to all speakers This function will control the...

Page 58: ...UMB STICK SELECT 63 50 CUSTOMIZE SETUP VIDEO AUDIO THEATER SEL SEL AUDIO Press select to set SEL AUDIO Press select to set Advanced Settings Stereo Mono Second Audio Program Internal Speakers Auto Noise Cancel Loudness Perfect Volume Advanced Settings Stereo Mono Second Audio Program Internal Speakers Auto Noise Cancel Loudness Perfect Volume Bass Treble Balance Reset Advanced Settings INTERNAL SP...

Page 59: ...uit menu or THUMB STICK to return to previous menu Use this function to choose from automatic picture settings to optimize your TV s performance THEATER MODES Menu To Menu Bar To Quit Exit Menu To Menu Bar To Quit Exit Menu To Menu Bar To Quit Exit MENU THUMB STICK THUMB STICK THUMB STICK CUSTOMIZE SETUP VIDEO AUDIO THEATER SEL THEATER SEL Press select to set THEATER SEL Press select to set Theate...

Page 60: ...ITACHI television is connected to an external audio system BBE will also create an incredible crisp sound experience from two speakers and even more complete and accurate reproduction of the original performance BBE brings to the listener s ear a more complete and accurate reproduction of the original performance Each voice speaking or singing each instrument or sound effect is presented with its ...

Page 61: ...r a chemically treated cloth Do not place rubber or vinyl products or cellophane tape on your television Do not touch the screen too often Do not subject the remote control to shocks such as dropping it on the floor etc Physical damage to the precision parts may result Avoid placing the remote control in a high humidity place or getting it wet Do not leave it on or near a heater Excessive heat or ...

Page 62: ...efects in the antenna system such as unshielded leads or connecting several sets to the same antenna without using multiple antenna couplers SNOW If your receiver is located in the fringe area of a television station where the signal is weak your picture may be marred by the appearance of small dots When the signal is extremely weak it may be necessary to install a special antenna to improve the p...

Page 63: ... H E C K T H E S E I T E M S A N D T R Y T H E S E A D J U S T M E N T S No Picture no sound Sound OK picture poor Picture OK sound poor Picture blurred Lines or streaks in picture Poor reception on some channels Picture rolls vertically No color Poor color B e s u r e e x t e r n a l c o n n e c t i o n i s c o r r e c t B e s u r e p o w e r c o r d i s p l u g g e d i n B e s u r e T V i s s w ...

Page 64: ...brands cable boxes satellite boxes and other audio equipment High Definition On Screen Display UltraTEC BIT MAP ON SCREEN PLUG and PLAY guide Full Set of Input Jacks including S VIDEO COMPONENT VIDEO Y PB PR Inputs Power Input AC 120V 60Hz Stand By Power 43FDX10B 43FDDX11B 2 7W 53UDX10B 61UDX10B 2 7W Power Consumption operating 43FDX11B 43FDX10B 225W 53UDX10B 61UDX10B 216W Power Consumption maximu...

Page 65: ... the Hitachi Authorized Service Facility nearest you Just present proof of purchase and or delivery receipts to the Hitachi Authorized Service Facility and service will be rendered in accordance with the terms of the limited warranty as stated on your warranty card or operating guide Should you have any questions regarding warranty service operation or technical assistance please contact In Canada...

Page 66: ...NOTES 66 ...

Page 67: ...NOTES 67 ...

Page 68: ...QR48504 ...

Reviews: