background image

English   

- 33 -

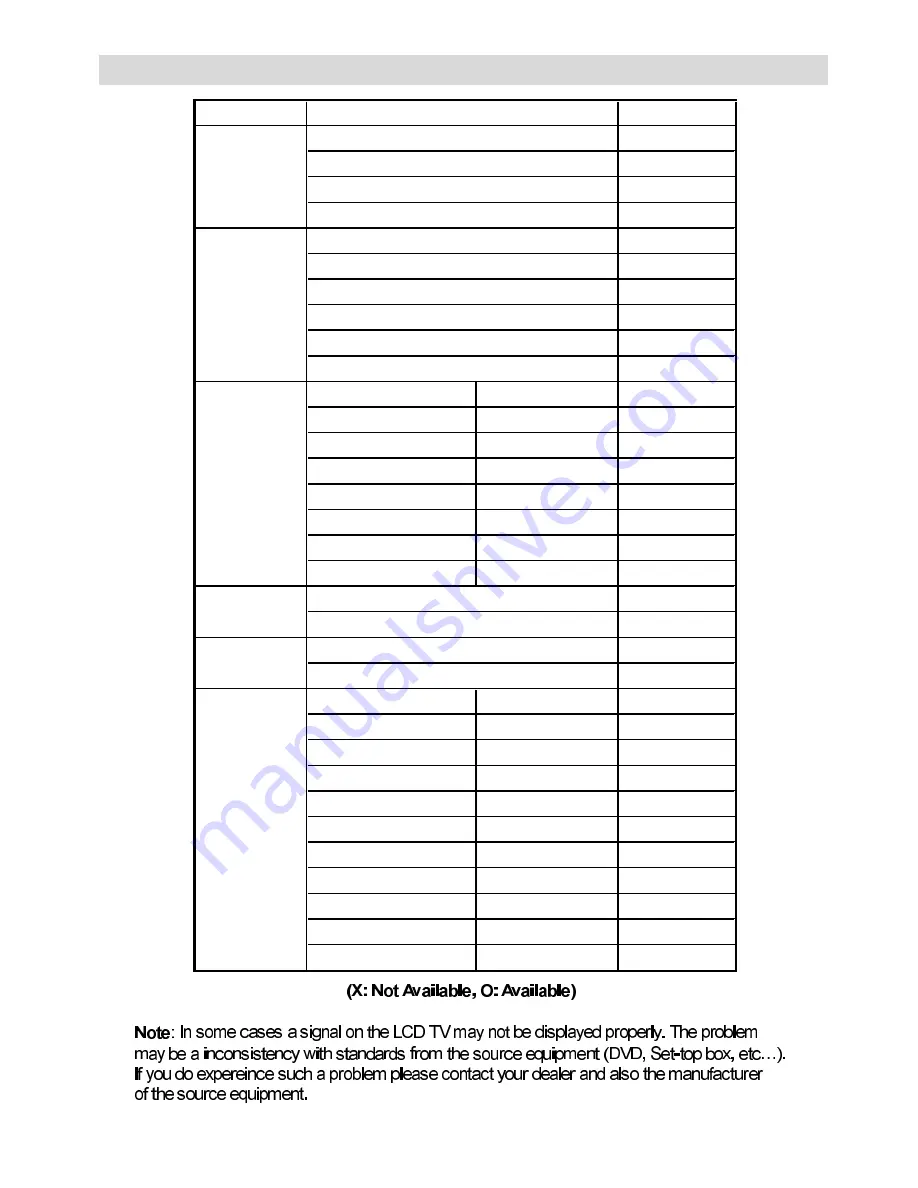
Appendix D: AV and HDMI Signal Compatibility

6RXUFH

$YDLODEOH

2
2
2
2
2
2
2
2
2
2

,

+]

2

3

+]

2

,

+]

2

3

+]

2

3

+]

2

3

+]

2

,

+]

2

,

+]

2
2
2
2
2

,

+]

2

3

+]

2

,

+]

2

3

+]

2

3

+]

2

3

+]

2

,

+]

2

,

+]

2

3

+]

;

3

+]

;

3

+=

;

5*%
5*%

(;7

6&$57

+'0,

)$9

3$/

176&

69LGHR

3$/

176&

<3E3U

3$/

176&

69+6
69+6

6XSSRUWHG6LJQDOV

(;7

6&$57

3$/

176&

5*%
5*%

Summary of Contents for 37LD8D20UA

Page 1: ...37LD8D20U A GB Instructions for use Digital LCD olo r Television C u ...

Page 2: ...ation 10 Before Switching On Your TV 10 Power Connection 10 Connections to the Aerial Input Socket 10 Inserting Batteries in the Remote Control Handset 10 Handling the Remote Control 10 Operating Range for the Remote Control 10 Switching The TV ON OFF 11 Navigating the Menu System 11 Initial Settings 11 Basic Operations 12 Volume Setting 12 Programme Selection 12 Entering Main Menu 12 AV Mode 12 V...

Page 3: ... a decoder with an aerial socket to the TV 30 Connect a decoder without an aerial socket to the TV 30 TV And Video Recorder 30 Playback NTSC 30 Copy Facility 31 Camera And Camcorder 31 To Connect to AV Input 31 To Connect To S VHS Input 31 Connect the Decoder to the Video Recorder31 Connecting Headphones optional 31 Connecting Subwoofer 31 Audio Lineout 31 Tips 31 Care Of The Screen 31 Poor Pictur...

Page 4: ...ch the power cord when your hands are wet as this could cause a short Safety Precautions Please read the following recommended safety pre cautions carefully for your safety IMPORTANT SAFETY INFORMATION ON OPERATING YOUR TV Do s and Don ts DO s This Television has been designed and manu factured to meet international safety standards but like any electrical equipment care must be taken if you are t...

Page 5: ... let 8 Replacement Part When replacement parts are required be sure the ser vice technician has used replacement parts which are specified by the manufacturer or have the same speci fications as the original one Unauthorised substitutions may result in fire electrical shock or other hazards 9 Servicing Please refer all servicing to qualified personnel Do not remove the cover yourself as this may r...

Page 6: ...Lock Automatic sound mute when no transmission NTSC Playback AV in and S VHS in are available It has VGA connector for external devices such as computer It has an HDMI connector for Digital Video andAudio This connection is also designed to accept High Definition signals AVL Automatic Volume Limiting When no valid signal is detected after 5 minutes the TV switches itself automatically to stand by ...

Page 7: ...are used at the same time Likewise because SVHS C and SCART II R are connected parallelly the picture may blend if the two peripherals are used at the same time Thus these two are not to be used at the same time P CH VOLUME STAND BY PC VGA Input PC RGB PCAudio Input RF Antenna TV DTV Component Video Inputs YPbPr Component Audio Inputs SCART 1 EXT 1 SCART 2 EXT 2 HDMI Input HDMI1 For Service Use On...

Page 8: ...e Up P Programme Up TV Digital TV Mode External Source TV EXT1 EXT2 EXT2 S FAV S VIDEO HDMI YPBPR PC DTV PP Personal preference Cursor Up Cursor Right OK SELECT OK Store Cursor Down M Menu Cursor Left I II Mono Stereo Dual I II INFO Info P Programme Down Mute V Volume Down P P Previous Programme WIDE Image size Expand PIP Mode Mix Teletext Time subtitle on off in the digital mode RED SOUND Sound M...

Page 9: ...he indi cated part Insert two AAA R03 or equivalent type batteries inside Place the batteries in the right directions and replace the battery cover Note Remove the battery from remote control hand set when it is not to be used for a long period Otherwise it can be damaged due to any leak age of battery Handling the Remote Control It could cause corrosion or battery leakage and may result in physic...

Page 10: ... the TV on Your TV will switch on in two steps 1 Connect the power supply cord to the system Press Power On Off button Then the TV switches itself to stand by mode Optional 2 To switch on the TV from stand by mode either Press a digit button on the remote control so that a programme number is selected or Press the P CH or P CH button on the TV or press the P or P button on the remote control so th...

Page 11: ...e MENU button to enter Main menu In the Main menu select sub menu using P CH or P CH buttons and enter the sub menu using or buttons To learn the usage of the menus refer to the Menu System sections pages 15 or 21 AV Mode Press the TV AV button at the control panel on the the TV to switch your TV to AV modes Operation with Remote Control The remote control of your TV is designed to control all the...

Page 12: ...ls Electronic Programme Guide EPG Some but not all channels send information about the current and next events Please note that event information is updated automatically If there is no event information data available in channels only channel names with No Information Available banner is displayed Pressing the GUIDE button again exits EPG menu In EPG Menu you can easily see the extended help info...

Page 13: ... teletext Digital teletext is sometimes broadcast at the same time as normal broadcasting 1 Press the button The digital teletext information appears 2 Operate it with the coloured buttons _ a b buttons and OK button The operation method may differ depending on the contents of the digital teletext Follow the instructions displayed on digital teletext screen When Press SELECT button or similar mess...

Page 14: ... SELECT item on Channel List menu is highlighted by using _ button Then the name and number of the selected channel will be displayed in the top left and top right of the channel display at the top right of the screen re spectively Deleting the channels in the channel list Press a b button to select the channel that will be deleted Press _ button to select the Delete item on Channel List menu As s...

Page 15: ... Enter the password using the digit buttons on the remote control The Lock icon will now be dis played next to the selected channel Repeat the same operation to cancel the Lock Setting Favourites You can set various channels as favourites so that only the favourite channels are navigated To set a favourite you should highlight the Favourites item at bottom of the Channel List menu Use the _ button...

Page 16: ...ot re stored to avoid redundant duplicates of that channel FIRST TIME INSTALLATION The user can use this item to load default settings which had been loaded to the receiver at the factory To install factory settings highlight First Time In stallation menu and press the OK button then you will be asked to confirm for deleting all channels and settings QVWDOODWLRQ GG 1HZ KDQQHOV LUVW 7LPH QVWDOODWLR...

Page 17: ...the _ button to cycle through Off and language options Favourite mode This function enables or disables the favourite chan nel list mode See Channel List menu Favourites on page 16 Use _ button to turn on off favourite mode If the Favourite Mode is on in normal operating mode pressing P and P buttons will only navigate through the channels that were previously defined as favourites in Channel List...

Page 18: ...Main Menu or the Installation Menu to restrict access If the menu lock is disabled there will be free access to the menu system Also in this menu you can change the lock key and set change parental lock mode Disabled All menus are unlocked Main Menu Main menu is accessible only with the correct lock key So the user cannot add delete re name move channels cannot set timers Installation Installation...

Page 19: ...ghlight the Language line and press the SELECT button 0DLQ 0HQX KDQQHO LVW QVWDOODWLRQ RQILJXUDWLRQ 7LPHUV DQJXDJH 79 6HWXS RPPRQ QWHUIDFH Use the a b button to highlight the soundtrack language required and press the SELECT button Normal viewing with the required language soundtrack can be resumed by pressing the M button DQJXDJHV TV Setup To be able to go through TV functions you can use this it...

Page 20: ...een Refer to the module instruction manual for details of the settings Analogue TV Menu System Picture Menu 3 785 In picture menu if PC YPbPr or HDMI modes are selected resolution information is displayed at the bottom of the menu osd Mode By pressing a b button select Mode Press _ button to choose from one of these options Cinema Dynamic and Natural Contrast Brightness Sharpness Colour Hue By pre...

Page 21: ...ecrease hp volume level Headphone volume level can be adjusted between 0 and 63 sound mode By pressing a b button select Sound Mode Press _ button to change sound mode Sound mode is used to identify sound mode of the headphone and can be set to mono stereo dual I or dual II according to the transmission balance By pressing a b button select Balance Press button to increase balance to the right Pre...

Page 22: ...using a b button Use button to set PIP source Note When main picture source is TV EXT 1 EXT 2 FAV or S VIDEO PIP Window can only be set to HDMI YPBPR PC source or vice versa PIP Programme Select PIP Programme item by using a b button PIP Programme is displayed at the bottom of menu OSD Use button to set PIP Programme You can also use digit buttons on the remote control to set PIPProgramme If the s...

Page 23: ...sh Finnish Turkish Croatian Slovenian Polish Czech Hungarian Russian Bul garian Greek Slovak EXT2 Out By pressing a b select EXT2 Output Use _ button to set Ext 2 Out to TV DTV EXT1 FAV YPbPr Audio or PC Audio Note When TV Source is set to HDMI HDMI Audio setting will be available among EXT 2 Out options Note If the currently watched source is analogue TV a connected device displays analogue TV so...

Page 24: ... navi gation buttons move the selected programme to the decided programme space and press the GREEN but ton again Delete To delete a programme press the YELLOW button Pressing the YELLOW button again erases the se lected programme from the programme list and the programmes below shift one up APS Auto Programming System When you press the BLUE button for APS Auto Pro gramming System Menu will appea...

Page 25: ... digit buttons when search item is highlighted Store By pressing a b button select Store Press or OK button to store the adjustments Stored will be displayed on the screen Install menu in AV modes The following screen appears in the install menu Colour System By pressing a b select Colour System By press ing _ button you can change the colour system to PAL SECAM PAL 60 NTSC 4 43 NTSC 3 58 or AUTO ...

Page 26: ...rect place automatically Select Autoposition item by using a b buttons Press or OK button Warning Auto position adjustment recommended to be done with the full screen image for the proper adjustment H Horizontal Position This item shifts the image horizontally to right hand side or left hand side of the screen Select H Position item by using a b button Use _ button to adjust the value V Vertical P...

Page 27: ... to AV modes except being in teletext Pressing this button consecutively will switch the TV in one of the optional AV modes TV DTV EXT1 EXT2 EXT2 S FAV S VIDEO HDMI YPBPR or PC Personal Preference By pressing PP button you maychange Picture Mode settings ZoomModes Zoom mode can be changed by pressing the WIDE button You can change the screen size according to the picture aspect ratio Select the op...

Page 28: ...quickly and easily Press the corresponding coloured button to access the page Special Teletext Functions To Display a page of text The view text services press To return normal viewing press again Programmes cannot be changed until text is cancelled To select a page press the number buttons or pro gram buttons P P To select index page press button To select superimposed over the programme on the s...

Page 29: ...te Receiver or DVD Player These devices must be connected via the HDMI socket or Compo nent Socket These socket can accept either 720p or 1080i signals Note When it is desired to watch HDMI source with a DVI to HDMI cable in order to enable au dio Audio Input which is located at the left side of the antenna input is to be used to get DVI device s audio signals Via The Scart The TV has 2 Scart sock...

Page 30: ...he TV Additionally turn Line out setting on in the Sound Menu Note While watching PC or YPbPr sources Lineout selection could only be the current source Tips Care Of The Screen Clean the screen with a slightly damp soft cloth Do not use abrasive solvents as they may damage the TV screen coating layer Poor Picture Have you selected the correct TV system Is your TV set or house aerial located too cl...

Page 31: ... Equipment Appendix B Aerial Connection Appendix A PC Input Typical Display Modes The display has a maximum resolution of 1360 x 768 frequency range of 56 75 Hz The following table is an illustration of some of the typical video display modes ...

Page 32: ...AV and HDMI Signal Compatibility 6RXUFH YDLODEOH 2 2 2 2 2 2 2 2 2 2 2 3 2 2 3 2 3 2 3 2 2 2 2 2 2 2 2 3 2 2 3 2 3 2 3 2 2 2 3 3 3 5 5 7 6 57 0 9 3 176 6 9LGHR 3 176 3E3U 3 176 6 9 6 6 9 6 6XSSRUWHG 6LJQDOV 7 6 57 3 176 5 5 ...

Page 33: ...English 34 Specifications ...

Page 34: ...nitor will automatically select the signals in the following priority order Even in the case of the recommended signals shown on the following page there may be instances when correct display is not pos sible In this case use H V separate sync H V composite sync S input connector pin specifications HDMI connector pin specifications SCART connector pin specifications Specifications ...

Page 35: ...ined or modified by any person other than an Hitachi authorised engineer iii The product serial number has not been removed or altered This guarantee does not apply to product acquired second hand or for commercial or communal use This guarantee does not cover the replacement of exhausted batteries the adjustment of user controls or aerial alignment Any parts replaced under this guarantee shall be...

Page 36: ...r TV or connect the aerial through a VCR Aerial RF Socket Aerial RF Socket wall socket wall socket Aerial RF Lead Aerial RF Lead Optional Scart Lead TV to VCR Aerial RF Socket VCR RF connector lead VCR to TV It is recommended that a scart lead should be fitted between your TV and VCR to enhance your picture and sound quality Scart leads are essential if you have a stereo TV and VCR and wish to obt...

Page 37: ...IN ANT IN RF Lead to Aerial RF Lead to Aerial RF Lead from VCR to Satellite RF Lead from VCR to TV Satellite LNB lead Satellite LNB lead RF Lead from Satellite to TV Aerial Aerial VCR Scart Lead to on TV EXT 1 Scart Lead to EXT 1 on TV AV 1 TV TV VCR VCR AV 2 TFT LCD TV TFT LCD TV GB ...

Page 38: ...t is first switched on the set will be in standby Press the channel up down P and the indicator on the front of the set will illuminate red P or numeric buttons 1 2 3 to operate insert plug European plug and switch on insert plug UK plug Programme Up Volume Up Volume Down Programme Down To select a programme number To enter the main menu Also used for navigation in menus Power Cord Input Power on ...

Page 39: ...ble will appear on the screen In the programme list you will see the programme numbers and names assigned to the programmes 4 Please ensure aerial is plugged in Do you want to start first time installation Yes No MENU BBC ONE BBC TWO BBC CHOICE Searching UHF channels 30 Please wait This will take a few minutes Cancel searching AUTOMATIC SEARCH Channels 12 To start installation process select to ca...

Page 40: ... FFQ UIJT JNQPSUBOU JOGPSNBUJPO BCPVU IPX UP SF UVOF ZPVS 57 EVSJOH UIF EJHJUBM 57 TXJUDIPWFS FFQ UIJT MFBGMFU BOE ZPVS JOTUSVDUJPO NBOVBM TBGF ZPVµMM OFFE UIFN ...

Page 41: ...NFOU PVS OFX 57 IBT B EJHJUBM UVOFS CVJMU JO XIJDI NFBOT JU JT SFBEZ UP SFDFJWF UIF Freeview signal CZ TJNQMZ QMVHHJOH JU JOUP ZPVS BFSJBM TPDLFU DIFDL JG ZPV DBO HFU EJHJUBM 57 UISPVHI ZPVS BFSJBM OPX PS XIFUIFS ZPVµMM IBWF UP XBJU VOUJM TXJUDIPWFS BU XXX EJHJUBMVL DP VL 8IFO UIF 57 TXJUDIPWFS IBQQFOT JO ZPVS BSFB UIFSF BSF BU MFBTU UXP PDDBTJPOT XIFO ZPV XJMM OFFE UP SF UVOF ZPVS 57 JO PSEFS UP ...

Page 42: ...JHJUBMVL DP VL 1 With your TV in digital TV mode press Menu on your remote control 2 From the menu options on screen select Installation Select First Time Installation to re tune your digital TV not Add New Channels 3 If you do not re tune your channels when advised to do so by Digital UK you may lose some or all of your channels until you do re tune You should re tune your Freeview every few mont...

Page 43: ...GPS DBMMT GSPN OPO 5 MJOFT 7JTJU VT BU EJHJUBMVL DP VL DBMM VT PO 5IF FYBDU EBUF ZPV TXJUDI EFQFOET PO UIF USBOTNJUUFS ZPV BSF TFSWFE CZ 5P DIFDL XIFO ZPV TXJUDI HP UP JHJUBM 6 µT QPTUDPEF DIFDLFS PO XXX EJHJUBMVL DP VL IFDL ZPVS 57 OFXT TFSWJDF PS MPPL BU 5FMFUFYU QBHF UP TFF XIBU 57 SFHJPO ZPVµSF JO PQFMBOE TXJUDIFT PO 0DUPCFS ...

Page 44: ...om customerservice italy hitachi eu com france consommateur hitachi eu com Digital Media Group Cité Internationale HITACHI EUROPE LTD CZECH REPUBLIC Kodanska 46 101 00 Praha 10 Tel 234 064 514 Fax 234 064 513 Email info hitachi be dmg eeu hitachi eu com HITACHI EUROPE S A GREECE HITACHI EUROPE S A HITACHI EUROPE AB SWEDEN NORWAY 364 Kifissias Ave 1 Delfon Str 152 33 Chalandri Athens Email Gran Via...

Reviews: