background image

- 2 -

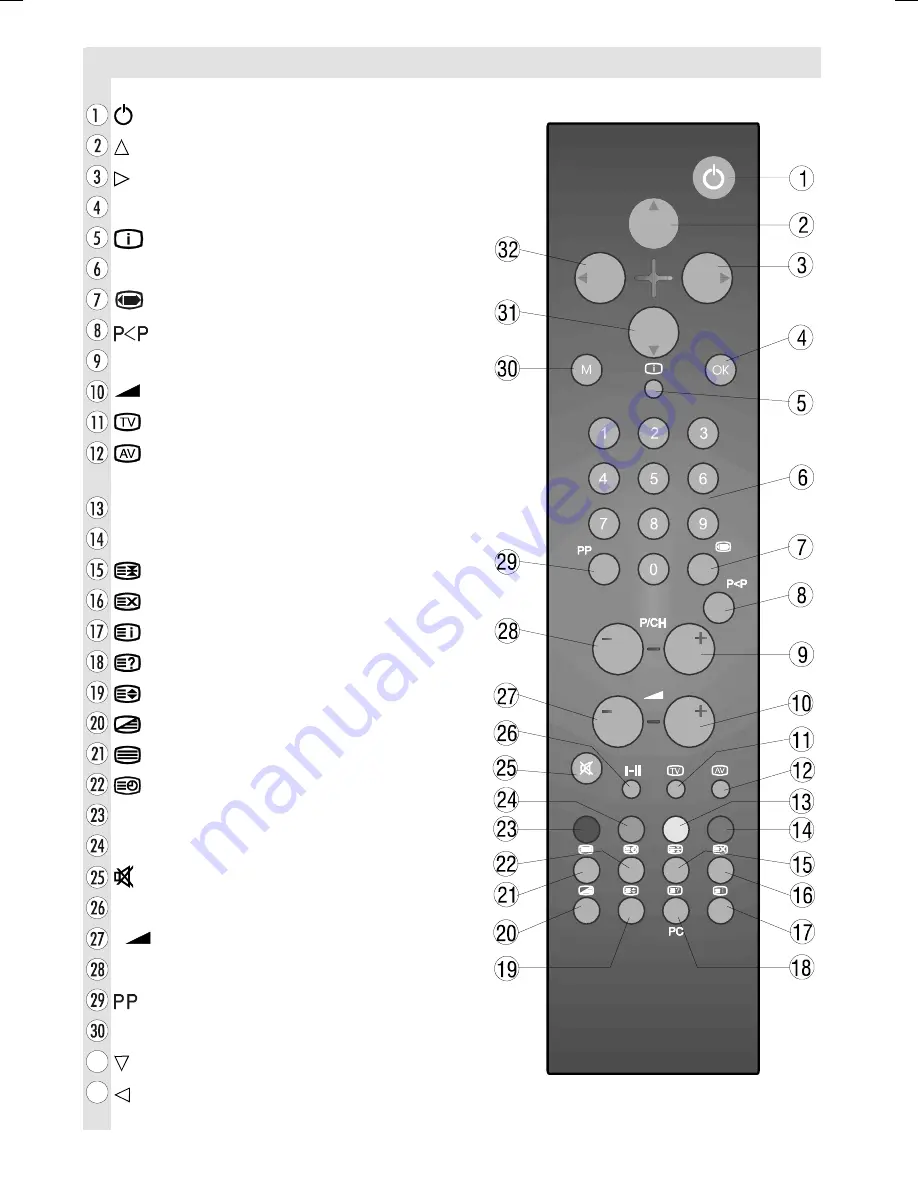
Remote Control Buttons

   = Stand By
   = Cursor Up
   = Cursor Right
 

OK

 = Okay (Store)


 = Info


0 - 9 

=


Direct Programme


 = Image size


 =Previous Programme


P/CH +

 = Programme Up


 +

 =  Volume 

Up


 = TV / Quit Menu


 = External Source

(AV-1, RGB1, AV-2, SVHS)

 Yellow button


Blue button


 = Hold


 = Update


 = Index Page


 = Reveal / 

PC

 = No Function


 = Expand


 = Mix


 = Teletext


 = Time / Subcode page

 Red button
 Green button
   = Mute
 

I-II 

=


Mono/Stereo - Dual I-II


 =  Volume 

Down


- P/CH

 = Programme Down


=


Color temperature settings


M

 = Menu

   = Cursor Down

   = Cursor Left

50091569-1-1511-ENGLISH-1551 UK-15inchPixelWorks-17MB18-(LAU)-WO PC.p65

31.07.2006, 17:33

2

Summary of Contents for 15LD3200

Page 1: ...15LD3200 GB Instructions for use 20LD3200 ...

Page 2: ...tions 20 Tips 21 Care Of The Screen 21 Poor Picture 21 No Picture 21 Sound 21 Remote Control 21 Specifications 22 Important Instruction 23 Remote Control Buttons 2 Control Panel Buttons 3 Preparation 4 Features 4 Panel Features 4 Safety Precautions 4 Before Switching On Your TV 7 Power Connection 7 Connections to the Aerial socket 7 How To Connect Other Devices 7 Inserting Batteries In The Remote ...

Page 3: ... CH Programme Up Volume Up TV Quit Menu External Source AV 1 RGB1 AV 2 SVHS Yellow button Blue button Hold Update Index Page Reveal PC No Function Expand Mix Teletext Time Subcode page Red button Green button Mute I II Mono Stereo Dual I II Volume Down P CH Programme Down Color temperature settings M Menu Cursor Down Cursor Left ...

Page 4: ... 3 Control Panel Buttons 79 9 63 5 63 5 1 5 5 5 9 5 0 18 352 5 00 83 2 1 0 18 1 9 7 21 92 80 83 2 1 0 18 1 9 7 21 32 5 21 2 3 21 227 723 29 5 ...

Page 5: ...o interference filter the re moval of which could lead to impaired perfor mance If you wish to extend the lead obtain an appropriate safety approved extension lead or consult your dealer Observe the manufacturers instructions when connecting extension leads to the TV Check the fuse rating on the new plug this Preparation Install Display on solid horizontal surface such as a table or desk For venti...

Page 6: ...his could re sult in a fatal electric shock NEVER guess or take chances with elec trical equipment of any kind it is better to be safe than sorry 1 Power Always use the provided AC adaptor Operate only from the power source specified on the AC adaptor In using the AC adaptor gets heat on the sur face of the case It is normal not defective Do not cover the case of AC adaptor with any material while...

Page 7: ...e kept away from children Battery including those which is heavy metal free should not be disposed of with house hold waste Please dispose of used battery in an environmentally sound manner Find out about the legal regulations which apply in your area The mains plug of the power supply is used as disconnect device and therefore shall remain readily operable Warning To prevent injury this device mu...

Page 8: ...connection of other devices via SCART refer to the manuals of the related devices Inserting Batteries In The Remote Control Handset Remove the battery cover located on the back of the handset by gently pulling up wards from the indicated part Insert two AAA R03 or equivalent type of batteries inside Replace the battery cover NOTE Remove the batteries from remote control handset when it is not to b...

Page 9: ...s This will effect the sort process in A P S To start aps select A P S by using buttons and press the button The following warning is displayed 1 7 3 6 51 1 3OHDVH KHFN WKH QWHQQD DEOH 0 WR FDQFHO 2 WR VWDUW If you want to cancel A P S function press the M button If OK button is pressed A P S starts and the following warning is displayed 3 6 LV UXQQLQJ 3OHDVH DLW 0 WR H LW After A P S is finalized...

Page 10: ...st digit within 2 seconds Menu System Your TV has been designed with a menu system to provide easy operation of all of the functions Press the M MENU button to enter the menu The M button has two functions opening or closing the menu and closing the submenu and then opening its parent menu Press button to select a menu title and then button to select a menu item and button to enter the menu item T...

Page 11: ...UHV DXGLR 9 RQ RII volume By pressing button select volume Press button to increase volume level Press button to decrease volume level Volume level can be adjusted between 0 and 50 balance By pressing button select balance Press button to increase balance to the right Press button to increase balance to the left Balance level can be adjusted be tween 0 and 100 AVL Automatic Volume Level or AVL nor...

Page 12: ...n select volume Press button to increase volume level Press button to decrease volume level Volume level can be adjusted between 0 and 50 balance By pressing button select balance Press button to increase balance to the right Press button to increase balance to the left Balance level can be adjusted be tween 0 and 100 window menu By pressing button select the third icon Window menu appears on the ...

Page 13: ...or changing programs or adjustments etc without remote control By pressing button select child lock The child lock feature can be set to ei ther on or off by pressing or button When off is selected there will be no differ ence in the operation of your TV When on is selected the TV can only be controlled by the remote control handset In this case the side panel buttons on the TV except the On Off s...

Page 14: ... digit buttons on remote control to enter the frequency you want After the fre quency is adjusted press button to exit fine tuning By pressing button select fine tun ing Press button to change the fre quency value program skip Use this feature after you run A P S to skip unwanted programs By pressing button select program skip Press button to select on or off When on is selected current program ca...

Page 15: ...ed Program table is displayed with the programmes found and located teletext language By pressing button in the Settings menu select teletext language There are three options to select Europe Cyrillic and Greek 7 7 1 8 7 7 5 21 1 8 32 6 ULOOLF DVW 50 1 6 29 1 1 520 1 1 50 1 5866 1 79 1 1 6 50 1 7 1 5 1 6 29 1 1 5 785 6 32 6 50 1 6721 1 6 5 1 527 1 XURSH 5 3 6 29 520 1 1 50 1 1 6 6 6 7 1 63 1 785 6...

Page 16: ...ng the button thus the volume is set to the preceding value and the second one is increasing the volume level thus it starts from minimum level to in crease AV Modes By pressing the button you can switch your TV to AV modes except being in Tele text Pressing this button consecutively will switch the TV in one of the optional AV modes AV1 RGB1 AV2 and SVHS RGB1 mode is supported from AV1 In order t...

Page 17: ... be displayed in double height text Press the button once more for the full page of normal height text To Reveal Concealed Information Pressing the button once will reveal an swers on a quiz or games page Pressing the button again will conceal the revealed answers To Stop Automatic Page Change The teletext page you have selected may contain more information than what is on the screen the rest of t...

Page 18: ...an be connected to your TV The following connection diagrams show you where the different optional equipment should be connected at the rear side of the TV Via The SCART Your TV has one Scart socket If you want to connect peripherals e g video decoder etc which have Scarts to the TV use Scart input If an external device is connected via the Scart socket the TV will be switched to AV mode automatic...

Page 19: ... test sig nal under programme number 0 Replace the aerial cable in the aerial socket Aerial of your video recorder once you have stored the test signal Camera And Camcorder To Connect To AV 2 Input Connect your camera or camcorder to AV 2 input at the rear side of the TV Connect your equipment to the TV via VIDEO yellow AUDIO R red and AUDIO L white inputs You must connect the jacks to the in put ...

Page 20: ... 19 Peripheral Equipment Connections 9 6 9 2 1387 9 2 1387 8 2 1387 5 8 2 1387 9 1 287 1 287 5 6 57 62 7 9 9 9 9 9 5 ...

Page 21: ...ct Peripheral Equipment 17 1 1 36 6 8 2 1 5 9 2 1 1 287 1 287 HULDO DECODER FOR SATELLITE RECEIVER VIDEO HEADPHONE AUDIO Aerial Connections 9 8 9 HULDO 5RXQG RKP FRD LDO FDEOH 5HDU RI 79 2XWGRRU HULDO RQQHFWLRQV ...

Page 22: ...y to the aerial socket Is the aerial cable damaged Are suitable plugs used to connect the aerial If you are in doubt consult your dealer No Picture means that your TV is not receiv ing any transmission Have you pressed the correct buttons on the remote control Try once more Sound You can not hear any sound Did you per haps interrupt the sound pressing the button Are external speakers connected to ...

Page 23: ... stand D 178 mm with stand 59 mm without stand Weight 4 4 Kg Specifications TV BROADCASTING PAL SECAM B G D K K I I L L RECEIVING CHANNELS VHF BAND I III UHF BAND U HYPERBAND CABLE TV S1 S20 S21 S41 NUMBER OF PRESET CHANNELS 100 CHANNEL INDICATOR On Screen Display RF AERIAL INPUT 75 Ohm unbalanced OPERATING VOLTAGE 240 V AC 50 Hz AUDIO German Nicam Stereo ...

Page 24: ...hich is marked with the letter E or by the earth symbol or coloured green or green and yellow The wire which is coloured blue or black must be connected to the terminal which is marked with the letter N or coloured Black The wire which is coloured brown or red must be connected to the terminal which is marked with the letter L or coloured Red For continued protection against risk of fire replace o...

Page 25: ...d should be fitted between your TV and VCR to enhance picture and sound quality Scart leads are essential if you have a stereo TV and VCR and wish to obtain stereo sound from your equipment These leads can be purchased from your Hitachi dealer or any good High Street electrical retailer the ANT IN VCR AV 1 AV 2 Aerial RF Socket wall socket Aerial RF Lead Optional Scart Lead TV to VCR RF connector ...

Page 26: ... ANT IN ANT IN ANT IN RF Lead to Aerial RF Lead to Aerial RF Lead from VCR to Satellite RF Lead from VCR to TV Satellite LNB lead Satellite LNB lead RF Lead from Satellite to TV Aerial Aerial VCR Scart Lead to AV 1 on TV Scart Lead to AV 1 on TV AV 1 TV TV VCR VCR AV 2 EU ...

Page 27: ... move the menu selection box up Press this button to enter the main menu of the TV and again to exit the menu and return to normalTV operation M connect the TV plug to the mains socket TV AV MENU P CH TV AV LED SPEAKER SPEAKER INFRARED RECEIVER MENU PROGRAMME UP DOWN MENU NAVIGATION VOLUME UP DOWN MENU NAVIGATION POWER ON OFF HEADPHONE EU and switch on insert plug switch your TV on ready to start ...

Page 28: ...e measures ensure that all your external equipment is tuned in during the Auto Setup procedure First select the country by using the or buttons on the remote control Use the or to select Language Select the required language by using the or buttons on the remote control 1 2 3 Press M on the Remote Control to remove the menu and start viewing TV 4 down for A P S A P S country A P S Austria language...

Page 29: ... KISTA 20147 MILAN SWEDEN ITALY Tel 08 562 711 00 Tel 02 487861 Fax 08 562 711 11 Fax 02 48786381 Servizio Clienti Email csgswe hitachi eu com Tel 02 38073415 Email customerservice italy hitachi eu com HITACHI EUROPE AB HITACHI EUROPE S A S Norway Branch Nuf Lyon Office Strandveien 18 Digital Media Group 1366 Lysaker 94 Quai Charles de Gaulles 69006 Lyon NORWAY FRANCE Tel 67519030 Tel 04 72 14 29 ...

Reviews: