Hisense LTDN42K390HK3D User Manual Download Page 12

7


Getting Started

       USER MANUAL

In ATV mode, press the 

OK 

to display the All 

channel list.
In DTV mode, press the 

OK 

to display the All, 

Recent, Radio list.
Press the 

▲/▼ button

 to select the channel, press 

the 

OK 

to enter the channel to watch the program.

When the focus is on the channel, press 

◄ button 

to open the EPG interface.
· When the focus is on the day, press 

▲/▼ button 

to select the day of the week.

· When the focus is on the program, press 

▲/▼ 

button 

to select program and press 

OK 

to book 

it, re-press 

OK 

to undo it.

NOTES

The E-program guide information is provided by the 

broadcasting company. Because the broadcasting 

information is provided on the specified channel, 

the program entries are possibly displayed as null 

or the date fails to be displayed. The display will 

automatically renew when new information are 

available for use.

The only way to booking the program successfully is 

the start time of the program you have booked must 

be later than the Current time. The same time period 

can only respond to one program. When booking 

conflicts, it responds the highest priority program, 

according to the priority you have chosen.
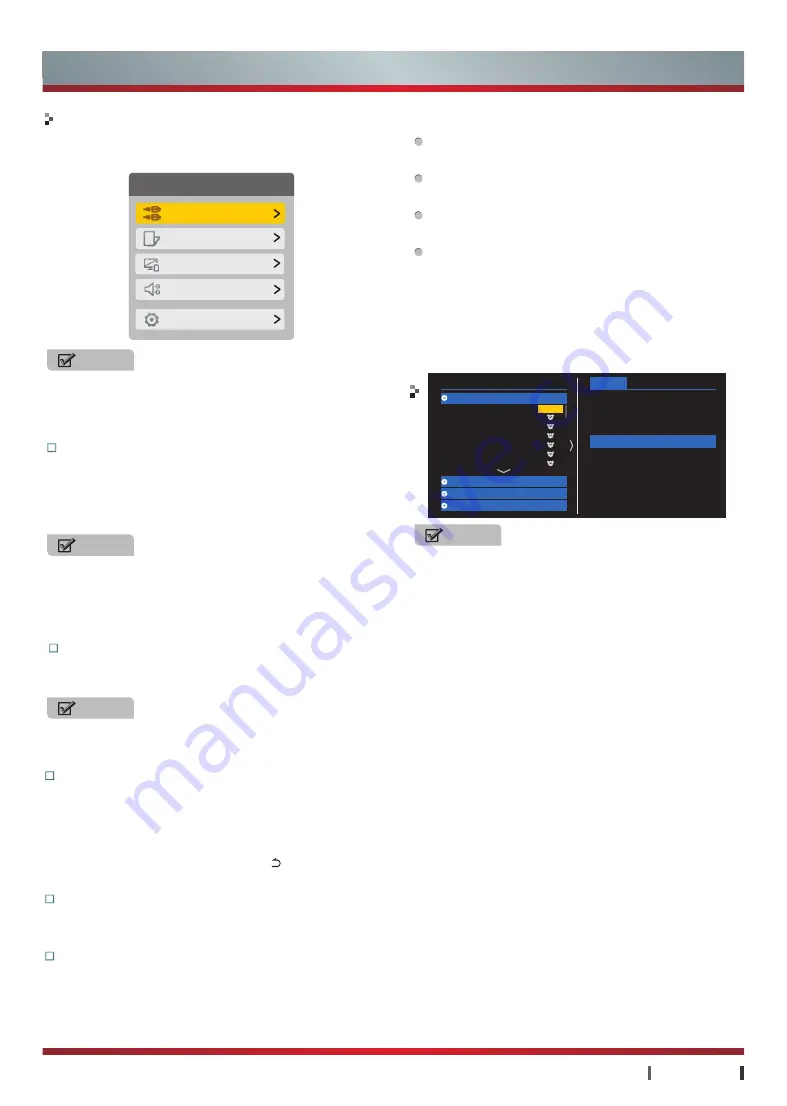
  All 

Recent 

Radio

  82.J2                                  DTV

  83.iNews                            DTV

  85.High Definition Jade      

DTV


85.High Definition Jade


  Thursday 

(2012-04-19) 

  07:16 Money Smart 
  08:40 News Headlines 
  08:45 Justice Bao 2010... 
  09:15 The Green Room 
  09:45 The forbodden 
  09:50 J.S.G Song Vid 
  09:55 Jade Solid Gold 

  Friday 

(2012-04-20) 

  Saturday 

(2012-04-21) 

  Sunday 

(2012-04-19) 

Playing

Getting Started

Channel list

Setting button

Press the button to switch on/off the settings menu, 
including: Source, 3D/2D, Screen Off, Nicam, More.

NOTE

In the different application modes, the menu of 

setting button will vary, according to the specific 

functions supported by different application scenes, 

press the button for decision.

Source

Select the current input signal in the manner of 
menu, the menu is to provide all signal input modes 
for the TV set, including: DTV, ATV, AV1, AV2, 
COMPONENT, HDMI1, HDMI2, HDMI3, VGA.

NOTE

If you want to appreciate the program from the 

external equipment, you should choose the 

connection mode corresponding to the device, and 

use the remote control to select the correct signal 

source. (See "Connections")

3D / 2D

In DTV/ATV mode, you can switch the video 
between 3D and 2D display.

NOTE

3D mode options vary depending on the source of 

the video varies.

Settings

Source 

ATV

3D/2D 

Screen Off

Nicam 

Mono

More

Screen Off

If you selected "Screen Off", the TV screen will be 
closed. In this state, the TV is still running, you can 
reduce power consumption when listening to the 
music. You can press the 

Home button

, 

Direction 

buttons

, 

OK button

 and 

Return   button

 etc. to 

recovery the screen.

Nicam

In DTV/ATV mode, if the program has Nicam 
function, you can switch the tracks.

More

You can use this menu to set the TV, including: 
General, Picture, Sound, 3D, Channel, Network, 
System, About.

Summary of Contents for LTDN42K390HK3D

Page 1: ...LTDN42K390HK3D LTDN55K390HK3D English USER MANUAL Before using the TV Please read this manual thoroughly retain it for future reference...

Page 2: ...Our company does not assume any liability for any accident arising from violation of the matters of attention and instruction on use in this manual The TV set is a Type II equipment and used without...

Page 3: ...en Display Power Saving Mode Multimedia Port is trademarks registered by SRS Labs Inc SRS Labs Inc have approved the product to apply TruSurround HD technology Characteristics Special Statement This s...

Page 4: ...rt all the formats listed above as the programming tools are different Dimension W H D mm Without stand With stand Weight kg Without stand With stand Active screen diagonal size cm Screen resolution P...

Page 5: ...he image effect so you must pay attention to the following items Alerts Before using the product please read the following clauses carefully Product Watching TV Others Power and signal Maintenance LCD...

Page 6: ...PC 11 Connecting a TV Monitor or VCR 11 Connecting an Ex Speaker 12 Connecting a Headphone 12 Connecting a USB Device 12 Connecting a TF card 13 Selecting the Input Source 13 Basic Features 14 Using...

Page 7: ...tand with the provided screws in the accessory bag in case of causing damage to TV Appearance prevail in kind Insert the stands into the bottom slots of the TV Attention The stands need to be installe...

Page 8: ...pace around the set Install with stand Install on the wall Leave enough space around the set Wall Wall Air circulation is blocked Securing the Installation Space Align the BASE STAND with the screw ho...

Page 9: ...arrow button to select part of the interfaces and applications does not support the button for the time being As a result of time consumption of power down of power supply and system processing please...

Page 10: ...on The effective range of remote control Cute button Return button Home button Mute button Power indicator Numeric buttons button VOL button OK button CH button Source button NICAM button Apps button...

Page 11: ...n In the home page operation and browsing the webpage you can use air mouse and part of the interfaces and applications cannot be supported temporarily NOTES The remote control s initial code matching...

Page 12: ...to the priority you have chosen All Recent Radio 82 J2 DTV 83 iNews DTV 85 High Definition Jade DTV 85 High Definition Jade Thursday 2012 04 19 Friday 2012 04 20 Saturday 2012 04 21 Sunday 2012 04 19...

Page 13: ...riate external signal cable or increase the adapter to match with the port in such case Illustrations for reference only TV Terminal Connections ETHERNET COAXIAL VGA USB HDMI VIDEO IN COMPONENT HEADPH...

Page 14: ...istortion or non image Devices with lower version may be compatible supported by this machine but it may not be able to achieve the best visual effects Some lower versions of the HDMI cables may resul...

Page 15: ...d The AV2 video signal is connected to external devices with Comp Video Adapter provided The audio signal are connected to external devices with Audio Adapter provided Please make sure that the audio...

Page 16: ...a PC VGA Input Format Resolution Frequency Making Connections NOTES The audio signal are connected to external devices with Audio Adapter provided When used as TV monitor please read the Attention on...

Page 17: ...more than 500 mA when the single USB jack is connected with external devices and the total current should be no more than 1200 mA when all the USB jacks are connected with external devices Hisense war...

Page 18: ...13 Input Jacks Input Source Connections Selecting the Input Source EXTERNAL DEVICE TV JACK Connecting a TF card Making Connections TF card TF...

Page 19: ...ds at least in case the abnormal phenomena occurred NOTE Changing the channels can also be achieved by directly pressing the programme No If you want to choose the programme No from 1 9 press Numeric...

Page 20: ...g Bright Light Soft Light Stereoscopic Frequency Comfort Frequency Custom Multi screen Service Picture Mode 3D NR NOTE If the TV has no signal this option is not available Zoom Full screen Standard Zo...

Page 21: ...n is not available The options of the Geometry varies with different source H Position V Position H Size V Size Clock Phase Auto Adjust Display Area Brightness Contrast Color Sharpness Color Temperatu...

Page 22: ...ue If you feel headache tired or dizzy please stop watching TV and have a rest 2 Kids at or below 6 years of age should not view 3D video as they are incomplete in visual development The parents shall...

Page 23: ...Delete Skip OK Auto Scanning Manual Scanning OK OK button Return button Search channel in ATV signal Video System Audio System Manual Scanning OK OK button Return button Auto Scanning Channel Edit Ren...

Page 24: ...ADSL Modem Modem Cable ADSL Modem Basic Features Network WB PPPoE OK Wireless Network OK OK OK Manual Setting OK OK Added network management OK Soft AP Settings NOTE The default SSID is set randomly...

Page 25: ...i Display Network Information Bluetooth System About Input Method Location Language Retail Mode Sleep Boot Music Subtitles Settings TV Info Upgrade TV Name Restore Factory Settings Auto pairing Availa...

Page 26: ...erver including normal upgrade or forced upgrade Enter the App Setting button More General Account Return button NOTE When registering please fill in the correct mailbox this will be the only way to r...

Page 27: ...s Enter the App Apps browse comment share and download Manage Application search NOTES Parts of the temporary files data or downloaded files generated from operation of application procedures are save...

Page 28: ...e button Upload to Hisense Cloud Download to external device Upload Download Manager Cycling Mode Play List button button Delete Open the Multi screen Service Setting button More General Multi screen...

Page 29: ...Play Pause OK Forward Backward button button button Previous Next button Exit Return button Menu Instructions Cute button Upload to Hisense Cloud Download to external device Upload Download Manager P...

Page 30: ...devices during reading the files or this may damage your system files 5 Don t press other buttons repeatedly when the system is processing your last operation otherwise it will affect the processing s...

Page 31: ...Standby button When there is something wrong with your TV you can try turning off the TV and then restart it You can also operate according to the following chart If the problem still cannot be solved...

Reviews: