background image

3

4

 Connecting component cevices (DVD/PVR)

1. Component video(Y, Pb, Pr)transmits video as separate Y, Pb, Pr signals. Use this 

connection for high-definition video signals from a DVD or other equipment. 

2. Connect  Component  inputs  (“Pr  ”,“Pb  ”,  “Y”)  and  audio(R/L)  of  your  set  with 

Component  video  and  audio  cables  to  the  corresponding  component  video  and 
audio (R/L)out connectors on the PVR or DVD. Component audio Jack common AV 
IN audio Jack.

 Connect to AV devices

1. Connect video terminal to an appropriate external terminal on A/V device  such as 

a VCR, DVD or Camcorder with a video cable.

2. Connect“R -AUDIO - L” on your set to the corresponding audio terminal with audio 

cables on the A/V device.

Equipment with A/V jacks

DVD Player/Recorder

Video 

Camera

EXTERNAL DEVICES

Set-top box

Satellite Receiver

Satellite 
antenna 
cable

VCR

TV JACK

A/V OUT

Video

L

R

White(L)

White(L)

Yellow(Video)

Yellow(Video)

Red(R)

Red(R)

AV Cable 

(not included)

VIDEO

L

R

A

V IN

Y

P

B

P

R

COMPONENT IN

L

R

Equipment with A/V jacks

Video 

Camera

EXTERNAL DEVICES

Satellite 
antenna 

VCR

White(L)

White(L)

Red(R)

Red(R)

Audio Cable 

(not included)

Component Cable 

(not included)

TV JACK

Component

R

L

P

R

P

B

Y

P

R

/C

R

P

R

/C

R

P

B

/C

B

P

B

/C

B

Y

Y

Getting Started

Getting Started

NOTE

The  “Y,  Pb    and  Pr  ”  connectors  on  your  component  devices  (PVR  or  DVD)  are 
sometimes marked with  Y, B-Y and R-Y or Y, CB and CR. (Colors for inputs and 
cables must correspond on both devices.)
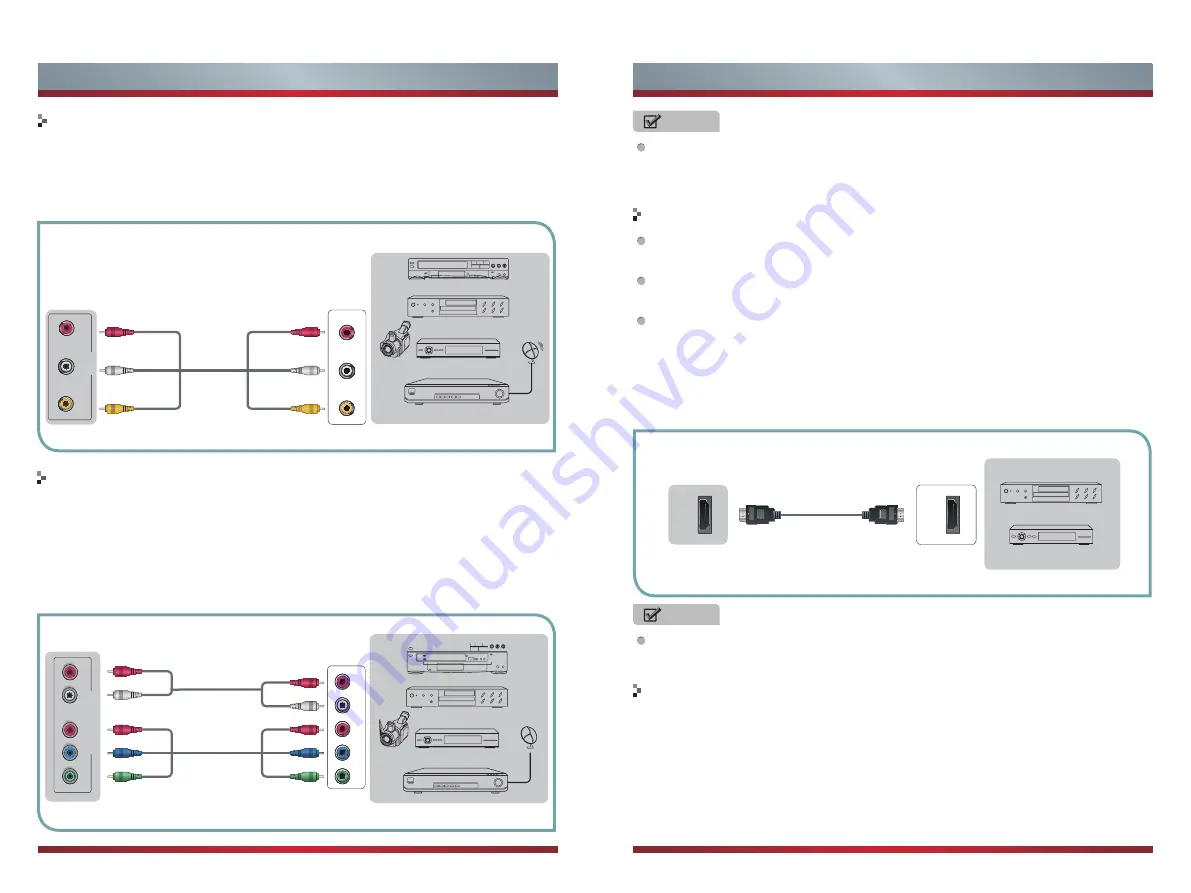
NOTE

The  HDMI  connector  provides  both  video  and  audio  signals,  it’s  not  necessary  to 
connect the audio cable.

 Connect to devices with HDMI interface

Support  digital  connections  between  HDMI  -  enabled AV  devices  such  as  PVR, 
DVD, Blu-Ray, AV receiver and digital devices. 

Some devices such as PVR or DVD player require HDMI signal to be set to output 
in the device's settings.

Please consult your device user manual for instructions. 

1. Use an HDMI cable to connect the A/V device’s HDMI output jack to the TV’s HDMI 

jack. 

2. Plug the connected devices into the mains socket before switching on the TV .

3. Select the corresponding source from the TV. 

HDMI

HDMI

TV JACK

EXTERNAL DEVICES

DVD Player/Recorder

Set-top box

Equipment with HDMI jacks

HDMI Cable 

(not included)

 Connecting a PC with VGA cable

1. Use a VGA cable to connect the PC’s VGA output jack to the TV’s VGA jack. Use 

an audio cable to connect the PC’s audio output jack to TV’s PC/DVI AUDIO IN jack. 

2. Plug the connected devices into the mains socket before switching on the TV. 

3. Select the corresponding source from the TV. 

Summary of Contents for 32D33

Page 1: ...English ES M135202...

Page 2: ...lectrician to replace your obsolete outlet Do not defeat the safety purpose of the polarized plug A s n o i t c u r t s n I y t e f a S t n a t r o p m I The flash with the symbol of arrowhead inside...

Page 3: ...nding of the lead in wire to an antenna discharge unit connection to grounding electrodes and requirements for the grounding electrode 15 Servicing Do not attempt to service this TV yourself as openin...

Page 4: ...r to the user manual of your A V device for compatibility and connections procedure Always unplug the power cord when connecting external equipment Connect to broadcast antenna or the cable TV 1 To ha...

Page 5: ...nt R L PR PB Y PR CR PR CR PB CB PB CB Y Y Getting Started Getting Started NOTE The Y Pb and Pr connectors on your component devices PVR or DVD are sometimes marked with Y B Y and R Y or Y CB and CR C...

Page 6: ...our set While the headphone is connected the sound from the built in speakers will be disabled Turning your TV on and off Selecting the video source Adjusting the volume 1 To turn your TV on Connect t...

Page 7: ...ndby mode automatically after about 15 minutes Changing channels Selecting the sound mode Press CH CH to go to the previous or next channel Either Press the number buttons to select a channel For exam...

Page 8: ...to adjust Brightness Adjust the visual perception output of the entire picture it will effect the iuminousness of the picture Contrast Adjust the highlight intensity of the picture but the shadow of...

Page 9: ...u Not available in Australia AVL Automatically reduces sudden volume changes for example when switching beween the channels Press button to select AVL then press button to select On or Off Mode Press...

Page 10: ...annel Edit then press OK button to enter sub menu The three colored key are the shortcut key for programming the channels First press to highlight the channel you want to delete or move or skip then P...

Page 11: ...Mode Set hotel mode On or Off Note The following settings work only when Active Hotel Mode is set to be ON Max Vol Set the max volume that you can adjust Default Vol Set the default volume for every...

Page 12: ...ings Only available under DTV ATV AV source Press button to select Teletext then press OK button to enter sub menu Under DTV source press button to select Digital Teletext Language and Decoding Page L...

Page 13: ...ile Manager section you would be able to see the recorded file list on right side of menu By selecting the files from the list the information of the recorded program has been displayed at the button...

Page 14: ...e manufacturer of the PC Video Graphic s card for further support Perfect compatibility is not warranted NOTES NOTES The option allows the user to watch a live broadcast DTV only with a delay Since th...

Page 15: ...e table provided at the end of User Manual for playable format list How to play Music Press button to select Audio file in the main menu and enter to the desired folder by pressing OK Press to move be...

Page 16: ...control and the monitor Check if the batteries are correctly installed How to read a TEXT file Only when you enter the Music playback music and then enter the Photo or Text the function of Background...

Page 17: ...ower point without extension cords power boards or surge protectors Disconnect and reconnect the device make sure that the cables are plugged in to corresponding ports Test the device on another TV Di...

Page 18: ...posed to be obtained by customers themselves flv H 264 AVC MP Level 4 H 264 AVC HP Level 4 VC 1 WMV9 wmv asf RMVB rm rmvb mp3 AAC aac m4a wav jpg jpeg txt VC 1 MP VC 1 SP VC 1 AP RV8 720P 30 RV9 720P...

Reviews: