23
2.3 Current Measurement
1.
Move the function selector to
the CLAMP position.
(
lights up)
2.
Set the measurement range
of the Clamp-on probe
(option).
If you are not sure of the level
of the current to be mea-
sured, select a large range.
3.
Press the RANGE button and
select the same range as that
of the Clamp-on probe.
The Auto Range function is
not available for current mea-
surement.
4.
Clamp the measurement
object, and read the indicated
value.
Change the range in accor-
dance with the actual mea-
surement. If the range of the
Clamp-on probe is changed
during measurement, change
the range of the product as
well.
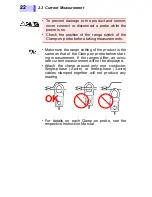
Make sure the range setting of
the product is the same as that
of the Clamp-on probe before
starting measurement.
SOURCE
LOAD
Conductor
Position the clamp with
the current direction in-
dicator pointing toward
the load side.
When the measurement
range is set to 100A
3255-50
9010
Appearance of O.F
...............
The measured value exceeds maximum
display counts
10, 100, 1000-A range: display up to 999
20, 200-A range: display up to 1999
50, 500-A range: display up to 499
Summary of Contents for 3255-50 HiTESTER
Page 1: ...INSTRUCTION MANUAL DIGITAL HiTESTER 3255 50 ...
Page 2: ......
Page 16: ...Usage Notes 12 ...
Page 20: ...1 3 Parts Names and Functions 16 ...
Page 36: ...3 4 Auto Power Save Function 32 ...
Page 48: ...5 3 Service 44 ...
Page 49: ......
Page 50: ......


