background image

7

Usage Notes

*IP54

This indicates the degree of protection provided by
the enclosure of the device against use in hazard-
ous locations, entry of solid foreign objects, and
the ingress of water.

5:

Protected against access to hazardous parts with
wire measuring 1.0 mm in diameter. Dust-proof
type (The penetration of dust cannot be prevented
completely, but quantities of dust that may hinder
the stated operation of equipment or safety cannot
penetrate the enclosure.)

4:

The equipment inside the enclosure is protected
against the harmful effects of water splashed
against the enclosure from any direction.

Observe the following to avoid damage to the
product.
• Installation and Operating Environment

Between 0°C and 40°C; 80% RH or less;
indoors only. However, it can be safely operated
at as low as -10°C.

• Do not store or use the product where it could

be exposed to direct sunlight, high temperature
or humidity, or condensation. 
Under such conditions, the product may be
damaged and insulation may deteriorate so that
it no longer meets specifications.

• Although this product is designed to resist the

ingress of dust and water, it is not entirely water-
or dust-proof, so to avoid shock or damage, do
not use it in a wet or dusty environment.
The protection rating for the enclosure of this
device (based on EN60529) is


*IP54.

• Do not use the product near a device that gener-

ates a strong electromagnetic field or electro-
static charge, as these may cause erroneous
measurements.

• To avoid damage to the product, protect it from

vibration or shock during transport and handling,
and be especially careful to avoid dropping.

Summary of Contents for 3255-50 HiTESTER

Page 1: ...INSTRUCTION MANUAL DIGITAL HiTESTER 3255 50 ...

Page 2: ......

Page 3: ...ions 14 Chapter 2 Measurement Procedures 17 2 1 Connection 17 2 2 Voltage Measurement 19 2 3 Current Measurement 21 2 4 Resistance Measurement 24 2 5 Continuity Check 25 2 6 Diode Check 26 Chapter 3 Additional Functions 27 3 1 Auto Range Function and Manual Range Function 27 3 2 HOLD AUTO Function 29 3 3 Overflow Warning Function 30 3 4 Auto Power Save Function 31 ...

Page 4: ...ntents ii Chapter 4 Specifications 33 4 1 General Specifications 33 4 2 Accuracy 37 Chapter 5 Maintenace and Service 39 5 1 Replacing the Batteries and Fuses 39 5 2 Cleaning and Storage 42 5 3 Service 43 ...

Page 5: ... ensure that no damage occurred during ship ping In particular check the accessories panel switches and connectors If damage is evident or if it fails to operate according to the specifications contact your dealer or Hioki representative Accessories 9207 10 TEST LEAD 1 Instruction Manual 1 R03 Manganese battery 2 Supplied with this product for monitor 9371 CARRYING CASE 1 Options 9010 CLAMP ON PRO...

Page 6: ...otes Safety Notes This product is designed to conform to IEC 61010 Safety Standards and has been thor oughly tested for safety prior to shipment However mishandling during use could result in injury or death as well as damage to the product Be certain that you understand the instructions and precautions in the man ual before use We disclaim any responsibil ity for accidents or injuries not resulti...

Page 7: ...s voltage may be present at this terminal Indicates a double insulated device Indicates a grounding terminal Indicates DC Direct Current Indicates AC Alternating Current Indicates DC Direct Current or AC Alternating Current Indicates that incorrect operation presents an ex treme hazard that could result in serious injury or death to the user Indicates that incorrect operation presents a sig nifica...

Page 8: ... display value or scale length The maximum displayable value or the full length of the scale This is usually the maximum value of the currently selected range rdg reading or displayed value The value currently being measured and indicated on the measuring product dgt resolution The smallest displayable unit on a digital measur ing product i e the input value that causes the digital display to show...

Page 9: ...connected directly to the distribution panel and feeders from the distribution panel to outlets CAT IV The circuit from the service drop to the service entrance and to the power meter and primary overcurrent protection device distribution panel Higher numbered categories correspond to electrical environ ments with greater momentary energy so a measurement product designed for CAT III environments ...

Page 10: ...ke sure that the insu lation on the test leads is undamaged and that no bare conductors are improperly exposed Using the product under such conditions could result in electrocution Replace the test leads with the specified Hioki Model 9207 10 Usage Notes Inspection before Use Installation Operating Environment and Handling To avoid electric shock do not allow the product to get wet and do not use ...

Page 11: ...een 0 C and 40 C 80 RH or less indoors only However it can be safely operated at as low as 10 C Do not store or use the product where it could be exposed to direct sunlight high temperature or humidity or condensation Under such conditions the product may be damaged and insulation may deteriorate so that it no longer meets specifications Although this product is designed to resist the ingress of d...

Page 12: ...f strong magnetic fields such as near transformers and high current conductors or in the presence of strong electromagnetic fields such as near radio transmitters To avoid battery depletion turn the function selector OFF after use the Auto Power Save feature consumes a small amount of current The indicator appears when battery voltage becomes low Replace the batteries as soon as possible Handling ...

Page 13: ...t occurs Connections should never be made to the primary side of a breaker because unrestricted current flow could cause a seri ous accident if a short circuit occurs The maximum input voltage is 1000 VDC 1000 Vrms sin or 107 V Hz Attempt ing to measure voltage in excess of the maximum input could destroy the product and result in personal injury or death The maximum rated voltage between input te...

Page 14: ...uit before measuring Connect the Clamp on probe to the product first and then to the active lines to be mea sured Observe the following to avoid electric shock and short circuits Never attach the clamp on probe to a cir cuit that operates at more than 600 V or over bare conductors When the Clamp on probe is opened do not allow the metal part of the clamp to touch any exposed metal or to short betw...

Page 15: ...ile the power is on Be careful to avoid dropping the Clamp on probe or otherwise subjecting them to mechani cal shock which could damage the mating sur faces of the core and adversely affect measurement Keep the clamp jaws and core slits free from for eign objects which could interfere with clamping action ...

Page 16: ...Usage Notes 12 ...

Page 17: ...ds Handy and safe digital multimeter DMM with protections against accidents No need to replace a test lead two input termi nals are provided A fuse and protective resistor between input ter minals prevent an accident caused by a short cir cuit The dustproof and waterproof structure prevents dust and moisture from entering the product IP54 Current measurement AC using a Clamp on probe Displays the ...

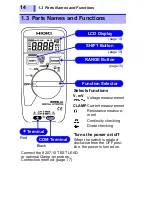
Page 18: ... the OFF posi tion the power is turned on V mV Voltage measurement CLAMP Current measurement Resistance measure ment Continuity checking Diode checking page 15 page 15 page 15 Black Red Connect the 9207 10 TEST LEAD or optional Clamp on probes Connection method page 17 LCD Display SHIFT Button RANGE Button Function Selector COM Terminal Terminal ...

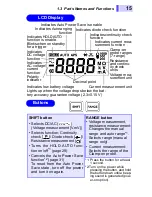
Page 19: ...er Indicates DC voltage function Indicates AC voltage current function Polarity indicator SHIFT button Selects DC AC Voltage measurement V mV Selects function Continuity check Diode check Resistance measurement Turns the HOLD AUTO func tion on off 1 page 29 Cancels the Auto Power Save function 2 page 31 To reset from the Auto Power Save state turn off the power and turn it on again RANGE button Vo...

Page 20: ...1 3 Parts Names and Functions 16 ...

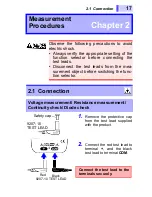
Page 21: ...est leads from the mea surement object before switching the func tion selector 2 1 Connection Voltage measurement Resistance measurement Continuity check Diode check 1 Remove the protective cap from the test lead supplied with the product 2 Connect the red test lead to terminal and the black test lead to terminal COM Connect the test lead to the terminals securely Black Red Safety cap 9207 10 TEST...

Page 22: ...asurement Connect the red plug of the Clamp on probe to terminal and the black plug to terminal COM To perform measurement an optional Clamp on probe is required Black Red Connect the plug to the ter minals securely Clamp on probe ...

Page 23: ...AT II DC 1000 V AC1000 Vrms sin or 107 V Hz CAT III DC 600 V AC600 Vrms sin or 107V Hz Attempting to measure voltages exceeding this level with respect to ground could damage the product and result in personal injury To avoid electrical shock be careful to avoid shorting live lines with the test leads For safety test lead connections must always be made at the secondary side of a circuit breaker T...

Page 24: ...k Red Red Black V measurement mV measurement AC Voltage Measurement Example DC Voltage Measurement Example Selecting the manual range Press RANGE AUTO is turned off Reselecting the auto range Press RANGE for at least 1 second AUTO lights up Holding the measured value page 29 Press SHIFT for at least 1 second Measurement Intermittent sound Move the test leads away from the mea surement object Appea...

Page 25: ...conduc tors Clamp on probe should only be connected to the secondary side of a breaker so the breaker can prevent an accident if a short circuit occurs Connections should never be made to the primary side of a breaker because unrestricted current flow could cause a serious accident if a short circuit occurs When the Clamp on probe is opened do not allow the metal part of the clamp to touch any exp...

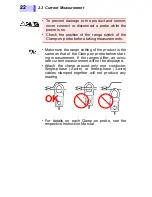
Page 26: ...rements Make sure the range setting of the product is the same as that of the Clamp on probe before start ing measurement If the ranges differ an accu rate current measurement will not be displayed Attach the clamp around only one conductor Single phase 2 wire or three phase 3 wire cables clamped together will not produce any reading For details on each Clamp on probe see the respective Instructio...

Page 27: ...cated value Change the range in accor dance with the actual mea surement If the range of the Clamp on probe is changed during measurement change the range of the product as well Make sure the range setting of the product is the same as that of the Clamp on probe before starting measurement SOURCE LOAD Conductor Position the clamp with the current direction in dicator pointing toward the load side ...

Page 28: ...uit before measuring 1 Move the function selector to the Ω position lights up 2 Connect the test leads to the measurement object and read the indicated value Black Red Selecting the manual range Press RANGE AUTO is turned off Reselecting the auto range Press RANGE for at least 1 second AUTO lights up Holding the measured value page 29 Press SHIFT for at least 1 second Measurement Intermittent soun...

Page 29: ...To avoid electrical accidents remove power from the circuit before measuring 1 Move the function selector to the Ω position 2 Select Continuity check func tion using the SHIFT button lights up 3 Connect the test leads to the measurement object When the continuity thresh old 45 35 Ω or less is estab lished the beeping sounds and the resistance is dis played fixed to the 420 Ω range Black Red ...

Page 30: ...e check function pressing the SHIFT but ton twice lights up 3 Connect the test leads to the measurement object The display shows forward voltage 0 15 V to 2 0 V for a normal diode Forward direction Cathode Anode Black Red If displays for both directions are the same the following may have occurred The diode has malfunc tioned The forward voltage of the diode is out of the mea surement range When t...

Page 31: ...nging on AUTO lights up The range automatically switches up when the dis play shows 4200 counts or more and down when the display shows less than 400 counts A beep sound is generated when the 3255 50 is switched to a different range and decimal point is dis played Additional Functions Chapter 3 3 1 Auto Range Function and Manual Range Function Functions Auto range function V Manual range function ...

Page 32: ...ction V Ω Each pressing of the RANGE button selects the next larger range After the largest range pressing the select button again returns you to the smallest range CLAMP Each pressing of the RANGE button selects the next smaller range After the smallest range pressing the select button again returns you to the largest range Switching from Manual Range to Auto Range Press and hold down the RANGE b...

Page 33: ...ue is held Blind zone V mV less than 400 counts Ω 4200 counts or more 1 Move the function selector to the desired position 2 Press the SHIFT button HOLD blinks In the measurement of resistance O F is displayed 3 Connect the test leads to the mea surement object After the measured value is stabi lized an intermittent sound is gener ated HOLD lights up 4 When the intermittent sound is heard move the...

Page 34: ...tion 4199 counts O F is displayed and an intermittent sound is generated O F is displayed and an intermittent sound is generated also in the cases described below Range Maximum display value O F display Voltage measurement 1000 V 1099 1100 or more Current measurement 10 100 1000 A 999 1000 or more 20 200 A 1999 2000 or more 50 500 A 499 500 or more The Overflow Warning function is disabled while t...

Page 35: ...roximately 10 minutes after completing final operation the measurement product automati cally enters Power Save mode When the mea surement product is turned on it automatically enters Auto Power Save mode APS lights up In Power Save mode the LCD is blank but power is supplied to the measurement product To avoid battery depletion turn the function selector OFF after use the Auto Power Save feature ...

Page 36: ...3 4 Auto Power Save Function 32 ...

Page 37: ...uto function HOLD Auto Power Save function APS Battery Life Warning function Overflow Warning function OF Circuit protection Circuit current limiting resistor Protective fuse Model DMM 44 100 fast acting Rating 0 44 A 1000 V AC DC breaking capacity 10 kA made by Cooper Bussmann Cooper Industries Inc Bussmann Division USA Display type TN type LCD 1 4 duty dynamic drive Display elements 3 1 2 dgt Ma...

Page 38: ...31D mm 2 76 W 5 71 H 1 22 D without protrusions Mass Approx 210 g 7 4 oz including batteries Operating environment Indoors altitude up to 2000 m 6562 ft Operating temper ature and humidity 0 to 40 C 32 to 104 F at 80 RH or less non condensating Storage tempera ture and humidity 20 to 40 C 4 to 104 F at 80 RH or less non condensating 40 to 60 C 104 to 140 F at 70 RH or less non condensating Accesso...

Page 39: ...F 9 F 80 RH or less non condensating Regulated power supply range 3 4 V or lower until the mark lights up Temperature characteristic Measurement accuracy 0 1 C except 23 C 5 C Noise suppression NMRR DCV 40dB or better 50 60 Hz ACV 40dB or better DC Noise suppression CMRR DCV 100dB or better 50 60 Hz ACV 60dB or better 50 60 Hz 1 kΩ Unbalance Dielectric strength Input terminals to case 5 55 kVrms s...

Page 40: ...C Rated power 4 mVA Typ supply voltage 3 0 VDC in DCV mode Power during auto power saving 0 1 mVA Max supply voltage 3 0 VDC during Auto Power Saving Continuous operating time Approx 200 hours in DCV mode with R03 manganese batteries Approx 500 hours in DCV mode with LR03 alkaline batteries Electrical Characteristics ...

Page 41: ... rdg dgt Input Impedance Frequency range mV V 420 0 m 4 200 42 00 420 0 1000 1 0 4 1 0 4 0 5 4 0 7 4 0 7 4 Approx 10 MΩ Approx 11 MΩ Approx 10 MΩ Approx 10 MΩ Approx 10 MΩ mV V 420 0 m 4 200 42 00 420 0 1000 2 0 4 2 0 4 1 2 4 1 5 4 1 5 4 50 to 500 Hz Approx 10 MΩ Approx 11 MΩ Approx 10 MΩ Approx 10 MΩ Approx 10 MΩ Overload protection for one minute 1000 VDC 1000 Vrms sin or 107V Hz ...

Page 42: ...inute 1000 VDC 1000 Vrms sin or 107V Hz Resistance Measurement Continuity Check Diode Check Range Ω Accuracy rdg dgt Open terminal voltage Notes Resis tance 420 0 4 200 k 42 00 k 420 0 k 4 200 M 42 00 M 1 0 8 0 7 4 1 0 4 1 0 4 2 0 4 5 0 4 3 4 V or less Approx 0 7 V Approx 0 5 V Approx 0 5 V Approx 0 5 V Approx 0 5 V Measurement current 850 μA max Varies accord ing to resistance levels to be measur...

Page 43: ...he cover and screw Do not mix old and new batteries or differ ent types of batteries Also be careful to observe battery polarity during installation Otherwise poor performance or damage from battery leakage could result To avoid the possibility of explosion do not short circuit disassemble or incinerate bat teries Handle and dispose of batteries in accor dance with local regulations The indicator ...

Page 44: ...current minimizing arcing at the tip of the test probe and providing safer operation Replace the fuse only with one of the speci fied characteristics and voltage and current ratings Using a non specified fuse or short ing the fuse holder may cause a life threat ening hazard Fuse type Model DMM 44 100 Fast acting Rating 0 44 A 1000 V AC DC Breaking capacity 10 kA made by Cooper Bussmann Be careful ...

Page 45: ...ew 3 Lift and remove the rear case 4 Replace the two manga nese batteries R03 mounted to the rear case or the fuse mounted to the front case 5 Mount the rear case and tighten the retaining screw Necessary tool Phillips screwdriver Rear case Front case Batteries Fuse Fuse type Model DMM 44 100 fast acting Rating 0 44 A 1000 V AC DC Breaking capacity 10 kA made by Cooper Bussmann Cooper Industries I...

Page 46: ... wipe it gently with a soft cloth moistened with water or mild detergent Never use solvents such as benzene alcohol acetone ether ketones thinners or gasoline as they can deform and discolor the case Wipe the LCD gently with a soft dry cloth To avoid corrosion from battery leakage remove the batteries from the product if it is to be stored for a long time ...

Page 47: ...s clamp on probes and fuse are not open circuited before contacting your dealer or Hioki representative When sending the product for repair remove the batteries and pack carefully to prevent damage in transit Include cushioning material so the instrument cannot move within the package Be sure to include details of the problem Hioki can not be responsible for damage that occurs during shipment 5 3 ...

Page 48: ...5 3 Service 44 ...

Page 49: ......

Page 50: ......

Page 51: ... 268 28 0568 E mail os com hioki co jp URL http www hioki co jp Printed in Japan 3255AD981 01 All reasonable care has been taken in the production of this manual but if you find any points which are unclear or in error please contact your supplier or the International Sales and Marketing Department at HIOKI headquarters In the interests of product development the contents of this manual are subjec...

Page 52: ...09H HEAD OFFICE 81 Koizumi Ueda Nagano 386 1192 Japan TEL 81 268 28 0562 FAX 81 268 28 0568 E mail os com hioki co jp URL http www hioki co jp HIOKI USA CORPORATION 6 Corporate Drive Cranbury NJ 08512 USA TEL 1 609 409 9109 FAX 1 609 409 9108 ...

Reviews: