background image


26


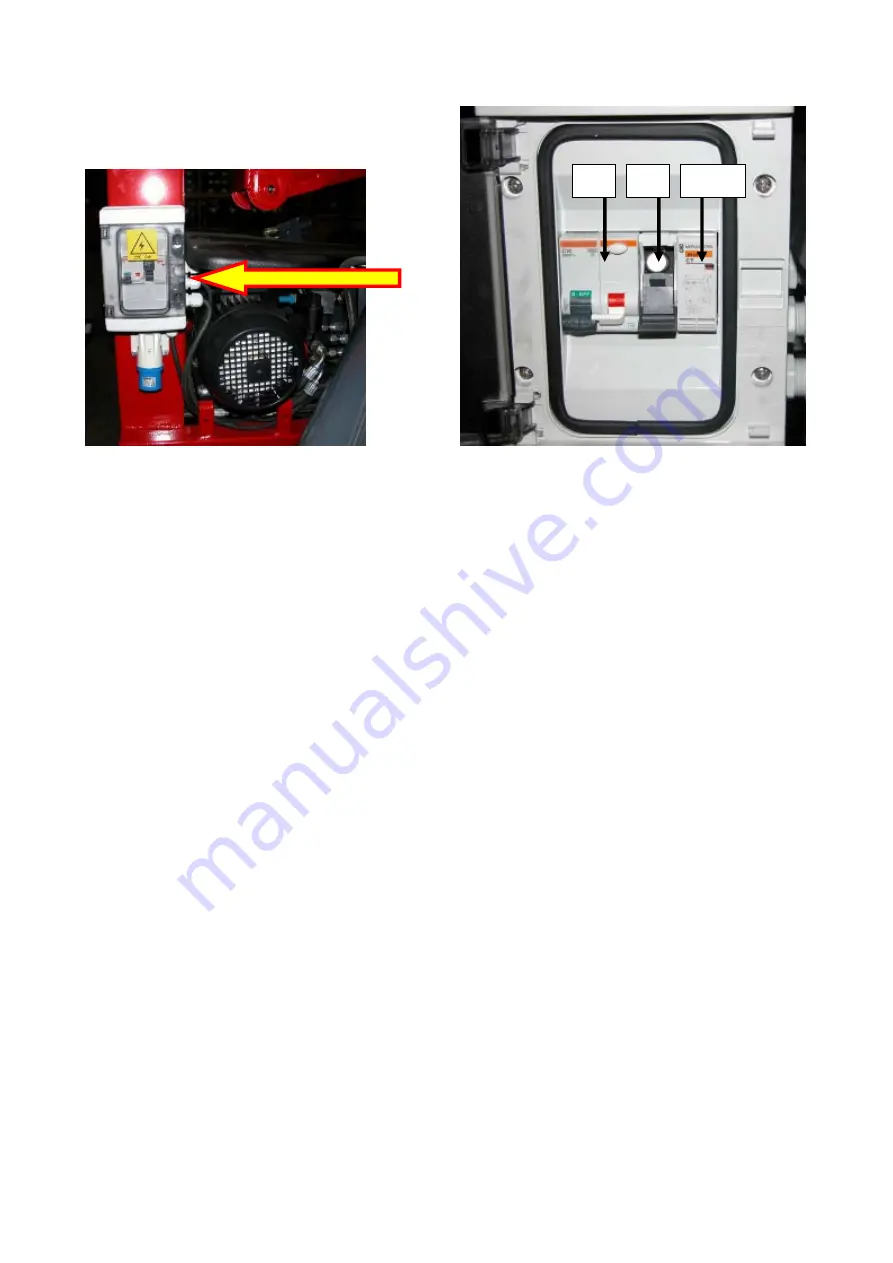
(Attachment 5) Outside the board


there is


the electric plug CEE 2P+T 16A that feeds the electric 

engine. Through the cables 230L and 230N you enter the Q1 differential switch. Then the cables L 
and N connect in parallel the transformer and the relay KM1, that controls the electric engine. When 
the PLC closes the contact Q7, the relay KM1 that closes the circuit is powered, and it feeds the 
electric engine. The fuse F4 protects the circuit. After of the transformer there is a rectifier that 
changes the alternate current into continuous current and feeds the line at low voltage.  
From the cables L and N starts a connection that goes to the electric plug CEE 2P+T 16A in the 
basket. 
 

4.4 Starter in the basket (gasoline only) 

 
(Attachments 3 and 5) Pushing the starter button on the control panel in the basket, you feed the 
cable 6 that is connected with the solenoid located on the 

thermic

 engine.  

4.5  Operations of the platform. 


4.5.1  Translation and stabilization 

In order to allow the translation, the machine needs to be aligned.  
(Attachment 4) The alignment of the photoelectric cell 1 emitter receiver, powers the 
relay KA1 and sends a signal to I8 of the PLC; on the contrary, the alignment of the 
reflection photoelectric cell powers the relay KA1-A. 
The two relays in series close the circuit on the cable 10 that feeds the electrovalve of 
the deviator aerial part / undercarriage part. The tension comes also to the control 
panel in the basket, where the cable 10 lights the consent lamp for the translation KL4 
(Attachment 3). 
The electrovalves of undercarriage, aerial part and Jib are protected by the fuse F2. 


4.5.2  Aerial work. 

In order to work with the aerial part, the machine needs to be stabilized. 
(Attachment 2) On the outriggers there are 4

 end of stroke

 (stops) ST1; ST2; ST3; ST4 

that are equipped with a double contact NC and NA. When the 4 stops are released, 
the contacts in parallel NA open, and take the feeding away from the entrances I1; I2; 

Q1 

KM1 

F4 

Summary of Contents for GOLD LIFT 1470

Page 1: ...Technical Course GOLD LIFT 1470 ...

Page 2: ...UNCTIONING OF THE UNDERCARRIAGE PART 17 FUNCTIONING OF THE AERIAL PART 18 FUNCTIONING OF THE FIRST AND SECOND ARM 21 FUNCTIONING OF THE BASKET LEVELLING 21 JIB FUNCTIONING 22 4 ELECTRIC SYSTEM 4 1 Feeding of the main lines F1 and 11 24 4 2 Starting the thermic engine 24 4 2 1 Starting the thermic engine from the ground 24 4 2 2 Starting the thermic engine from the basket 25 4 3 Starting the electr...

Page 3: ...3 ...

Page 4: ... aerial platform is equipped with a hydraulic and electric system that interact to ensure the safety of the machine in any situations Below we are presenting the two systems in particular paying attention to their interactions We remind you that the correct position of the operator during the translation is inside the basket in the rear part We have then the following scheme In the basket there is...

Page 5: ...80 0 80 MAX WORKING INCLINATION 1 2 2 MAX STABILIZATION INCLINATION 10 TOT WEIGHT DURING TRANSPORT 1700 kg THERMIC ENGINE HONDA GX270 9 CV 3000 rpm HONDA GX390 13 CV 3000 rpm Optional HATZ 1B30 7 CV 3000 rpm Optional ELECTRIC ENGINE 1 5 kw 220V 50Hz 1500 rpm 1 5 kw 110V 50Hz 1500 rpm Optional ELECTRIC SYSTEM VOLTAGE 12 V PUMPS 2x3 15 cc MAX TRANSLATION SPEED thermic engine 1 4 km h MAX TRANSLATION...

Page 6: ... during the translation or while it is stabilized you operate the undercarriage part if you are working in altitude height then you operate the aerial part The operation of the two parts and their functioning is controlled by an electric panel consisting of the assembly PLC relay control the relays are inside the electric components housing on the left side of the machine ...

Page 7: ...y if the machine is closed and aligned This condition is ensured by the two photoelectric cells on the rear part of the machine The first photoelectric cell is the type sender receiver The sender located on the arm sends a signal If the machine is closed and aligned the signal is perceived by the receiver that is fixed to the valve block support and that sends a positive signal to the electric pan...

Page 8: ... drive or stabilize the machine BOTH THE PHOTOELECTRIC CELLS MUST SEND A POSITIVE SIGNAL TO THE ELECTRIC PANEL This condition is signalled by a lamp on the control panel translation consent lamp The alignment of the machine is indicated by the two arrows on the valve block support 2 2 Functioning during the aerial works The aerial operations are usually controlled by the valve block in the basket ...

Page 9: ...scs on the ground is signalled by the 4 micrswitches located on the 4 outriggers that are released by the cylinder rod when the disc touches the ground When all 4 outriggers send the signal to the electric panel the machine is stabilized and a lamp lights on the electric panel lamp outriggers on the ground The levelling of the machine needs to be checked by the operator on the water level located ...

Page 10: ...s controlled by a microswitch located in the lower part of the JIB arm When the arm is closed the micro switch sends a signal to the electric panel allowing the 200kg load only up to max 12 working metres In case you chose the 200kg way and the Jib arm was not completely closed the red flashing lamp on the control panel load sensor lamp would light emitting an intermittent acoustic signal 120kg on...

Page 11: ... is on the control panel and the other one is on the undercarriage part near the valve block that controls the aerial part If you use the emergency buttons to stop the machine when the arm is closed an intermittent acoustic signal warns that the engine key is in the ON position 2 4 Emergency descend The machine has been designed taking into account possibile emergency situations such as mechanic f...

Page 12: ...the hydraulic motor Anyway in order to move the machine you need to move the rotation lever on the valve block either in the basket or on the ground In the model 1470 when you are using the emergency descend the jib cylinder cannot be activated this means that when the arm is completely down the basket is at about 1 8 m height In this case in order to help the person in the basket it is necessary ...

Page 13: ...ol for example a ladder 2 4 3 Emergency descend from the ground through the manual pump in case of failure of all the systems conveying energy This emergency descend is to be used only in case of failure of the electric system of the machine when it is not possible to make any emergency manoeuvres from the basket The only reason to allow the use of the emergency descend from the ground is to compe...

Page 14: ...Case 1 there is tension when you turn the ignition key to the ON position and when the emergency descend buttons are not on 1 move the deviator towards the manual pump in the position corresponding to the arms movement 2 move the selection deviator from the valve block in the basket to the valve block on the undercarriage 3 move the manual pump and at the same time move the levers of the arms move...

Page 15: ...o failures of the main hydraulic system The manual pump is equipped with a manual deviator that allows choosing to move either the two right outriggers Position 1 or the two left outriggers and the aerial part of the structure Position 2 The outrigger operations are allowed only if the electric system hasn t got failures and the ignition key is in the ON position In case of failure of the electric...

Page 16: ...bers in brackets indicate the components of the hydraulic circuit The circuit of the Gold Lift is fed through three pumps groups 1 Group 4 connected with the thermic engine 2 2 3cc rev pumps set at 3000rpm 2 Group 4 connected with the electric engine 3 2 3cc rev pumps set at 1500rpm 3 Emergency manual pump 1 Since this pump is unique a deviator has been put on the delivery line 1 to select in whic...

Page 17: ...o hydraulic drive motors are controlled 14 to the 4 outriggers 12 and to the undercarriage s widening cylinders 11 On each of the 4 outriggers are mounted two piloted block valves in series on the piston side flanged near the pin that fixes the cylinder to the structure From the right valve block 10 comes a hose carry over connection that goes together with the delivery of the valve blocks in the ...

Page 18: ...the aerial part This condition happens when 1 The machine is not stabilized 2 The load sensor is alarmed 3 You select the 200kg way and the Jib is not completely closed On the contrary when the machine is stabilized with a load which is lower than its limit and in the proper functioning way you can go up To excite the electrovalve 8 you need to close the connection to the tank The delivery hose go...

Page 19: ...ters at the sides of the valveblock that limit the spools run bypassing some of the oil to the tank Such settings cannot be altered since the speed of the machine is set by law The connections of the hoses coming from the valveblocks both on the undercarriage and in the basket are usually positioned on the balancing valves ...

Page 20: ...ome of these valves also include the electrovalve for the emergency descend see 2 4 1 20 21 23 On the contrary the valve of the basket levelling cylinder is double 31 The manufacturer sets these valves and they must not be altered tampered with An action on these valves for example releasing the setting screw can increase the descend speed and decrease the setting of the anti shock valve with a co...

Page 21: ...oth raising and descending FUNCTIONING OF THE BASKET LEVELLING The basket levelling during the movement of the first arm the second arm and the jib is mechanic and follows a parallelogram system On the contrary when moving the third arm the basket levelling is hydraulic and is made by two cylinders The first cylinder is located near the second extension and is moved by the third arm The oil pushed...

Page 22: ... and the oil delivered to the piston is conveyed directly to the tank The oil delivered to the rod is conveyed to the tank through a hole Ø 0 3mm that is necessary to avoid couterstokes when you stop the machine and at the same time not to leave the rod side completely free A non returning valve 34 prevents any pressure peaks inside the valveblock from coming back to the valve which would cause a ...

Page 23: ...STEM In the following description we refer to the attached electric system Attachment 2 Attachment 3 Attachment 4 Attachment 5 and to the pictures of the electric components housing below indicated BATTERY TRANSFORMER ...

Page 24: ...anel on the undercarriage part and the other one is on the control panel in the basket these buttons if not powered feed the main line 11 When the line 11 is powered the lamp KL2 indicating the electric panel feeding on the control panel in the basket lights 4 2 STARTING THE THERMIC ENGINE 4 2 1 Starting the thermic engine from the ground Attachment 3 the main line F1 goes into the control panel o...

Page 25: ...e emergency stops are not powered Moreover the main line 11 is fed In order to start the thermic engine the selector 1 on the control panel SC EL DIS EM in attachment 3 must be positioned on the thermic engine as in the scheme 3 open 4 closed When the stop button is not powered and you push the Start button you power the cable 2 then through the selector the cable 4 Attachment 5 The cable 4 energi...

Page 26: ...the thermic engine 4 5 Operations of the platform 4 5 1 Translation and stabilization In order to allow the translation the machine needs to be aligned Attachment 4 The alignment of the photoelectric cell 1 emitter receiver powers the relay KA1 and sends a signal to I8 of the PLC on the contrary the alignment of the reflection photoelectric cell powers the relay KA1 A The two relays in series clos...

Page 27: ...Attachment 3 If you operate the selector 1 SC EL DIS EM closes the circuit 11 energizing KA3 Attachment 4 KA3 feeds the 3 emergency descend coils controlled by the fuse F3 NOTE The line 11 is directly connected to F1 then the emergency descend always works even when the STOP emergency button is activated unless the key is in the OFF position or F1 F3 are burned out 4 7 Load sensor setting The load...

Page 28: ...oad sensor has lost the max load references This can be caused either by an overvoltage or by a replacement of the load sensor or of the circuit board This possibility is very unusual Setting procedure 1 Connect the contacts JP1 and JP2 2 Check that the selector 2 is turned to 20kg 3 Feed the circuit board 4 When the basket is empty push SW1 and then SW2 system s zero setting the leds DL3 and DL4 ...

Page 29: ...29 10 Push SW1 to confirm and close the setting procedure 11 Remove the contacts JP1 and JP2 and put them inside the circuit board s housing ...

Page 30: ...30 4 8 Summary of the check operations of the electric system PLC KA5 F1 F2 F3 KA6 KA4 KA3 KA1 KA2 Q1 KM1 F4 ...

Page 31: ... coil It is to be checked if the Jib cylinder doesn t work KA5 relay activated by the green button for the engine starting It controls the positive pole of the engine starting It is to be checked if the engine doesn t start with the green button KA6 relay activated by the reflection photoelectric cell for the alignment It controls the undercarriage s electrovalve It is to be checked if the underca...

Page 32: ...lace the deviator Overload check the load sensor lamp on the control panel The Jib arm is not closed and the selector 2 is on 200kg load less than 120kg position the selector 2 on 120kg and close the Jib arm Friction of the pins or wrong setting of the load sensor see point 4 5 7 The outriggers don t go up The aerial part is not completely closed or centred check the centering and the lamp to allo...

Reviews:

Related manuals for GOLD LIFT 1470