background image


39


5)


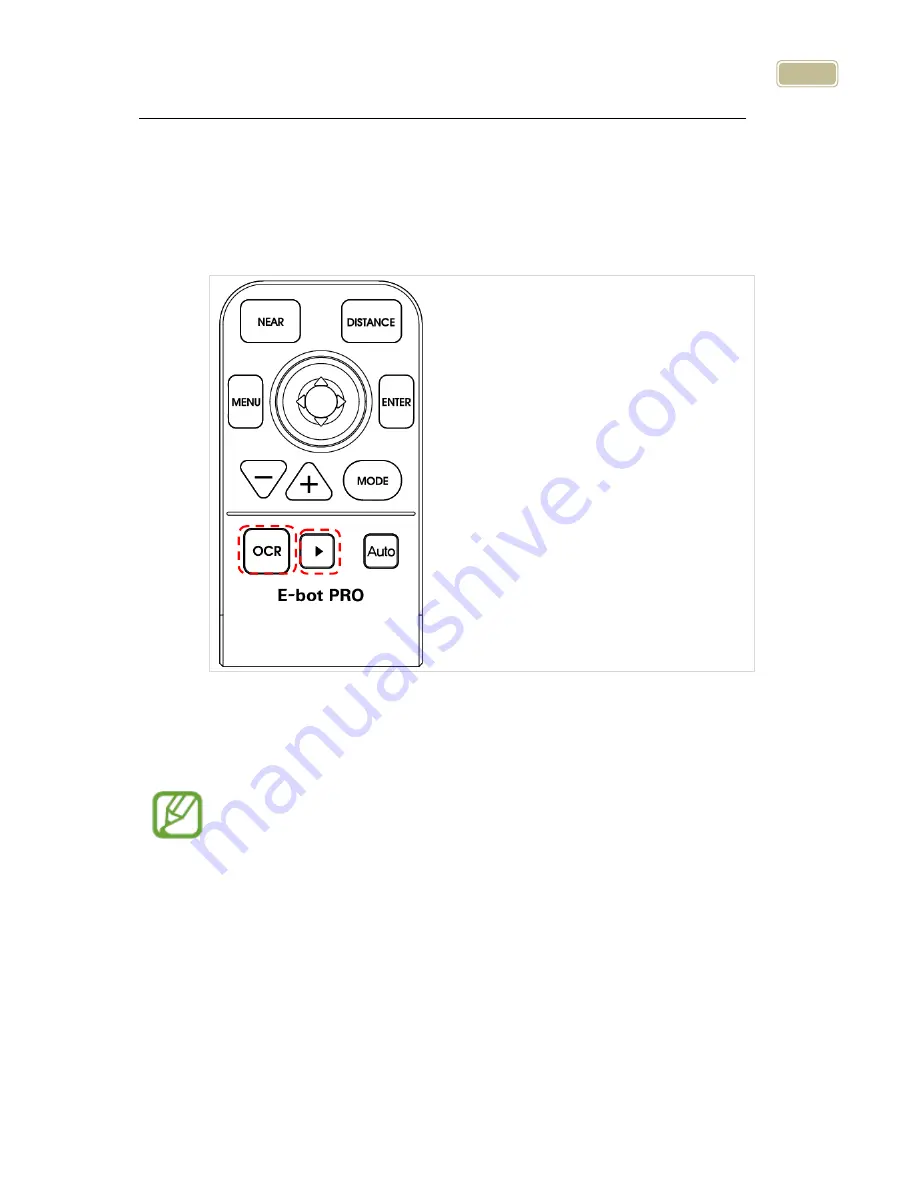
OCR 

Recognizes text under the camera when using near view mode and 
reads it aloud with built-in text-to-speech voices. 


OCR execution 


When using near view, the image freezes when the OCR button is 
pressed. The text displayed on the frozen screen is recognized then 
read aloud using the internal TTS voices. 

While recognition is being performed, a  message indicating 
recognition is in progress appears. Please do not perform other 
functions while recognition is in progress.   

Press  the  Play/Stop button to stop and start reading  text aloud,  if 
the  Play/Stop button is pressed after  text reading has completed, 
reading will start again from the beginning of the text. 

Press the OCR button again to exit the OCR function and return to 
live camera mode. 

∙  OCR button : OCR 

execution


∙    button : OCR Play/Pause 


Summary of Contents for E-bot PRO

Page 1: ......

Page 2: ...the E bot in a moisture rich environment such as a bathroom shower or a wet kitchen counter as moisture may get inside the unit and damage the components 6 Do not use E bot in extreme high or low temp...

Page 3: ...3 Marked Symbol Description Caution is used to note information for safe and proper use of the product Note is used to introduce reference and usage Tips...

Page 4: ...6 4 How to replace a wireless remote control battery 5 Wireless controller Power On Off 6 Power On Off 18 7 Installing the PC Viewer Program Will be added later 20 8 Connecting to displays 20 Basic Fu...

Page 5: ...47 7 Keyboard Hot keys 48 Tablet Viewer Gestures 49 Quick Guide to PC operations 53 Troubleshooting 55 1 When the wireless controller does not work 55 2 Even though the values are the same channel wi...

Page 6: ...E bot 2 1 E bot Battery 3 Wireless controller 4 Battery for Wireless controller 5 AC Adapter 6 Cables USB 3 0 HDMI HDMI to DVI gender 7 Carrying Case 8 Headphones 9 SD Card 16GB 10 User Guide 11 PC i...

Page 7: ...7 E bot PRO Orientation 1 Product Camera Arm Front controller Table Camera Arm Lock button Near Camera Lens Wireless controller SD Card Camera Arm s Joint Camera Arm s Handle...

Page 8: ...duct 3 Side of product Volume Switch Wi Fi switch Wireless Earphone Jack Battery USB 3 0 port PC connection ID switch DC IN port DC OUT port USB Monitor Connection Battery Release button HDMI port Mon...

Page 9: ...roller Near View Button Menu Button Zoom in out Button OCR Button Power LED Enter Button Distance View Button Joystick Navigation Color Change Button Auto Scroll Button Power Button LED Light Button P...

Page 10: ...10 6 Back side of Wireless controller ID Switch Power Switch Battery Battery Cover...

Page 11: ...11 Getting Started 1 Unfolding the E bot Follow the instructions below to setup the E bot Grip the camera handle and unfold it upward...

Page 12: ...12 Continue to unfold the camera until it lays flat on the desk or table top...

Page 13: ...hold the Lock button on the left side of the E bot While holding the lock button unfold the longer arm upward until it clicks in to place The camera arm should be at a 90 degree angle as shown in the...

Page 14: ...14 The E bot is ready for use Folding Press the power button to turn off the power Press the lock button fold the longer arm down Grip the camera piece and fold it inside as well...

Page 15: ...insert the battery When the battery is fully inserted you will feel and hear it click in to place Removing the battery Lift the battery release button on the back side of the unit While lifting the ba...

Page 16: ...ttery is being charged When you use the E bot for the first time or after a long period of disuse please allow the unit to charge for more than 5 hours Charging via USB Connect the larger end of the U...

Page 17: ...tes status as follows When the battery is being charged the Power LED appears red When the battery is fully charged the power LED color is changed to green 4 How to replace the battery on the wireless...

Page 18: ...ler Power On Off Push the power switch on the back of the wireless controller to ON To power it off push the power switch to OFF Once you press the button on the wireless controller the Power LED ligh...

Page 19: ...on the Power LED changes to green When the battery is being charged the Power LED appears red Press the power button briefly again to place the E bot into sleep mode When the power is turned on press...

Page 20: ...es such as desktop video monitors laptop computers and Apple or Android tablets Connecting a monitor HDMI Connect the monitor s power cord to a power outlet Connect the HDMI cable to the HDMI port on...

Page 21: ...may purchase it from HIMS International Connect the On Lap Monitor s USB power cable USB 2 0 to the DC OUT port on the back of E bot Connect On Lap s HDMI cable to E bot s HDMI port to display E bot s...

Page 22: ...method If you connect E bot to a PC which does not support USB 3 0 the enlarged image resolution is automatically adjusted to accommodate the difference in connection speed E bot cannot be supported o...

Page 23: ...is 00000000 Once your PC is connected to the E bot network run the E bot viewer program on your PC and select Wi Fi as the connection method In the E bot s options menu you can change the Wi Fi passw...

Page 24: ...iewer app on your tablet and make sure that the image is displaying correctly In the E bot s options menu you can change the Wi Fi password For instructions on controlling E bot using a tablet please...

Page 25: ...d distance viewing mode The camera mode can be changed by pressing the buttons on the top row of the wireless controller Press the button on the right to switch to Distance view and press the button o...

Page 26: ...camera mode the settings are automatically changed to the settings you last used for that mode 2 Magnification You can change the magnification level to suit your visual needs and the size of the pri...

Page 27: ...hold either of these buttons the magnification level is adjusted continuously 3 Changing the Color Mode You can change the color of the text and or background on the screen to accommodate your visual...

Page 28: ...Green letters black background The E bot PRO allows you to alternate between Natural color mode and your current color mode setting Press the Color Mode button on the wireless remote control for more...

Page 29: ...controller 5 LED light On Off In the near view mode the built in light is automatically turned on to ensure a clear image E bot contains a sensor to detect the amount of illumination in your current...

Page 30: ...ion to find the position of the magnified text you are currently reading in relation to the document placed on the reading plate in front of you or the presentation screen or whiteboard you are viewin...

Page 31: ...tic focus However if you re writing under the camera or doing something else on which you don t want the camera to focus you can use the Focus lock to lock the focus on the text rather than allowing t...

Page 32: ...o near view mode or powering off when focus is locked 8 Freeze Press and release the Play Pause button to take a still shot Press the Play Pause button again to release the still shot and return to th...

Page 33: ...menu button on the wireless controller and a menu window pops up on the left side of the screen Tabs The Menu consists of three tabs Options OCR and Files You can set the options related to magnificat...

Page 34: ...s the Enter button Moving back a level to move back a level in the menu structure press the menu button Closing the Menu To close the menu press the menu button from the top level of the menu structur...

Page 35: ...sing the joystick and press the enter button 3 Color mode settings You can set the color mode to best accommodate your visual condition or the material you are reading You can also disable color modes...

Page 36: ...the text color the Color setting mode is exited without selecting a Background color After you have selected the background color you are returned to the menu window To disable color modes You can dis...

Page 37: ...ing Set Marker There are 4 kinds of markers Horizontal Line Marker Vertical Line Marker Horizontal Window Marker and Vertical Window Marker Horizontal Line Marker Vertical Line Marker Horizontal Windo...

Page 38: ...e menu again to disable the marker Set Marker position and size You can adjust the size of the window marker and location of the line marker Bring up the Menu and select Options then Marker If the lin...

Page 39: ...l TTS voices While recognition is being performed a message indicating recognition is in progress appears Please do not perform other functions while recognition is in progress Press the Play Stop but...

Page 40: ...the Left to move to the previous sentence Move the Joystick Down to move to the next paragraph Move the Joystick Up to move to the previous paragraph Navigate to the place where you want to begin read...

Page 41: ...correction The Angle Correction function corrects the orientation of the text to the horizontal if it is not aligned correctly for more accurate text recognition You can turn this option on or off Br...

Page 42: ...E bot PRO can save videos photo images and OCR recognition files via an SD card Before using the storage function you must insert an SD card images Press the Play Pause button for more than 2 seconds...

Page 43: ...n fast forward through a video using the joystick To delete the video select the delete option in the video section of the Files tab Again you have the two deletion options full size image and select...

Page 44: ...r button to change the setting TTS Volume You can adjust the volume of the TTS voice in two ways Adjusting on the main body E bot s volume dial is located on the right side of the body Turn the dial a...

Page 45: ...select TTS pitch from the OCR tab The TTS pitch can be adjusted among 14 levels Use the Left and Right arrows to control the pitch of the TTS then press Enter to save the setting TTS voice Use this se...

Page 46: ...ew button the camera goes to the set position Set the camera direction Press the menu button Select camera direction from the Options tab Choose from a Vertical or Horizontal Joystick sensitivity Brin...

Page 47: ...version Products serial number Remaining battery Wi Fi AP Information of wireless remote control 6 Wi Fi password change An eight digit number is needed to connect E bot to Wi Fi using an iPad Androi...

Page 48: ...shed the above steps the new password is set 7 Keyboard Hot keys When using the E bot Viewer application on your PC to display and control E bot you can use your keyboard and mouse to control e bot s...

Page 49: ...let Viewer Gestures Functions Tablet Gesture Zoom In Field 1 Move fingers away from each other Zoom Out Field 1 Pinch fingers towards each other Find Position Field 2 Two finger one tap more than 2 se...

Page 50: ...right Previous color mode Field 2 One finger flick to left Switch to Natural Color Mode Field 2 Two finger double tap Contrast Up Field 3 One finger flick to up Contrast Down Field 3 One finger flick...

Page 51: ...ld 1 One finger Double tap Move Sentence Field 1 One finger flick to left or to right Move paragraph Field 1 One finger flick up or down OCR Exit Field 2 One finger Tap for more than 2 seconds OCR mod...

Page 52: ...ger Tap on the tap Move an item One finger Tap on the wanted item Select Set Enter the sub item One finger Tap on the wanted item Save One finger Tap on the confirm icon Cancel Exit One finger Tap on...

Page 53: ...board Mouse Zoom in Wheels up Zoom out Wheels down Find position For more than 2 seconds Next Color Left click Previous Color Right click Quick color change Increase Contrast Decrease Contrast Freese...

Page 54: ...ring OCR menu In OCR mode In OCR mode Right click OCR Mode Real View mode Menu Open Right click Moving tap or Left click on the item Move an item or Left click on the item Select Items Left click on t...

Page 55: ...et differently so that the controllers do not control the wrong E bot etc Check the Main body channel values Please check the channel values on the rear of the Main body An Arrow is pointing to the nu...

Page 56: ...ase change the battery in the wireless controller 2 Even though the values are the same channel wireless remote control does not operate normally Replace the batteries in the wireless remote control 3...

Page 57: ...57 FAX 042 864 0133...

Page 58: ...l not occur in a particular installation If this equipment does cause harmful interference to radio or television reception which can be determined by turning the equipment off and on the user is enco...

Page 59: ...erent from that to which the receiver is con nected Consult the dealer or an experienced radio TV technician for help Caution Modifications not expressly approved by the party responsible for complian...

Page 60: ...pean CE notice to users and product statements This product is CE marked according to the provisions of the R TTE Directive 99 5 EC Hereby HIMS International Corporation declares that this product is...

Page 61: ...or s represent local contacts for this product CORPORATE HEADQUARTERS HIMS International Corporation 174 Gajeong ro Yuseong gu Daejeon KOREA 305 350 Tel 82 42 864 4460 Fax 82 42 864 4462 Web http www...

Page 62: ...nder our sole responsibility that the product s Remote Controller E bot PRO Controller EB100PC to which this declaration relate s is in conformance with the following standards EN 301 489 1 V1 9 2 201...

Reviews: