background image

Step By Step Instructions for Typical Use Cases 

67/89 

NXHX 52-JTAG | Getting Started  
DOC131004GS02EN | Revision 2 | English | 2013-11 | Released | Public  

© Hilscher 2013 


 The 

Device

 and 

Network

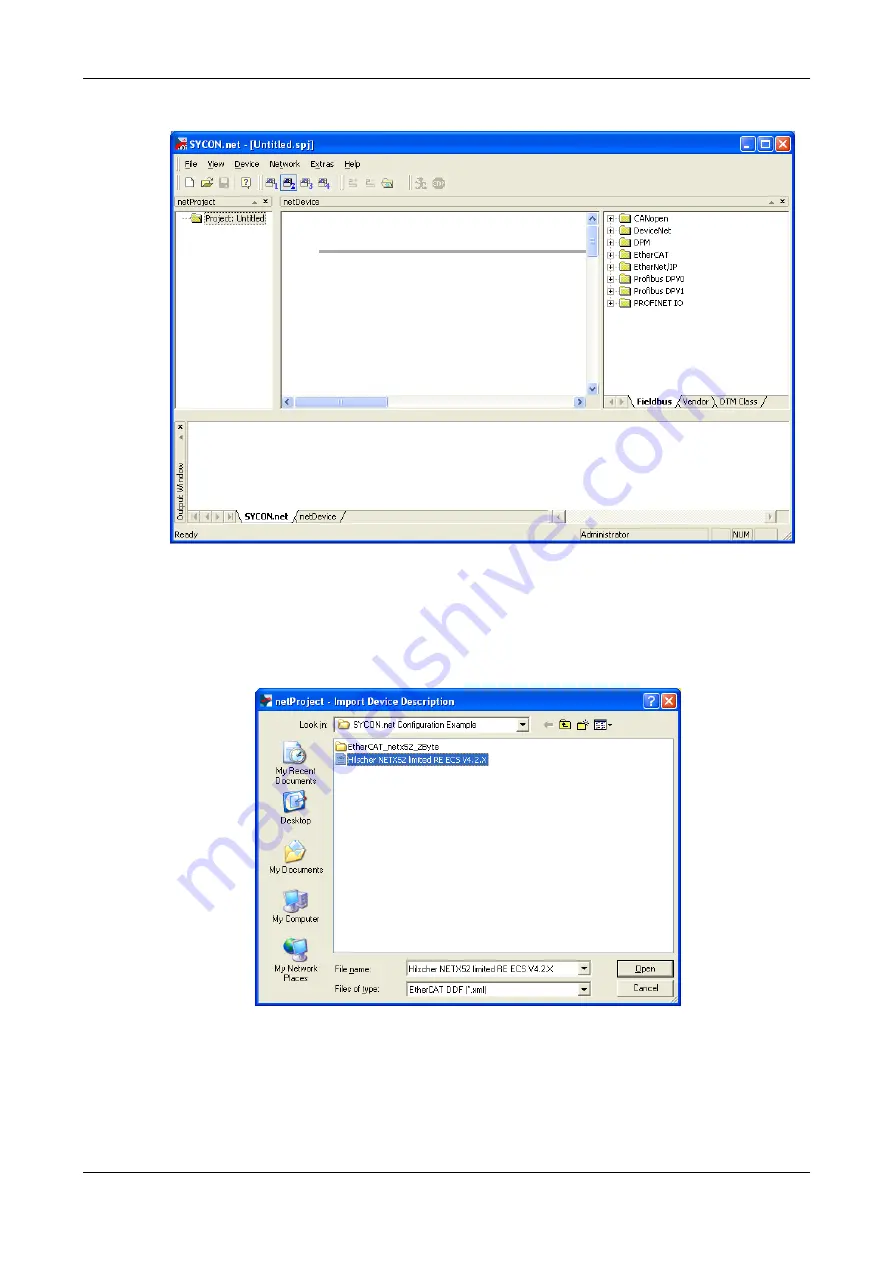
 menus are displayed in the menu bar: 


Figure 63: Empty Project in SYCON.net  


2. Import EtherCAT slave device description file for the NXHX board. 

  In the menu, choose 

Network 

>

 Import device description…


 The 

Import


Device Description

 dialog opens: 


Figure 64: Import Device Description  

 In 

the 

Files of type

 field, select 

EtherCAT DDF [*.xml]

  Navigate to the 

Examples and API\Targets\LFW\1. LFW netX 

Toolkit\Firmware\ETHERCAT\SYCON.net Configuration 

Example


directory on the product DVD. 

Summary of Contents for NXHX 52-JTAG

Page 1: ...Getting Started NXHX 52 JTAG Hilscher Gesellschaft f r Systemautomation mbH www hilscher com DOC131004GS02EN Revision 2 English 2013 11 Released Public...

Page 2: ...2 2 3 Using cifX Toolkit 10 2 3 Using the Application Examples on the Product DVD 10 2 3 1 Overview 10 2 3 2 Using Waf to Build the Application Examples 11 2 3 3 Using Eclipse to Build the Application...

Page 3: ...w 33 5 6 2 Prerequisites 33 5 6 3 Step by Step Instructions 34 5 7 Downloading NXF Firmware to Serial Flash of the NXHX 52 JTAG via USB 44 5 7 1 Overview 44 5 7 2 Prerequisites 44 5 7 3 Step by Step I...

Page 4: ...2 List of Revisions Index Date Chapter Revisions 1 2013 10 25 All Created 2 2013 11 13 5 8 Settings for Parallel Dual Port Memory 16 Bit Mode at Switch S2 updated according to hardware revision 3 Tab...

Page 5: ...documentation were created for the use of the products by qualified experts however errors cannot be ruled out For this reason no guarantee can be made and neither juristic responsibility for erroneou...

Page 6: ...traffic communication sys tems in life support systems in systems in which failures in the software could lead to personal injury or injuries leading to death We inform you that the software was not d...

Page 7: ...stration Act and its additional provisions You are obligated to comply with the regulations at your personal responsibility We wish to inform you that you may require permission from state authorities...

Page 8: ...g and debugging with a debugger of your choice Both build systems use Mentor Code Sourcery GNU GCC as tool for compiling C source code Detailed instructions on how to build the application examples an...

Page 9: ...the NXHX 52 JTAG board After download to flash the SSBL will be started by the ROM loader after every power on reset of the board given that flash boot mode is configured The SSBL then in turn starts...

Page 10: ...etailed information about the cifX Toolkit please refer to the Toolkit Manual cifX netX Toolkit DPM DOC090203TKxxEN which is stored in the Driver and Toolkit Driver Toolkit NXDRV TKIT Documentation di...

Page 11: ...xxEN which is stored in the Documentation 4 Tool Manuals Bootwizard directory of the NXHX 52 JTAG product DVD 2 3 2 Using Waf to Build the Application Examples If you use Waf you can build all of the...

Page 12: ...X1 Host interface X30 RJ45 Connector Ethernet interface CH1 Matrix Label X30 RJ45 Connector Ethernet interface CH0 V1 System status LED yellow green V30 Communication status LED COM 0 green red V31 Co...

Page 13: ...English 2013 11 Released Public Hilscher 2013 No in figure Name Description Drilling for attaching fieldbus interface to X6 S1 Boot strap options T1 Power On Reset X3 Mini B USB connector X4 JTAG Inte...

Page 14: ...4 V 6V Use the Hilscher NXAC Power adapter part number 7930 000 Device Destruction Use only the permissible supply voltage of 24V DC 6V to operate the NXHX 52 JTAG Operating the NXHX 52 JTAG with a su...

Page 15: ...piling the C source code provided on the product DVD 5 1 2 Prerequisites NXHX 52 JTAG Product DVD You have access to the internet for downloading Code Sourcery 5 1 3 Step by Step Instructions Open Sof...

Page 16: ...pment PC see Installing Code Sourcery Compiler on Your Development PC section on page 15 You have copied the Examples and API folder from the product DVD to a local path on your development PC 5 2 3 S...

Page 17: ...5 Execute Build bat Note If you later want to debug the produced ELF files with a debugger of your choice use the debug option If you don t want to debug them use the release option Waf starts to buil...

Page 18: ...to produce ELF files from different examples and for different purposes at different times i e debugging or release you can create separate customized Build bat batch files for each target and purpos...

Page 19: ...lose the wscript file Using Command Prompt 2 Open the command prompt on your development PC In the Windows Start menu choose All Programs Accessories Command Prompt The Command Prompt opens Figure 7 C...

Page 20: ...te If you want to build a different application not the rcX_Tasks application look up the APPNAME in the wscript file belonging to the corresponding application example and enter it behind the target...

Page 21: ...you want to use the batch file to build an ELF from the rcX Tasks application example for the purpose of debugging you could name it Build_rcx_Task_debug bat 3 Edit batch file Select your copy of the...

Page 22: ...ng cmd C waf bat build target rcX_Tasks install conditions debug Figure 12 Edited Build bat File Note The parameters are case sensitive therefore mind the upper case X in rcX_Tasks If you want to buil...

Page 23: ...ile Double click your edited copy of the Build bat file Waf starts to build the application example i e the rcX_Tasks example according to the options specified in the batch file It creates a build Ta...

Page 24: ...nd API folder of the product DVD at once 5 4 2 Prerequisites You have installed Code Sourcery G Lite for ARM EABI on your development PC see Installing Code Sourcery Compiler on Your Development PC se...

Page 25: ...ish 2013 11 Released Public Hilscher 2013 In the menu bar choose File Import The Select screen of the Import dialog window opens Figure 14 Select Screen Under Select an import source select General Ex...

Page 26: ...ts screen click Browse button The Browse For Folder dialog opens Figure 16 Browse For Folder Dialog Select the Examples and API folder which you have copied from the product DVD to a local path on you...

Page 27: ...glish 2013 11 Released Public Hilscher 2013 The Import dialog closes and the Project Explorer in Eclipse displays the chosen project Figure 18 Imported Project in Eclipse 2 Configure project Open Make...

Page 28: ...g or build release Note If you later want to debug the produced ELF files with a debugger of your choice use the debug option If you don t want to debug them use the release option Eclipse starts to b...

Page 29: ...on on your PC In the menu of the NXHX 52 JTAG product DVD choose Software and Tools Bootwizard to open the Tools Bootwizard folder then dou ble click bootwizard_1 3 xxxxx x_setup exe file The compiler...

Page 30: ...select the toolchain that was used to build the ELF in our example this is Codesourcery Click Load ELF binary button next to the Input file field The Select an input file dialog window opens Navigate...

Page 31: ...h is used on the NXHX 52 JTAG board the setting you choose in the right drop down list of the Source device parameter is actually of no consequence However any one of these entries must be selected ot...

Page 32: ...binary can then be downloaded and stored in the flash memory of the NXHX 52 JTAG board by the Bootwizard via serial interface Because both files are in essence executable binary images the procedure...

Page 33: ...refer to the Operating Instruction Manual netX Bootwizard DOC070502OIxxEN which is stored in the Documentation 4 Tool Manuals Bootwizard directory of the product DVD Note To ensure successful download...

Page 34: ...11 Released Public Hilscher 2013 5 6 3 Step by Step Instructions 1 Start the Bootwizard application on your PC In the Windows Start menu choose All Programs Hilscher GmbH Bootwizard Bootwizard The Boo...

Page 35: ...h 2013 11 Released Public Hilscher 2013 The Bootwizard shows the fields and controls for the Write to flash task Figure 26 Bootwizard Write to Flash Screen 3 Select the image to be downloaded In the I...

Page 36: ...Examples and API Targets LFW 1 LFW netX Tool kit Firmware ETHERCAT 2nd Stage Loader directory on the product DVD Select the image file in case of the SSBL for EtherCAT this is the NXHX52JTAG_2ndStageL...

Page 37: ...on the NXHX board see position in Device Drawing and Positions of the NXHX 52 JTAG section on page 12 and connect the USB cable to your PC You may have to push the Reset button T1 on the NXHX board a...

Page 38: ...Click Next button In the next screen answer the question What do you want the wizard to do by selecting Install the software automatically option Click Next Windows then copies the driver files to the...

Page 39: ...52 Bootmonitor Figure 30 Check USB Connection to netX 52 Bootmonitor in Windows XP The number of the COM port of your PC currently connected to the NXHX board is indicated in brackets In this example...

Page 40: ...ns In the Hardware and Sound window below Devices and Printers click Device Manager entry The Device Manager window opens Check the entries under Ports COM LPT for the netX52 Bootmonitor Figure 31 Che...

Page 41: ...wnload image file In the Bootwizard click Flash button Figure 32 Write to Flash Screen The plugin selector opens Figure 33 Plugin Selector for netX 52 Rom Loader Select the COM port connected to the n...

Page 42: ...hown Figure 35 Flashing Successful Message The SYS LED on the NXHX board see position in Device Drawing and Positions of the NXHX 52 JTAG chapter on page 12 shows steady yellow 10 Change boot mode and...

Page 43: ...and Positions of the NXHX 52 JTAG chapter on page 12 The executable binary image is loaded from flash memory and then runs in the internal RAM of the netX 52 In case of the Second Stage Bootloader the...

Page 44: ...need to be installed on your PC The ready made LFW EtherCAT slave NXF firmware for testing and evaluation purposes limited IO data exchange of 2 Bytes which is downloaded in this section is stored on...

Page 45: ...JTAG chapter on page 12 alternating between yellow and green 2 Establish USB connection Plug an USB cable into the Mini B USB socket on the NXHX board see position in Device Drawing and Positions of t...

Page 46: ...to the NXHX board is indicated in brackets In this example COM29 is connected to the netX 52 i e the Second Stage Bootloader running in the netX 52 controller on the NXHX board 3 Check USB connection...

Page 47: ...Explorer to open the directory Tools netX Transport on the DVD Double click netHOST exe The netHOST Device Test Application opens Figure 38 netHOST Device Test Application Start Screen 5 Open connect...

Page 48: ...Public Hilscher 2013 The Channel Selection dialog box closes and back in the netHOST Device Test Application window the header displays the selected channel Figure 40 netHOST Device Test Application...

Page 49: ...irmware file which you want to download The EtherCAT slave NXF firmware is stored on the product DVD in the Examples and API Targets LFW 1 LFW netX Toolkit Firmware ETHERCAT directory Select ECSV4_52...

Page 50: ...oad 8 Reset NXHX board to start the firmware Disconnect the USB cable from the NXHX board Push the Reset button T1 on the NXHX board see position in Device Drawing and Positions of the NXHX 52 JTAG ch...

Page 51: ...on is stored on the product DVD in the Examples and API Targets LFW 1 LFW netX Toolkit Firmware ETHERCAT directory 5 8 2 Prerequisites Hilscher NXPCA PCI Adapter Board part number 7902 100 Hilscher CA...

Page 52: ...d by parts with more than 50V First disconnect the power plug of the PC Make sure that the power supply is off at the PC Figure 44 Connecting NXHX Board to PC via Adapter Board On the NXPCA PCI board...

Page 53: ...stallation of the appropriate driver If you are using Windows 7 or 8 Under Windows 7 and 8 the Installing device driver software message appears in the Windows task bar If you have already installed t...

Page 54: ...ttings S2 SW Setting 1 off 2 on 3 off 4 on 5 on 6 on Table 6 Set Parallel Dual Port Memory 16 Bit Mode at Switch S2 for Hardware Revision 2 If you are using an NXHX 52 JTAG board hardware revision 3 u...

Page 55: ...e the NXPCA PCI driver before firmware download Before you can download the firmware file you have to acquaint the Windows driver on your development PC with the new system channel in the Dual Port Me...

Page 56: ...onds then open the context menu on the NX PCA PCI entry again and select Enable Figure 46 Enable NXPCA PCI in Device Manager Windows XP You can now proceed to download the firmware 7 Open cifX Driver...

Page 57: ...choose Control Panel The Control Panel opens In the navigation bar of the Control Panel click on button and select All Control Panel Items entry Figure 48 Control Panel in Windows 7 The All Control P...

Page 58: ...scher 2013 The cifX Driver Setup Utility window opens Figure 50 cifX Driver Setup Utility Start Screen 8 Select communication channel In the Device List in the folder Active Devices click on cifX0 ent...

Page 59: ...development PC e g the NXHX board and also a PC Card cifX In the Device List in the folder Active Devices cifX0 click CH 0 entry Note A firmware and a configuration file can be assigned to each of th...

Page 60: ...og window opens Figure 53 cifX Driver Setup Utility Open File Dialog Navigate to the directory where the NXF firmware is stored If you want to use the EtherCAT slave firmware navigate to the Examples...

Page 61: ...the cifX Test Application is accessing the NXHX board at the same time during download the following warning is displayed Figure 56 Device Still Accessed Warning In this case close the other program...

Page 62: ...The NXHX board is connected to the configuration PC via NXPCA PCI Adapter Board and CAB NXPCA PCI cable Instructions for this can be found in the Downloading NXF Firmware via PCI and Host Interface se...

Page 63: ...ol Panel Items cifX Setup The cifX Driver Setup Utility window opens Figure 57 cifX Driver Setup Utility Start Screen 2 Select communication channel of the NXHX board Note If you have connected two Hi...

Page 64: ...ost interface in the previous chapter see section Downloading NXF Firmware via PCI and Host Interface on page 51 Figure 58 Connected NXHX Board in cifX Driver Setup Utility 3 Configure EtherCAT slave...

Page 65: ...g the parameters click OK button The Change Warm Start Parameters dialog window closes 4 Download EtherCAT slave parameters to NXHX board In the footer of the main window click Apply button Figure 60...

Page 66: ...9 3 2 Configuring PC Card cifX as EtherCAT Master 1 Start SYCON net configuration software In the Windows Start menu select All Programs SYCON net System Configurator SYCON net A login dialog appears...

Page 67: ...63 Empty Project in SYCON net 2 Import EtherCAT slave device description file for the NXHX board In the menu choose Network Import device description The Import Device Description dialog opens Figure...

Page 68: ...orted and the following dialog opens Figure 65 Reload Catalog Confirmation Dialog Click Yes The catalog is updated Figure 66 Catalog Reloaded 3 Open EtherCAT configuration project in SYCON net In the...

Page 69: ...then click Open The project is opened in SYCON net Figure 68 Opened EtherCAT Project in SYCON net 4 Assign driver to PC Card cifX EtherCAT master Double click the CIFX_RE_ECM symbol in the bus configu...

Page 70: ...Revision 2 English 2013 11 Released Public Hilscher 2013 The Driver list opens Figure 69 Choose Driver for PC Card cifX Check the box in front of the cifX Device Driver entry and click Apply button I...

Page 71: ...displayed as CIFX 50 RE in the list Figure 70 Assign Driver to PC Card cifX Check the box in front of the CIFX 50 RE entry and click Apply button You have assigned the driver for the PC Card cifX 5 D...

Page 72: ...indow opens Figure 71 Firmware Download Dialog in SYCON net Click Browse button to choose the firmware which you want to load into the PC Card cifX The Select Firmware File dialog opens Figure 72 Sele...

Page 73: ...lick Open button Name and version of the selected firmware are displayed in the Firmware Download window Figure 73 Downloading Firmware to PC Card cifX Check whether you have selected the right firmwa...

Page 74: ...se the right mouse button to open the context menu In the context menu select Download Figure 74 Download Configuration to PC Card cifX Answer the configuration download confirmation request with Yes...

Page 75: ...ge 62 The NXHX board is connected to the configuration PC via NXPCA PCI Adapter Board and CAB NXPCA PCI cable Instructions for this can be found in the Downloading NXF Firmware via PCI and Host Interf...

Page 76: ...connection between SYCON net and the PC Card cifX Open your configuration project in SYCON net Select the CIFX_RE_ECM symbol and use the right mouse button to open the context menu In the context menu...

Page 77: ...2EN Revision 2 English 2013 11 Released Public Hilscher 2013 2 Open Diagnosis for PC Card cifX EtherCAT master in SYCON net Select the CIFX_RE_ECM symbol and use the right mouse button to open the con...

Page 78: ...sh 2013 11 Released Public Hilscher 2013 The General Diagnosis dialog window opens Figure 77 General Diagnosis for PC Card cifX Check whether the LEDs for Communication Operate Run and Bus ON are gree...

Page 79: ...N Revision 2 English 2013 11 Released Public Hilscher 2013 3 Open IO Monitor In the Navigation Area choose Tools IO Monitor The IO Monitor dialog window opens Figure 78 IO Monitor for PC Card cifX Lea...

Page 80: ...en and wait for a few seconds After a while the Channel Selection dialog box opens Figure 80 Channel Selection Dialog In the left part of the dialog box select the channel of the cifX driver to which...

Page 81: ...tion window the header displays the selected channel Figure 81 cifX Test Application After Channel Selection 6 Send I O Output data from IO Device to IO Controller In the menu choose Data Transfer I O...

Page 82: ...be sent to the EtherCAT master i e the PC Card cifX Keep in mind that the EtherCAT firmware for testing and evaluation purposes is limited to two Bytes IO data exchange For instance you can enter the...

Page 83: ...glish 2013 11 Released Public Hilscher 2013 7 Read I O data from EtherCAT slave in SYCON net IO Monitor Change to the IO Monitor window in SYCON net Figure 84 Incoming Data in IO Monitor The data whic...

Page 84: ...ve In the Output data area of the IO Monitor enter output data that can be sent from EtherCAT master i e the PC Card cifX to the EtherCAT slave i e the NXHX board For instance you can enter the value...

Page 85: ...d Public Hilscher 2013 9 Read I O data EtherCAT master in cifX Test Application Change to the cifX Test Application The data which has been sent from the EtherCAT master i e the PC Card cifX is displa...

Page 86: ...22 Select ELF File Dialog 30 Figure 23 ELF File Loaded 31 Figure 24 Generate Boot Image Screen 32 Figure 25 Bootwizard Start Screen 34 Figure 26 Bootwizard Write to Flash Screen 35 Figure 27 Select In...

Page 87: ...ure 64 Import Device Description 67 Figure 65 Reload Catalog Confirmation Dialog 68 Figure 66 Catalog Reloaded 68 Figure 67 Open Project Dialog 68 Figure 68 Opened EtherCAT Project in SYCON net 69 Fig...

Page 88: ...Printed Circuit Board 13 Table 3 Settings for Serial Boot Mode at Switch S1 37 Table 4 Set Flash Boot Mode at Switch S1 42 Table 5 Set Flash Boot Mode at Switch S1 45 Table 6 Set Parallel Dual Port M...

Page 89: ...Phone 33 0 4 72 37 98 40 E Mail fr support hilscher com India Hilscher India Pvt Ltd New Delhi 110 065 Phone 91 11 43055431 E Mail info hilscher in Italy Hilscher Italia S r l 20090 Vimodrone MI Phon...

Reviews: