background image

Wireless Bridge (Client) User Manual 

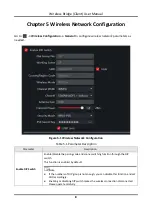
Parameter 

Description 


Dial Group No. 

1 to 16 indicate different numbers of groups. This information is only displayed 
when DIP switch is enabled. 

Working Scene 


DIP switch enabled: The web displays the selected working scene of the device. 
If AP is selected on the device, the web displays AP in Working Scene
If CPE is selected on the device, the web displays CPE in Working Scene


DIP switch disabled: You can set Working Scene as desired through the web. 
Select AP to set AP as Working Scene
Select CPE to set CPE as Working Scene.   

SSID 


By default, the SSID is determined by the dial group number, and the CPE pairs 
with the AP according to SSID. 


If DIP switch is disabled, you can set SSID as desired. 


It is recommended to hide the SSID of APs for security. 

Country/Region Code 

Set when activating the device. It is unchangeable after selected, unless you restore 
all the settings to default settings. 

Wireless Mode 

Default value: 802.11ac. It is not configurable. 

Channel Width 


For APs: Three channel widths available: 20 MHz, 40 MHz, and 80 MHz. The 
specific value depends on the country/region code. 


For CPEs: The channel width is automatically changed according to the AP. It is 
not configurable. 

Channel 


For APs: Auto is set by default. You can set a desired one.   


For CPEs: Auto is set by default. It is not configurable. 

Security Mode 


WPA2-PSK is set by default, and the encryption method is AES. 


If Not-Encrypted is selected, there is no need to set PSK Secret Key

PSK Secret Key 

The pairing password for CPEs and APs. If WPA2-PSK is set as Security Mode, you 
should configure PSK Secret Key


Summary of Contents for iVMS-4200

Page 1: ...Wireless Bridge Client User Manual ...

Page 2: ... BY YOU IS AT YOUR OWN RISK IN NO EVENT WILL HIKVISION BE LIABLE TO YOU FOR ANY SPECIAL CONSEQUENTIAL INCIDENTAL OR INDIRECT DAMAGES INCLUDING AMONG OTHERS DAMAGES FOR LOSS OF BUSINESS PROFITS BUSINESS INTERRUPTION OR LOSS OF DATA CORRUPTION OF SYSTEMS OR LOSS OF DOCUMENTATION WHETHER BASED ON BREACH OF CONTRACT TORT INCLUDING NEGLIGENCE PRODUCT LIABILITY OR OTHERWISE IN CONNECTION WITH THE USE OF...

Page 3: ... CHEMICAL OR BIOLOGICAL WEAPONS ANY ACTIVITIES IN THE CONTEXT RELATED TO ANY NUCLEAR EXPLOSIVE OR UNSAFE NUCLEAR FUEL CYCLE OR IN SUPPORT OF HUMAN RIGHTS ABUSES IN THE EVENT OF ANY CONFLICTS BETWEEN THIS MANUAL AND THE APPLICABLE LAW THE LATER PREVAILS ...

Page 4: ...ng two conditions 1 This device may not cause harmful interference 2 This device must accept any interference received including interference that may cause undesired operation EU Conformity Statement This product and if applicable the supplied accessories too are marked with CE and comply therefore with the applicable harmonized European standards listed under the EMC Directive 2014 30 EU the RoH...

Page 5: ...Wireless Bridge Client User Manual iv Industry Canada ICES 003 Compliance This device meets the CAN ICES 3 A NMB 3 A standards requirements ...

Page 6: ...gradation or unexpected results Note Provides additional information to emphasize or supplement important points of the main text Safety Instruction Danger This is a class A product and may cause radio interference in which case the user may be required to take adequate measures No naked flame sources such as lighted candles should be placed on the equipment The serial port of the equipment is use...

Page 7: ...trical safety regulations of the nation and region The socket outlet shall be installed near the equipment and shall be easily accessible Do not connect several devices to one power adapter as adapter overload may cause overheating or a fire hazard Please make sure that the plug is firmly connected to the power socket ...

Page 8: ...formation 10 6 2 User Management 10 6 3 Device Maintenance 11 6 4 Log Management 11 6 5 Security Configuration 12 Chapter 7 FAQ 13 7 1 Why the device cannot start up 13 7 2 Why devices pairing failed 13 7 3 Why the wireless connection rate is relatively low 13 7 4 Why the signal intensity is too low 13 7 5 Why the throughput is inadequate even with high signal quality 14 7 6 Why there are excessiv...

Page 9: ...1 Chapter 1 Introduction You can manage and configure the device through iVMS 4200 including device management network configuration system configuration etc Note The wireless bridges vary with different models The actual device prevails ...

Page 10: ...the Device For the inactive devices you are required to create a password to activate them before they can be added to the software and work properly Before You Start Make sure the device to be activated is connected to the network and is in the same network segment with the PC running the client Steps Note This function should be supported by the device 1 Run iVMS 4200 software 2 Go to Device Man...

Page 11: ...ce adding modes including IP domain IP segment cloud P2P ISUP protocol and HiDDNS The client also supports importing multiple devices in a batch when there are large amount of devices to be added The section only introduces one mode namely adding a detected online device Steps 1 Go to Device Management Device 2 Click Online Device to show the online devices The searched online devices are displaye...

Page 12: ...of your product And we recommend you change your password regularly especially in the high security system changing the password monthly or weekly can better protect your product Proper configuration of all passwords and other security settings is the responsibility of the installer and or end user 6 Check Synchronize Time to synchronize the device time with the PC running the client after adding ...

Page 13: ...o the actual device Figure 3 1 Device Status Device Status View the device usage device panel status and port information Basic Wireless Settings View the channel width channel frequency working scene transmit power etc Port Status View the bitrate duplex and flow control of ports Port Statistics View the number of bytes sent or received the number of packets sent or received sending or receiving ...

Page 14: ...Wireless Bridge Client User Manual 6 Note Drag the sliding bar on the bottom to view all data ...

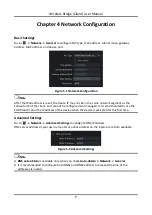
Page 15: ... so it cannot be configured and managed It is recommended to use the SADP tool to plan the IP address of the device when the device is activated for the first time Advanced Settings Go to Network Advanced Settings to configure DNS IP address DNS server address of your own computer or public address on the internet are both available Figure 5 2 Advanced Settings Note DNS auto obtain is available on...

Page 16: ...uration Table 5 1 Parameter Description Parameter Description Enable DIP Switch Enable Disable the pairing code and scene switching function through the DIP switch This function is enabled by default Note If the numbers of DIP group is not enough you can disable this function and set SSID accordingly Enabling or disabling DIP switch makes the wireless connection disconnected Please operate careful...

Page 17: ... you can set SSID as desired It is recommended to hide the SSID of APs for security Country Region Code Set when activating the device It is unchangeable after selected unless you restore all the settings to default settings Wireless Mode Default value 802 11ac It is not configurable Channel Width For APs Three channel widths available 20 MHz 40 MHz and 80 MHz The specific value depends on the cou...

Page 18: ...evice name device model serial No and program version 6 2 User Management The device only supports one admin user Users cannot be added or deleted You can only edit the passwords IP addresses and permissions of the user Steps 1 Go to System User 2 Click Edit or double click the user to edit the password IP address or permission of the user Figure 7 1 User Parameters ...

Page 19: ...ttings Except network configuration and user parameters all of the other parameters are restored to the default settings Restore All All parameters are restored to the default settings After restoration the device needs to be activated again Import Configuration File Select the configuration file and enter the password for file export After import the devices will be restarted automatically Export...

Page 20: ... locked because you enter a wrong password the admin user can log in to the client at the PC the IP is not locked and enter the Security interface to unlock the locked IP Steps Note If you need to unlock it immediately you can contact the admin user 1 Select System Security 2 Unlock the desired IPs Click unlock icon to unlock a single IP Click Unlock All to unlock all of the IPs Note If the admin ...

Page 21: ...E are directly faced to each other and the distance between them is within the limit 2 DIP switch enabled Ensure the pairing codes of the AP and CPE are consistent 3 DIP switch disabled Ensure the SSID name and PSK password are correct 7 3 Why the wireless connection rate is relatively low Reason The wireless system makes connection with its maximum working rate and the actual rate depends on the ...

Page 22: ...requency Method of changing frequency Reboot the AP of wireless bridge to allow auto search of available signal channel 2 Change a network cable or use another PC 7 6 Why there are excessive packet loss and time delay when PC Pings the device IP address Reason 1 The registered jack of the network cable is not firmly connected 2 The IP address of multiple devices conflict Solution Port isolation sh...

Page 23: ...Wireless Bridge Client User Manual 15 Appendix A Communication Matrix Please scan the QR code below to view the communication matrix document Figure A 1 Communication Matrix ...

Page 24: ...UD25099B ...

Reviews: