HIKVISION DS-TP50-12DT User Manual Download Page 8

DS-TP50-12DT Terminal Server User Manual 

Chapter 2 Introduction and Interfaces 

Purpose: 

DS-TP50-12DT as a traffic dedicated terminal server provides multiply features, including video 
management, traffic data management, video and audio decoding, picture processing, network 
transmission, etc. It integrates 16 network ports and 2 fiber ports, effectively meets the demands 
of distributed storage and accessing to surveillance management platform. Owning to the above 
features, DS-TP50-12DT series is widely applied in checkpoint, E-police, traffic surveillance system, 
etc. 

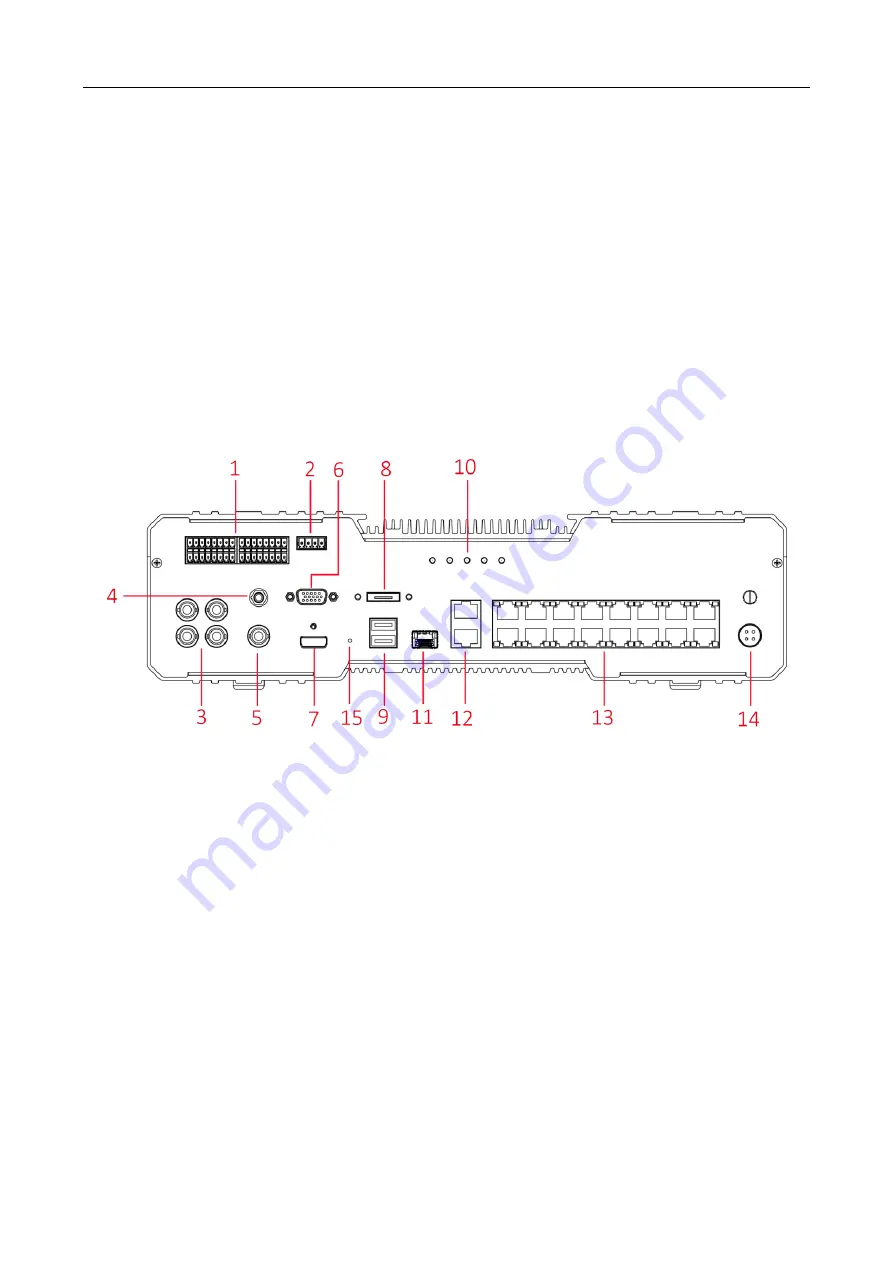
The front panel view is shown below: 


Figure 2-1


Front Panel View 

Summary of Contents for DS-TP50-12DT

Page 1: ...DS TP50 12DT Terminal Server User Manual...

Page 2: ...s mentioned below are the properties of their respective owners Legal Disclaimer TO THE MAXIMUM EXTENT PERMITTED BY APPLICABLE LAW THE PRODUCT DESCRIBED WITH ITS HARDWARE SOFTWARE AND FIRMWARE IS PROV...

Page 3: ...Provides additional information to emphasize or supplement important points of the main text Indicates a potentially hazardous situation which if not avoided could result in equipment damage data loss...

Page 4: ...is firmly connected to the power socket If smoke odor or noise rise from the device turn off the power at once and unplug the power cable and then please contact the service center Preventive and Cau...

Page 5: ...External Network Settings 18 4 2 Internal Network Settings 19 4 3 DDNS Settings 19 4 4 More Settings 21 4 4 1 Port Settings 22 4 4 2 Remote Access Configuration 22 4 4 3 HTTPS Configuration 23 4 4 4 S...

Page 6: ...a Uploading Configuration 56 Chapter 12 Status Information 58 12 1 Server Status 58 12 2 Camera Status 58 Chapter 13 Other Settings 60 13 1 User Management 60 13 1 1 Adding a User 60 13 1 2 Modifying...

Page 7: ...o output Powers external device like external HDD with 12 VDC power output Easy to dismounting design makes HDD convenient to maintenance Low consumption and lower heat generation GPS time synchroniza...

Page 8: ...ement video and audio decoding picture processing network transmission etc It integrates 16 network ports and 2 fiber ports effectively meets the demands of distributed storage and accessing to survei...

Page 9: ...ut 2 HD TVI video input 2 HD TVI loop output 4 ANT Antenna interface 5 CVBS CVBS output interface 6 VGA VGA interface 7 HDMI HDMI interface 8 eSATA eSATA interface 9 USB 2 USB 2 0 10 Indicators 5 stat...

Page 10: ...Make sure the power supply is plugged into an electrical outlet It is HIGHLY recommended that an Uninterruptible Power Supply UPS be used in conjunction with the device 3 1 2 Shutt Down Unplug the pow...

Page 11: ...he default IP address for G2 network interface is 192 0 0 64 Step 1 Enter device IP address in address bar of the browser and press Enter Thus the activation interface pops up Step 2 Enter the Admin P...

Page 12: ...list in the menu bar including Live View Playback Traffic Log and Configuration This section will introduce the contents provided by the five menus Figure 3 3 Menu Bar 3 4 1 Live View Interface Purpo...

Page 13: ...DS TP50 12DT Terminal Server User Manual 12 Figure 3 4 Live View Interface...

Page 14: ...tion and hue for the selected camera 5 Live View Control Bar Live view control is provided For details please refer to Table 3 2Live View Control Bar Table 3 2 Live View Control Bar Description Icon D...

Page 15: ...s and added IP cameras 2 Playback Window Display the playback image 3 Playback Status Show the playback status including playback camera No and playback speed 4 Calendar Select a day to play back reco...

Page 16: ...selected camera Stop playback for selected camera Download record files Slow forward Start stop clipping Fast forward Enable disable audio Start single frame playback 3 4 3 Traffic Interface Purpose...

Page 17: ...6 Log Interface Description No Name Description 1 Search Results Display the log search results 2 Search Conditions Configure log search conditions 3 4 5 Configuration Interface Purpose You can config...

Page 18: ...T Terminal Server User Manual 17 Table 3 7 Configuration Interface Description No Name Description 1 Menu List Display the main menu and sub menu 2 Parameter Area Shown or configure parameters of a ce...

Page 19: ...tion Remote Configuration Network Settings External Network Settings Figure 4 1 Basic Network Settings Step 2 Set the NIC Settings 1 Select the NIC Type in the dropdown list 2 Enter IPv4 Address IPv4...

Page 20: ...s IPv4 Subnet Mask IPv4 Default Gateway Or you can select DHCP Dynamic Host Configuration Protocol to obtain IPv4 address dynamically Step 3 Set the DNS Server Enter the Preferred DNS Server and Alter...

Page 21: ...NS Type DynDNS 1 Enter Server IP for DynDNS server 2 In the Domain text field input the domain obtained from the DynDNS website 3 Enter User Name and Password registered in the DynDNS website and Conf...

Page 22: ...omain obtained from the NO IP website www no ip com 3 Enter the User Name and Password registered in the NO IP website and Confirm the password 4 Click Save to save the settings Figure 4 6 NO IP 4 4 M...

Page 23: ...Port Port for browser to access the device Step 3 Click Save to save the settings Restart the device to activate the new settings 4 4 2 Remote Access Configuration Purpose SSH Secure Shell as a secur...

Page 24: ...cess the device by inputting https 192 0 0 64 443 via the web browser Step 1 Go to Configuration Remote Configuration Network Settings HTTPS Step 2 Create the self signed certificate or authorized cer...

Page 25: ...r receiving the signed valid certificate import the certificate to the device and install it Step 3 There will be the certificate information after you successfully create and install the certificate...

Page 26: ...Step 4 Enter Target Network Segment Subnet Mask and Gateway Target Network Segment The network segment of target server Subnet Mask subnet mask of target network segment Gateway gateway for the select...

Page 27: ...ace to view the basic information of device Step 1 Go to Configuration Remote Configuration Device Parameters Device Information Figure 5 1 Device Information 5 2 Time Settings Purpose You can synchro...

Page 28: ...nterval time Manual Time Synchronization Enter the time and date in Set Time Or you can select Synchronize with computer time 5 3 DST Settings Purpose DST Daylight Saving Time is the practice of advan...

Page 29: ...to your needs Traffic Camera Connection Mode Arming Mode Link between terminal server and traffic cameras is a long period link Terminal server takes pictures from traffic cameras Terminal server is...

Page 30: ...ve been recognized as unknown by traffic camera Traffic Camera Time Synchronization Enable Terminal server synchronizes the connected traffic cameras time Pre record s The time you set to record befor...

Page 31: ...he violation video completeness set the all day record schedule for cameras Mark Picture with Add Time Synchronization Mark or add Security Code to pictures The two items are written in binary code an...

Page 32: ...ded Option 1 Manual Add 1 Click the Add button 2 Select Registration Mode as IP or Normal Domain 3 Enter IP Address Domain 4 Select Protocol 5 Enter Management Port Channel No User Name Admin Password...

Page 33: ...ual 32 IP cameras have the same password with the device can be connected successfully Figure 6 2 Quick Scan Step 3 Optionally you can click to select an added IP camera and click Modify Delete or Reb...

Page 34: ...gs Step 2 Select camera to configure Step 3 Configure parameters according to your need including Camera Name Display Name Display Date Display Week Time Format Date Format and OSD Display Step 4 Opti...

Page 35: ...list Step 3 Enter contents in the four Text Contents Step 4 Check the checkbox of text content you want to display Step 5 Click Save to show the contents 7 3 Monitoring Spot Information Settings Purpo...

Page 36: ...usive No for each camera It only supports letter and number in 30 bytes Monitor Spot No internal Used to distinguish traffic cameras in different checkpoints Enter an exclusive No for each camera It o...

Page 37: ...to collage Step 6 Click Save 7 5 Collaged Picture Text Overlay Purpose Overlay text on collaged pictures Step 1 Go to Configuration Remote Configuration Camera Settings Collaged Picture Text Overlay S...

Page 38: ...Receiving Mode The default one is Normal Mode Normal Mode Device can record videos live view and receive pictures from the selected camera Data Receiving Mode Device can only receive pictures from the...

Page 39: ...ct the Dwell Time Thus the device sends out alarm output signal for the set time Step 4 Enter Alarm Name Step 5 Click the button to configure the arming time The alarm output signal is only available...

Page 40: ...to specification for details Step 1 Go to Configuration Remote Configuration HDD Management Basic Settings Step 2 Check the checkbox of HDD to initialize Step 3 Click Init to initiate it Figure 8 1 H...

Page 41: ...D to detect and report on various indicators of reliability in the hopes of anticipating failures 8 3 1 S M A R T Settings Step 1 Go to Configuration Remote Configuration HDD Management S M A R T Step...

Page 42: ...All or Key Area Detection Step 4 Click the Start button to start the detection You can pause or cancel the detection 8 4 Video Parameter Settings Purpose You can define the parameters that affect the...

Page 43: ...Stream for event recording Step 4 Configure Encoding Parameters You can configure the stream type resolution and other parameters on your demand Step 5 Optionally click and select cameras to copy the...

Page 44: ...ay checkbox Step 5 Select holiday Type as By Date By Week or By Month Step 6 Enter Start Date and End Date Step 7 Click OK to save the holiday and go back to upper menu 8 6 Record Schedule Settings Pu...

Page 45: ...heckbox of Enable Schedule Step 4 Click to configure record schedule Figure 8 9 Edit Record Schedule Step 5 Select a day in a week to configure Step 6 Check All Day record schedule or Segment Record s...

Page 46: ...ecord The time you set to record after the scheduled time or the event For example when an alarm triggered the recording ends at 11 00 if you set the post record time as 5 seconds it records till 11 0...

Page 47: ...ally open or NC normally closed for alarm type NO Alarm linking method and alarm recording are triggered when the alarm input is closed NC Alarm linking method and alarm recording are triggered when t...

Page 48: ...opy the schedule to other days Or repeat the step 1 and 2 to configure arming time for other days Step 6 Click to configure linking method Step 7 Set Alarm Linking Trigger Alarm Output Alarm Linked Re...

Page 49: ...an communicate with computer Step 1 Go to Configuration Remote Configuration Serial Port Settings RS 232 Serial Port Figure 9 1 RS 232 Settings Step 2 Configure the parameter including Baud Rate Data...

Page 50: ...er Manual 49 Figure 9 2 RS 485 Settings Step 2 Select Serial Port No Baud Rate Data Bit Stop Bit Parity and Flow Control Make sure the parameters are exactly the same with the connected device Step 3...

Page 51: ...e 1 Select Backup Period as Real Time Backup or Backup Every Day The recommend one is Real time Backup Real Time Backup Export pictures and video files immediately to USB backup device once terminal s...

Page 52: ...back to upper level Step 6 Click Save to save the settings 10 2 Web Backup Settings Purpose In Traffic interface you can export traffic information And you can set the file name and directory for the...

Page 53: ...2 Click the text field after the License Plate Picture Name The following menu pops up Figure 10 4 License Plate Picture Name Step 3 Edit the saving path and file name We can turn to Step 5 in 10 1 U...

Page 54: ...st 1 or Remote Host 2 in Select dropdown list You can configure both the two Remote Hosts Files can be uploaded to the two Remote Hosts Step 3 Select Upload Protocol as SDK Protocol Private Protocol o...

Page 55: ...ata during the start time and end time Step 8 Enter Upload Interval ms and Upload Timeout Interval ms Step 9 Optionally set the Enable Cloud Storage settings Thus the data are saved in Cloud Storage d...

Page 56: ...rd Step 5 You can select Upload Historical Data and Upload No Plate Data as Enable to upload historical data and No plate data Step 6 Enable the Upload by Time and set the Uploading Start Time and Upl...

Page 57: ...ngs To upload data to FTP server enable the Upload Historical Data function in FTP settings first For details refer to Step 5 of 11 2 FTP Settings Step 1 Go to Configuration Remote Configuration Remot...

Page 58: ...ost 2 Configure the four host s parameters before selecting Remote Host as any of them For detailed steps please refer to 11 1 Host Settings and 11 2 FTP Settings Step 4 Enter Start Time and End Time...

Page 59: ...Status Shows all network interfaces status Working Status Displays the system working status Network Uploading Status Shows the four uploading hosts status 12 2 Camera Status Purpose You can view the...

Page 60: ...End Device Status or Camera Management Status to view camera status Traffic Flow Statistics Shows the Average Speed Traffic Flow Lane Occupancy and Time Interval of Vehicle Head information Front End...

Page 61: ...Purpose You can add edit and delete users Step 1 Go to Configuration Remote Configuration User Management Figure 13 1 User Management 13 1 1 Adding a User Step 1 Click Add to enter the Add user inter...

Page 62: ...rmission of Local Log Search in Local Configuration Remote Log Search and Two way Audio in Remote Configuration and all operating permission in Camera Configuration User The Guest user has permission...

Page 63: ...tem resetting the password monthly or weekly can better protect your product Step 4 Configure the user permission for the user including the Basic Permission and Camera Operation Step 5 Click OK to fi...

Page 64: ...n Unable to recording or capture Step 1 Go to Configuration Remote Configuration Exception Figure 13 5 Exception Step 2 Select the Exception Type in the dropdown list Step 3 Select Alarm Linking and T...

Page 65: ...without HDD checkbox Then the device reboots automatically when no HDD is detected Figure 13 7 Restart 13 3 2 Default Settings Step 1 Select the restoring type as Restore or Default Restore Restore al...

Page 66: ...database Figure 13 9 Repairing Database Index 13 3 4 Exporting Importing Configuration File Figure 13 10 Importing Exporting Configuration File Import configuration file 1 Click Browser 2 Select conf...

Page 67: ...DS TP50 12DT Terminal Server User Manual 66 Figure 13 11 Remote Upgrade...

Page 68: ...elist Go to Configuration Remote Configuration Blacklist Whitelist Figure 14 1 Blacklist Whitelist 14 1 Adding List Step 1 Click Add Figure 14 2 Adding Blacklist Whitelist Step 2 Select List Type as B...

Page 69: ...ist Type as Blacklist or Whitelist in drop down list Step 2 Click Search to start searching Figure 14 3 Search 14 4 Exporting Importing List 14 4 1 Exporting List Purpose You can export all the licens...

Page 70: ...mporting List Purpose You can import license plate numbers to blacklist or whitelist in batch Step 1 Click Download Import Template to download the Excel template Step 2 Fill in license plate number l...

Page 71: ...Figure 15 1 Section Configuration Step 4 Check Enable Step 5 Configure section parameters and vehicle speeding parameters Section Number Select road segment number to configure 6 segments are selectab...

Page 72: ...must be larger than both Small Size Vehicle Speeding Percentage and Small Size Vehicle Speed Limit Step 6 Click OK 15 2 Camera Matching Purpose Collage the two picture of vehicles Configure the follo...

Page 73: ...nkage Main channel and sub channel must support license plate recognition feature When the recognized license plate number of main channel and sub channel matches device will collage the captured pict...

Page 74: ...UD09284B...

Reviews: