Mobile Digital Video Recorder User Manual
32
2.
Check the checkbox of
Motion Detection
to enable the motion detection function.
3.
Click the
Area Settings
button to set the area for motion detection.
Perform the following steps to set a specified area for motion detection:
1)
Press the
Edit
key on the remote control and a red block appears on the screen.
2)
Press the
Direction
keys on the remote control to adjust the position of the red block.
3)
Press the
Enter
key on the remote control to save the position of the red block.
4)
Press the
Direction
keys on the remote control to adjust the size of the block.
5)
Press the
Enter
key on the remote control to save the size of the block.
6)
Press the
Menu
key on the remote control to set the detection sensitivity. You can set the level as 1~6 or off. Click
OK
to save the settings.
7)
You can press the
A
key on the remote control to clear all the mask areas.
8)
Press the
Enter
key on the remote control to save the settings and then press
Esc
key to exit.
4.
Click the
Handle
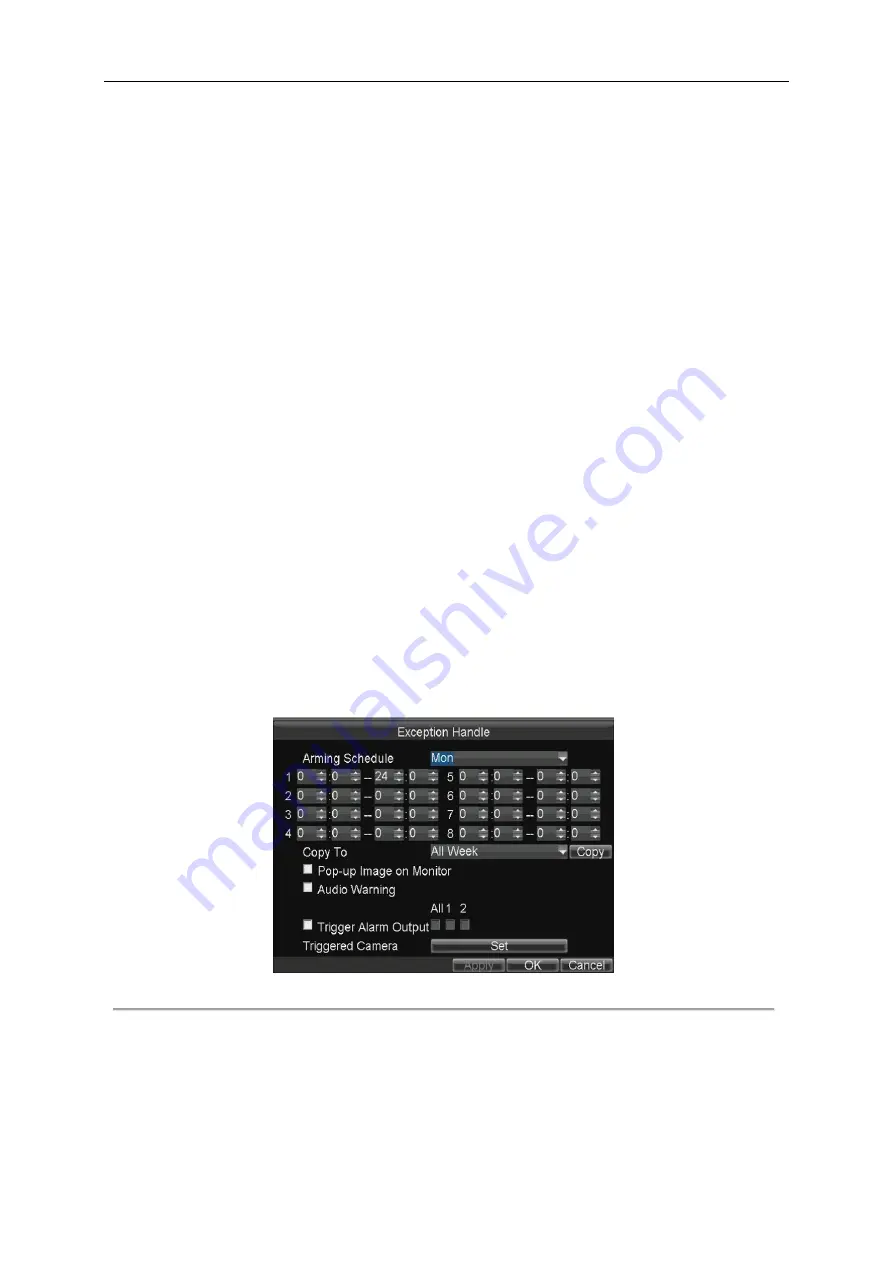
button of Motion Detection, and you can set the arming schedule and alarm linkage actions.
Perform the following steps to set the arming schedule and alarm triggered linkage actions:
1)
Select the day from the drop-down list, and set the arming schedule for the alarm linkage actions.
2)
Optionally, you can copy the current settings to other days in the week.
3)
Check the checkboxes to enable the corresponding linkage actions.
Pop-up Image on Monitor
When an alarm is triggered, the local monitor displays the video image from the alarming channel configured for
full screen monitoring.
Audio Warning
:
Trigger an audible
beep
when an alarm is detected.
Trigger Alarm Output
:
Trigger an alarm output when an alarm is detected. For details of alarm output settings, see Chapter 7.2.2.
4)
Click the
Set
button of Triggered Camera
to select the channel to be triggered.
5)
Click
Apply
to save the new settings and click
OK
to exit.
Figure 3. 5
Linkage Actions of Motion Detection
5.
Click
Apply
to save the new settings and click
OK
to exit.
6.
Enter the Record Settings interface, and select Motion as the record type to set the arming schedule of motion detection
record.
Menu>Basic Settings>Schedule>Set (More Setting)
Summary of Contents for DS-MP7504
Page 1: ...Mobile Digital Video Recorder User Manual UD 6L0204D1113A01...
Page 41: ...Mobile Digital Video Recorder User Manual 40 Figure 5 6 Wi Fi Status Interface...
Page 43: ...Mobile Digital Video Recorder User Manual 42 Figure 6 2 Push Mode Platform...
Page 67: ...User Manual of Mobile Digital Video Recorder 66...


