HIKVISION DS-MCW405 User Manual Download Page 27

DS-MCW405/32G/GPS/WIFI Body Camera User Manual


UM DS-MCW405/32G/GPS/WIFI 042021NA 

27 

STRONG  PASSWORD  RECOMMENDED 

  We highly recommend that you create a strong 

password of your own choosing (using a minimum of eight numbers in order to increase the 

security of your product. We also recommend that you reset your password regularly. 

Especially in high security systems, resetting the password monthly or weekly can better 

protect your product. 

Proper configuration of all passwords and other security settings is the responsibility of the 

installer and/or end-user. 

1.


Go to 

Device Configuration > Security Settings


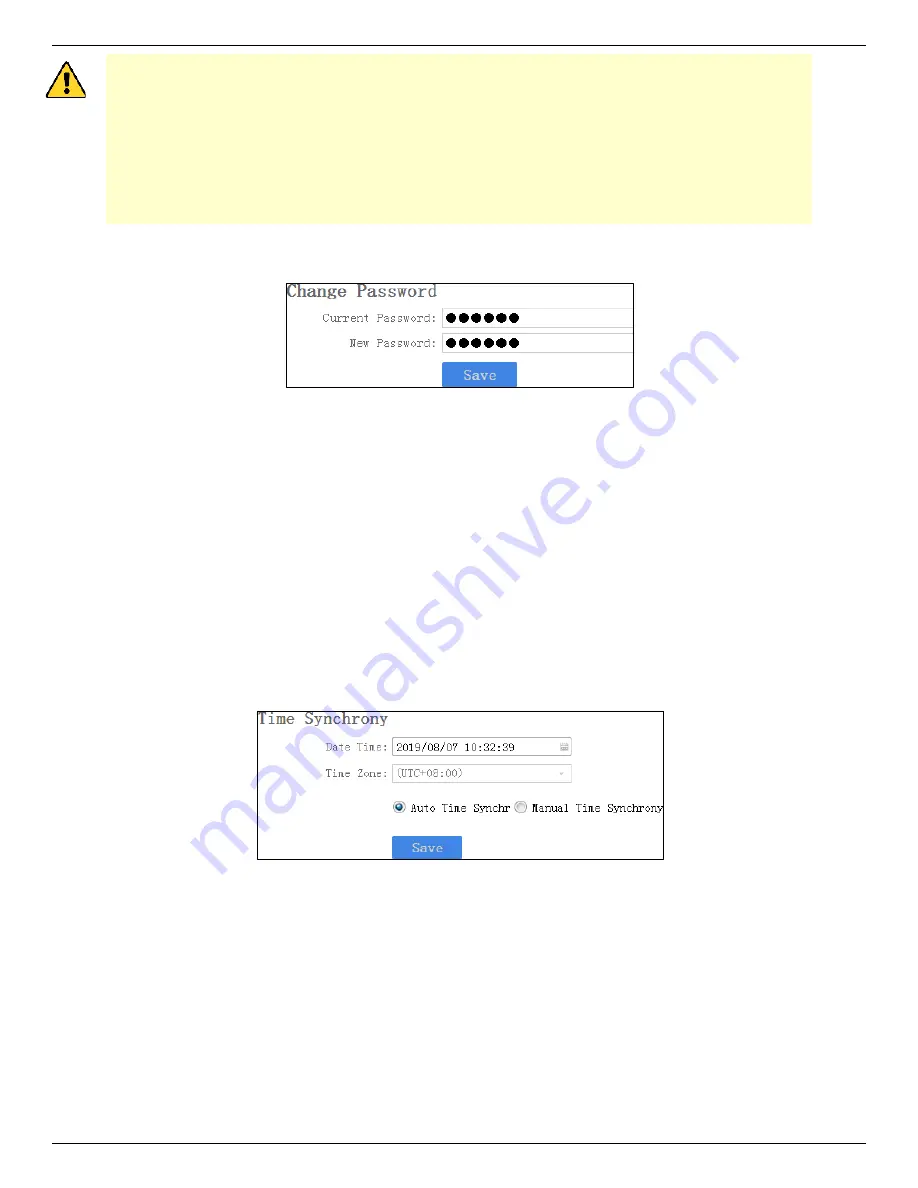
Figure 28, Change Password 

2.


Enter 

Current Password

3.


Enter 

New Password

.  

NOTE:


Password can contain only numbers. Letters and symbols are not supported. 

4.


Click 

Save

3.12.3


Synchronize Time 

You can synchronize device time with your custom time or computer time.  

1.


Go to 

Device Configuration > Time Settings


Figure 29, Synchronize Time 

2.


Select time synchronization type. 


Auto Time Synchrony

: If selected, 

Device Time 

and 

Time Zone 

are not configurable. Assistant will 

synchronize the device time with your computer time. 


Manual Time Synchrony

: If selected, you can synchronize device time according to your custom time. 

3.


(Optional) If 

Manual Time Synchrony 

is selected, select 

Device Time 

and 

Time Zone 

according to your 

needs. 

4.


Click 

Save

Summary of Contents for DS-MCW405

Page 1: ...DS MCW405 32G GPS WIFI Body Camera User Manual...

Page 2: ...OR IMPLIED INCLUDING WITHOUT LIMITATION MERCHANTABILITY SATISFACTORY QUALITY OR FITNESS FOR A PARTICULAR PURPOSE THE USE OF THE PRODUCT BY YOU IS AT YOUR OWN RISK IN NO EVENT WILL HIKVISION BE LIABLE...

Page 3: ...easures Reorient or relocate the receiving antenna Increase the separation between the equipment and receiver Connect the equipment into an outlet on a circuit different from that to which the receive...

Page 4: ...na of a type and maximum or lesser gain approved for the transmitter by Industry Canada To reduce potential radio interference to other users the antenna type and its gain should be so chosen that the...

Page 5: ...in 14 3 3 Log out 14 3 4 Recover Password 14 3 5 System Configuration 15 3 5 1 EnablePositioning 15 3 5 2 Upload Positioning Information 16 3 5 3 Overlay Positioning Information 16 3 5 4 Set IR 16 3...

Page 6: ...26 3 12 2 Change Password 26 3 12 3 Synchronize Time 27 3 12 4 Search Log 28 3 12 5 Upgrade Device 28 3 12 6 Restore Default Settings 28 3 12 7 Reset Device 29 Chapter 4 FAQ 30 4 1 Why does the devic...

Page 7: ...mportant data for future search It is small and light convenient to carry and can be worn on the shoulder satisfying the requirement of mobile duty and evidence record for single person It is widely a...

Page 8: ...Handle with care In case the charger or USB cable is physically damaged or is affected by dampness DO NOT use it To protect device and your security DO NOT touch the device charger and USB cable with...

Page 9: ...es effect only for the current record When the record ends tagging stops You cannot cancel tagging after it starts 2 6 Enable Disable Mute Mode By enabling mute mode the indicators LED light IR lights...

Page 10: ...n com en Assistant mentioned below refers to Body Camera Assistant 3 1 Install Assistant Install Body Camera Assistant according to your computer s operating system NOTE Install BodyCameraAssistant wi...

Page 11: ...art Menu Folder window You can edit the shortcut name and click Browser to select the folder where to create shortcut Figure 3 Select Start Menu Folder 4 Click Next to enter Select Additional Tasks wi...

Page 12: ...User Manual UM DS MCW405 32G GPS WIFI 042021NA 12 Figure 5 Ready to Install 6 During the installation process the following window will pop up Figure 6 Device Driver Installation Wizard 7 Click Next...

Page 13: ...13 Figure 7 Device Driver Installation Wizard 8 Click Finish in Device Driver Installation Wizard and click Finish in Body Camera Assistant Wizard to finish the installation Figure 8 Finish Installati...

Page 14: ...o start recognizing Then the recognized device will be listed Figure 10 Recognized Device 3 Click the recognized device input device password and then click Login to log in NOTE The device default pas...

Page 15: ...Click to import the encryption file received in step 4 6 Click Verifying Encryption to start verifying If verifying succeeded device password will be recovered to the default Figure 13 Recover Passwor...

Page 16: ...ctual device prevails 3 5 3 Overlay Positioning Information After positioning is enabled the positioning information can be overlaid on video 1 Go to Device Configuration Extended Settings 2 Check GPS...

Page 17: ...be automatically recorded into a new clip once reaching the size 3 Go to Device Configuration Extended Settings to select Code Type NOTE Reboot the device to have the settings take effect 3 5 6 Enable...

Page 18: ...will be overwritten 1 Go to Device Configuration Extended Settings 2 Check Overwritten Record to enable the function 3 Click Save 4 Reboot the device according to the prompt 3 5 10 Set Vibration Vibr...

Page 19: ...You can download files via assistant 1 Click Media Information Figure 14 Media Information 2 Click All or Video and the recorded videos will be listed 3 Check the checkbox es of file s you want to do...

Page 20: ...elete the selected file You can click Cancel to cancel the downloading You can click on the upper right corner to view the downloading status and downloaded file s saved in the local file saving path...

Page 21: ...rectory NOTE DCIM Contains subfolders named with the recording date Double click the subfolders to view the videos Log Contains the operation logs 3 7 Playback You need to install Hikvision player or...

Page 22: ...y Before You Start Back up the files to avoid data loss Refer to Export File for details 1 Go to Device Configuration System Settings 2 Click Format Figure 19 Format 3 Enter the device password Figure...

Page 23: ...file and log file saving path 1 Click on the upper right corner of the assistant window 2 Click to customize Local File Saving Path and Log Saving Path 3 Click Save Figure 22 Set Saving Path 3 11 Set...

Page 24: ...e network stability and retain the access address set a static Wi Fi 1 Go to Device Configuration Static Wi Fi Configuration Figure 24 Set Static Wi Fi 2 Check Enable 3 Enter the parameters listed 4 C...

Page 25: ...The Wi Fi function varies by model The actual product prevails 3 11 4 Set Bluetooth You can connect the device to Bluetooth headsets Before You Start Prepare Bluetooth headsets 1 Go to Device Configu...

Page 26: ...efault iVMS port is 7660 Device ID When adding a device via the platform the ID is needed It is the unique identification 4 Click Save 3 12 Maintenance 3 12 1 Set Device Information You can view the d...

Page 27: ...to Device Configuration Security Settings Figure 28 Change Password 2 Enter Current Password 3 Enter New Password NOTE Password can contain only numbers Letters and symbols are not supported 4 Click S...

Page 28: ...he saving path 4 Optional Click Clear to clear the searched logs 3 12 5 Upgrade Device You can upgrade device via the assistant Before You Start Save the upgrade package to your computer Start the dev...

Page 29: ...M DS MCW405 32G GPS WIFI 042021NA 29 3 12 7 Reset Device You can reset all parameters and clear all data of the device 1 Go to Device Configuration System Settings 2 Click Factory Defaults 3 Enter the...

Page 30: ...y Back up the data in the device and clear the storage Formatting storage error Format the device via Body Camera Assistant 4 3 Why can t the device be configured after it is connected to the computer...

Page 31: ......

Reviews: