background image


  10


A D D   I P   C A M E R A S

  ( c o n t i n u e d )


1)  Click an unused camera channel’s 

D

x

 checkbox. 

2)  Click the 

EDIT

 (Pencil) button to display the 

Edit IP Camera

 window.   

3)  Use pull-down menu to change 

Adding Method

 from “Plug and Play” to “Manual.” 

4)  Enter the camera’s IP address and other information as required. 
5)  Press the 

OK

 button to add the camera.


  Hikvision Cameras Not Detected 

— Must be added manually: 

1)  Click an unused camera channel’s 

D

x

 checkbox. 

2)  Click the 

EDIT

 (Pencil) button to display the 

Edit IP Camera

 window.   

3)  Use pull-down menu to change 

Adding Method

 from “Plug and Play” to “Manual.” 

4)  Enter the camera’s IP address and other information as required. 
5)  Press the 

OK

 button to add the camera. 

NOTE:


If camera does not connect, use SADP program to find and modify camera 

settings. 

  Third-Party


Cameras 

— Must be added manually: 

1)  Click an unused camera channel’s 

D

x

 checkbox. 

2)  Click the 

EDIT

 (Pencil) button to display the 

Edit IP Camera

 window.   

3)  Use pull-down menu to change 

Adding Method

 from “Plug and Play” to “Manual.” 

4)  Enter the camera’s IP address and other information as required. 
5)  Press the 

OK

 button to add the camera.


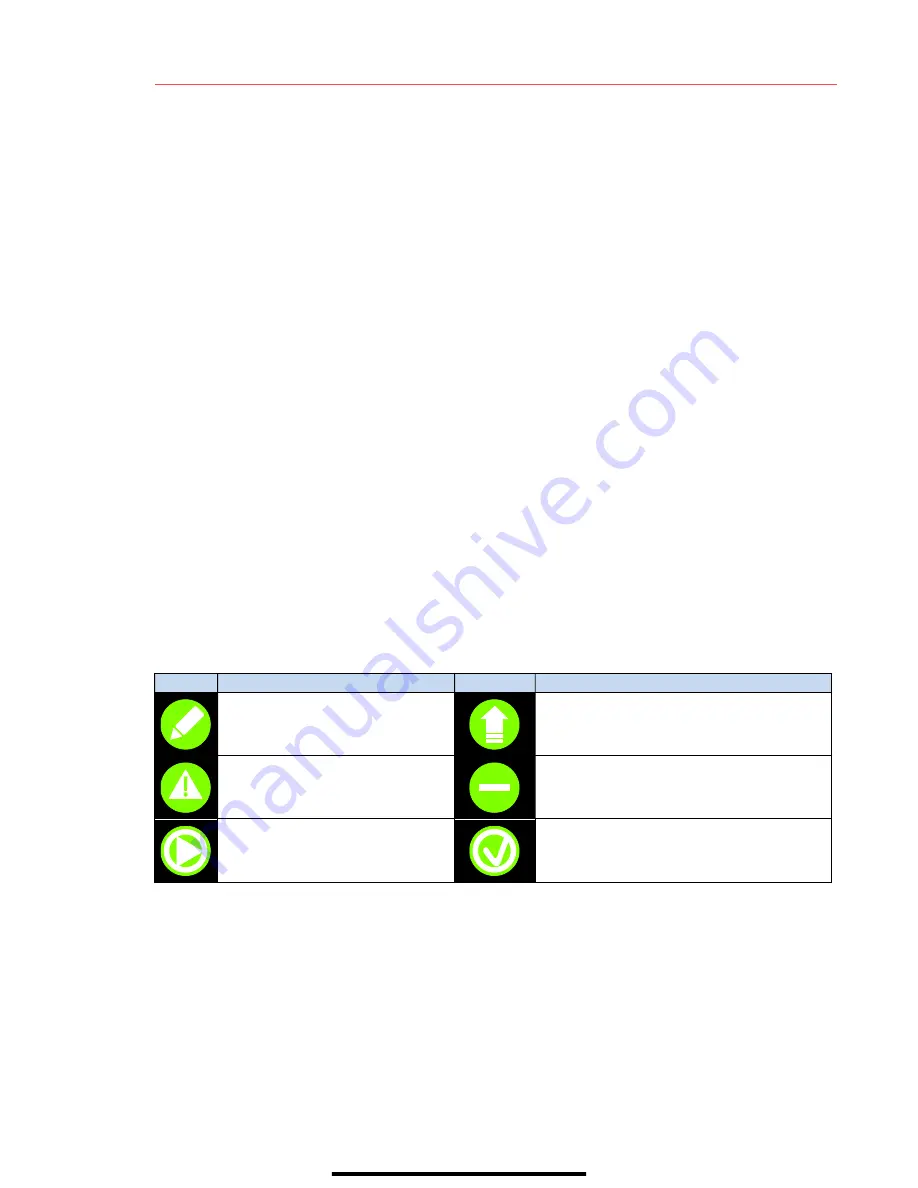
IP Camera Management Icons   

Icon 

Explanation 

Icon 

Explanation 


Edit basic camera parameters   


Upgrade the connected camera 


Camera disconnected; click icon 

to get camera’s exception 

information 


Delete the IP camera 


Play connected camera’s live 

video 


Camera connected 


Summary of Contents for DS-7716NI-I4/16P

Page 1: ...cessories too are marked with CE and comply therefore with the applicable harmonized European standards listed under the EMC Directive 2004 108 EC the RoHS Directive 2011 65 EU 2012 19 EU WEEE Directive Products marked with this symbol cannot be disposed of as unsorted municipal waste in the European Union For proper recycling return this product to your local supplier upon the purchase of equival...

Page 2: ...s are in your box NVR Mouse Remote AC Cord HDD Screws Installed HDD HDD Cables Ear Mounts QSG DVD ROM Installed Installed M E N U T R E E Use this menu tree to navigate the embedded menus F R O N T P A NE L Figure 1 DS 7716NI I4 16P Front Panel 1 2 3 4 5 6 ...

Page 3: ...ff 6 USB Ports Connects USB mouse or USB flash memory devices R E A R P A NE L Figure 2 DS 7716NI I4 16P Rear Panel No Item Description 1 Power Input 100 to 240 VAC 2 Audio I O RCA connectors 3 RS 232 Connects RS 232 devices 4 VGA Out DB 15 connector for VGA output display local video output and menu 5 HDMI Out HDMI video output connector 6 Power Switch Switch for turning device on off 7 LAN Conne...

Page 4: ... requires user to create an admin password 1 Input same password in Create New Password and Confirm New Password text fields Strong Password REQUIRED Password must contain 8 to 16 characters combining numbers lower and upper case letters and special characters At least two types of the above mentioned characters are required Also reset password regularly 2 Click OK to save password and activate de...

Page 5: ...V E I F N E E D E D The system is set up to record upon power up and will beep and display Do you want to initialize drive prompt if the hard drives are not initialized 1 Go to MENU SYSTEM CONFIGURATION HDD 2 Use the checkboxes to select the HDDs that need to be initialized 3 Press INIT Factory installed HDDs come initialized Initializing again will erase any record video This does not affect sett...

Page 6: ... IPv4 default gateway 5 Disable DHCP uncheck the checkbox 6 Change Preferred DNS Server value to 8 8 8 8 leave Alternate DNS Server blank DATE TIME Date and time settings TIME ZONE Time zone and daylight savings time settings ENABLE NTP Network Time Protocol settings GENERAL TAB Select this tab NIC TYPE Set LAN type ENABLE DHCP Check box so that router will assign IP address REFRESH Press to updat...

Page 7: ... router and proceed with port forwarding Port forwarding steps differ by router For port forwarding assistance contact your Internet Service Provider ISP or router manufacturer Also refer to www portforward com for step by step instructions NOTE Hikvision USA is not associated with www portforward com and is not responsible for any activity between the user and www portforward com Please avoid acc...

Page 8: ... QR Code If you do not have the device s QR Code Enter the device information manually a Click the Edit pencil icon on top right corner b Enter device serial number device must be online then click the OK button c When the device appears on the Results screen click the Add button d Enter device s 6 character Verification Code all upper case then click the OK button e Click the Finish button 10A D ...

Page 9: ...Enter the camera s IP address and other information as required 5 Press the OK button to add the camera NOTE If camera does not connect use SADP program to find and modify camera settings Third Party Cameras Must be added manually 1 Click an unused camera channel s Dx checkbox 2 Click the EDIT Pencil button to display the Edit IP Camera window 3 Use pull down menu to change Adding Method from Plug...

Page 10: ...t or deselect days will turn gray off the calendar days you wish to record Icons in the upper right of screen show each camera s record and alarm status Alarm video loss tampering motion detection sensor alarm or VCA alarm Record manual record continuous record motion detection alarm or VCA triggered record Event Exception event and exception information appears at lower left corner of screen NVR ...

Page 11: ...rea s on the image that will be sensitive to motion 6 Click the Settings Set button to configure Arming Schedule when detection is enabled and Linkage Actions what action s to take when motion is detected CAMERA Select camera ENABLE MOTION DETECTION Click to enable disable MOTION GRID Draw grid area to detect motion SENSITIVITY Select of green squares to set sensitivity SETTINGS SET Configure armi...

Page 12: ...etween good picture and saving HDD space Frame Rate sets recording frame rate 8 fps on continuous and 15 on motion by default Higher frame rates require more storage but allows better slow motion playback Max Bitrate Mode chooses between pre set bitrate values and customized values General setting is default MAIN STREAM Select tab CAMERA Select IP camera EVENT For event recording only motion or al...

Page 13: ...rame rate bitrate and or resolution for more fluent mobile viewing 13P L A Y B A C K R E C O R D E D V I D E O 1 Go to MENU PLAYBACK 2 Select the desired camera s from the menu on the right of the screen 3 Select date days w recordings will be blue if continuous only or yellow if all part of day was event 4 Press PLAY 5 Click within the timeline to jump to desired time PLAYBACK TYPE MENU Select ty...

Page 14: ...important video is not lost or destroyed Choose Recorded Video Clips To Back Up 1 Connect a USB flash drive HDD or DVD writer to an available USB port this step is mandatory 2 Go to MENU PLAYBACK 3 Select cameras for playback 4 Select the date and beginning time of the incident 5 Click START CLIPPING button 6 Select the ending time of the incident 7 Click END CLIPPING button same button as START C...

Page 15: ...clip s to back up and click Export button 4 Choose backup device USB flash drive USB HDD or DVD writer 5 Click Export to check backup choose recorded file in Export interface and click button CAMERA LIST Select cameras to view CALENDAR Select dates to view PLAY STOP Toggles between Play and Stop START STOP CLIPPING Toggles between Start Clipping and Stop Clipping LOCK Locks selected video clips to...

Page 16: ... Canada 4848 rue Levy St Laurent Quebec Canada H4R 2P1 Telephone 1 909 895 0400 Toll Free in USA 1 866 200 6690 E Mail sales usa hikvision com www hikvision com 2017 Hikvision USA Inc All Rights Reserved Specifications subject to change without notice QSG DS 7716NI I4 16P 060117NA ...

Reviews: