background image


  11


A D D   A N A L O G   C A M E R A S

  ( c o n t i n u e d )


12 

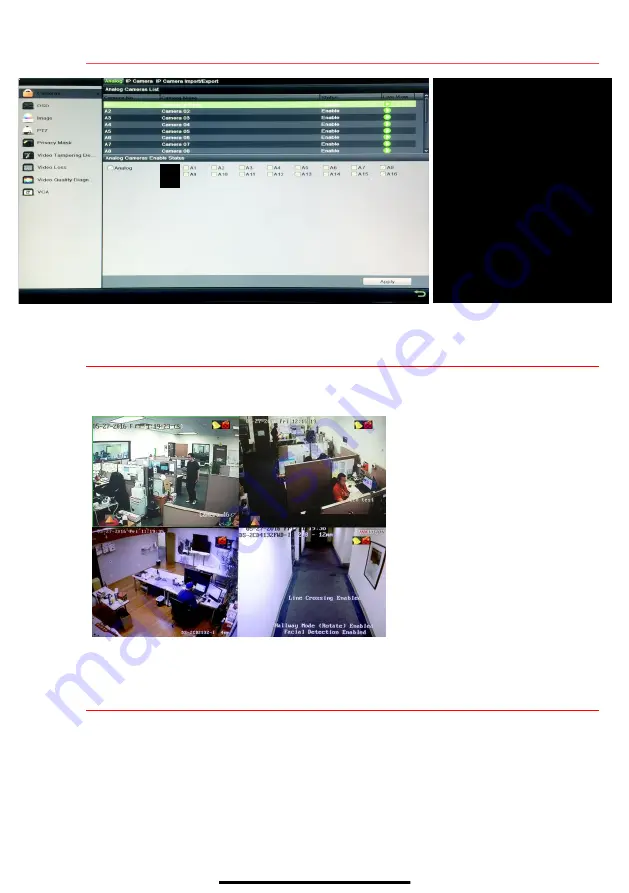
V I E W   L I V E   V I D E O  


Live View displays real-time video. 


13 

S E T   U P   R E C O R D I N G  


Set up recording to capture camera video.


Continuous Recording (Default)


1.


Go to MENU > RECORDING CONFIGURATION. 

2.


Click 

CONTINUOUS

 under the calendar (blue) and the cursor will change to a wand. 

3.


Select the calendar days you wish to record continuously and the days will turn blue. 

4.


Press 

APPLY

.   


Icons in the upper-right of screen show 

each camera’s record and alarm status. 
• 

Alarm

 (video loss, tampering, motion 

detection, sensor alarm, or VCA 

alarm) 

• 

Record

 (manual record, continuous 

record, motion detection, alarm, or 

VCA triggered record) 

• 

Event/Exception

 (event and 

exception information appears at 

lower-left corner of screen) 



CAMERA LIST   

List of analog cameras 



 STATUS 

Camera enabled or disabled




ENABLE   

Check checkbox to enable camera 



ANALOG     

Check/uncheck to enable/disable 

all analog cameras 



APPLY   

Click to accept settings 

NOTE:

 To change camera 

name, go to 

OSD


Summary of Contents for DS-7332HGHI-SH

Page 1: ...essories too are marked with CE and comply therefore with the applicable harmonized European standards listed under the EMC Directive 2004 108 EC the RoHS Directive 2011 65 EU 2012 19 EU WEEE Directive Products marked with this symbol cannot be disposed of as unsorted municipal waste in the European Union For proper recycling return this product to your local supplier upon the purchase of equivale...

Page 2: ... sure the following items are in your box DVR Mouse Remote Power Cord HDD Screws Installed HDD HDD Cables Ear Mounts QSG DVD ROM Installed Installed M E N U T R E E Use this menu tree to navigate the embedded menus F R O N T P A NE L ...

Page 3: ...Switch Switch for applying power to thedevice do not power off device until you first shut down the device s processes by using the On Off Switch on the front panel 1 Status Indicators Power Indicator Green when power switch on real panel is on red when power switch is off Ready Indicator Green when DVR is functioning properly Status Indicator N A Alarm Indicator Red when a sensor alarm is detecte...

Page 4: ...ain illuminated 3 L O C A L A C T I V A T I O N System access requires a secure user assigned password Set Admin Password 1 First time access requires user to create an admin password 2 Input the same password in the Create New Password and Confirm New Password text fields Strong Password REQUIRED Password must contain 8 to 16 characters combining numbers lower and upper case letters and special c...

Page 5: ...select the HDDs that need to be formatted 3 Press INIT NOTES Units purchased with HDDs come with HDDs preformatted Formatting erases any recorded video this does not affect settings 5 S E T D A TE A N D T I ME 1 Go to MENU SYSTEM CONFIGURATION GENERAL DATE TIME Date and time settings TIME ZONE Time zone and daylight savings time settings ENABLE NTP Network Time Protocol settings HDD LIST TOTAL HDD...

Page 6: ... the checkbox 5 Change Preferred DNS Server value to 8 8 8 8 leave Alternate DNS Server blank 7S E T C A ME R A P O RT S After assigning the IP information click the More Settings tab The More Settings tab contains the ports that need to be forwarded for remote access GENERAL TAB Select this tab NIC TYPE Not changeable ENABLE DHCP Check box so that router will assign IP address IP V4 ADDRESS Defau...

Page 7: ...ociated with www portforward com and is not responsible for any activity between the user and www portforward com Refrain from downloading any software from the above mentioned website 2 Proceed to the Routers section on the website for step by step instructions 9 S E T UP HI K C O N NE C T P 2 P C L O U D S E R V I CE NOTE Ports 9010 and 9020 must not be blocked for the Hik Connect Cloud service ...

Page 8: ... the Add button d Enter device s 6 character Verification Code all upper case then click the OK button e Click the Finish button 10A D D I P C A M E R A S 1 Click an idle window in Live View mode 2 Click the icon in the center of the window to display the Add IP Camera window 3 Highlight an IP camera and click the Add button to add it directly you can click the Search button to refresh the online ...

Page 9: ...amera List will display all enabled cameras 3 Disable analog cameras in the Analog Cameras Enable Status section Uncheck the camera checkbox of any camera s you wish to disable Check the Analog checkbox to disable enable all analog cameras 4 Press APPLY to save settings TRASH CAN Press to delete camera Press to add camera EDIT Press to change IP address must be in LAN2 range CAMERA LIST WHITE Adde...

Page 10: ... the days will turn blue 4 Press APPLY Icons in the upper right of screen show each camera s record and alarm status Alarm video loss tampering motion detection sensor alarm or VCA alarm Record manual record continuous record motion detection alarm or VCA triggered record Event Exception event and exception information appears at lower left corner of screen CAMERA LIST List of analog cameras STATU...

Page 11: ... APPLY 5 Press COPY button to copy the new schedule to the remaining cameras CAMERA Select camera ENABLE MOTION DETECTION Click to enable disable MOTION GRID Draw grid area that will detect motion MOTION SENSITIVITY Select number of green squares to set sensitivity in example sensitivity is set to 3 APPLY Click to apply settings COLOR Shows Recording Schedule Blue Continuous Yellow Event motion al...

Page 12: ...commended Medium setting is a balance between good picture and saving HDD space Frame Rate sets recording frame rate 12 15 fps is recommended to save HDD space and prevent choppy video Max Bitrate Mode chooses between pre set bitrate values and customized values General setting is recommended Max Bitrate KBPS is the chosen bitrate for streaming the video Max Bitrate Recommended is the recommended ...

Page 13: ...multiple cameras locally NOTE If upload speed is insufficient lower frame rate bitrate and or resolution 14P L A Y B A C K R E C O R D E D V I D E O Video playback plays back recorded video 1 Go to MENU PLAYBACK 2 Select the desired camera from the drop down menu 3 Select the desired date days that contain recordings will be highlighted 4 Select the desired time using the Timeline or Jump to Time ...

Page 14: ...lash drive HDD or DVD writer to an available USB port 1 Go to MENU PLAYBACK 2 Select the date and beginning time of the incident 3 Click START CLIPPING button 4 Select the ending time of the incident 5 Click END CLIPPING same button as START CLIPPING Clip will be marked 6 Repeat steps 1 6 as many times as required 7 Click FILE MANAGEMENT to display a new window containing all marked clips 8 Select...

Page 15: ... flash drive USB HDD or DVD writer 4 Click Export to check backup choose recorded file in Export interface and click button CAMERA LIST Select cameras to view CALENDAR Select dates to view PLAY STOP Toggles between Play and Stop START STOP CLIPPING Toggles between Start Clipping and Stop Clipping FILE MANAGEMENT Displays Clips Export a list of saved clips CLIP LIST Select desired clips multiple cl...

Page 16: ...on Canada 4485 Dobrin St Laurent Quebec Canada H4R 2L8 Telephone 1 909 895 0400 Toll Free in USA 1 866 200 6690 E Mail sales usa hikvision com www hikvision com 2017 Hikvision USA Inc All Rights Reserved Specifications subject to change without notice QSG DS 7332HGHI SH 040517NA ...

Reviews: