HighPoint RocketRAID 4520 User Manual Download Page 37

37 


Email Notifications 

 
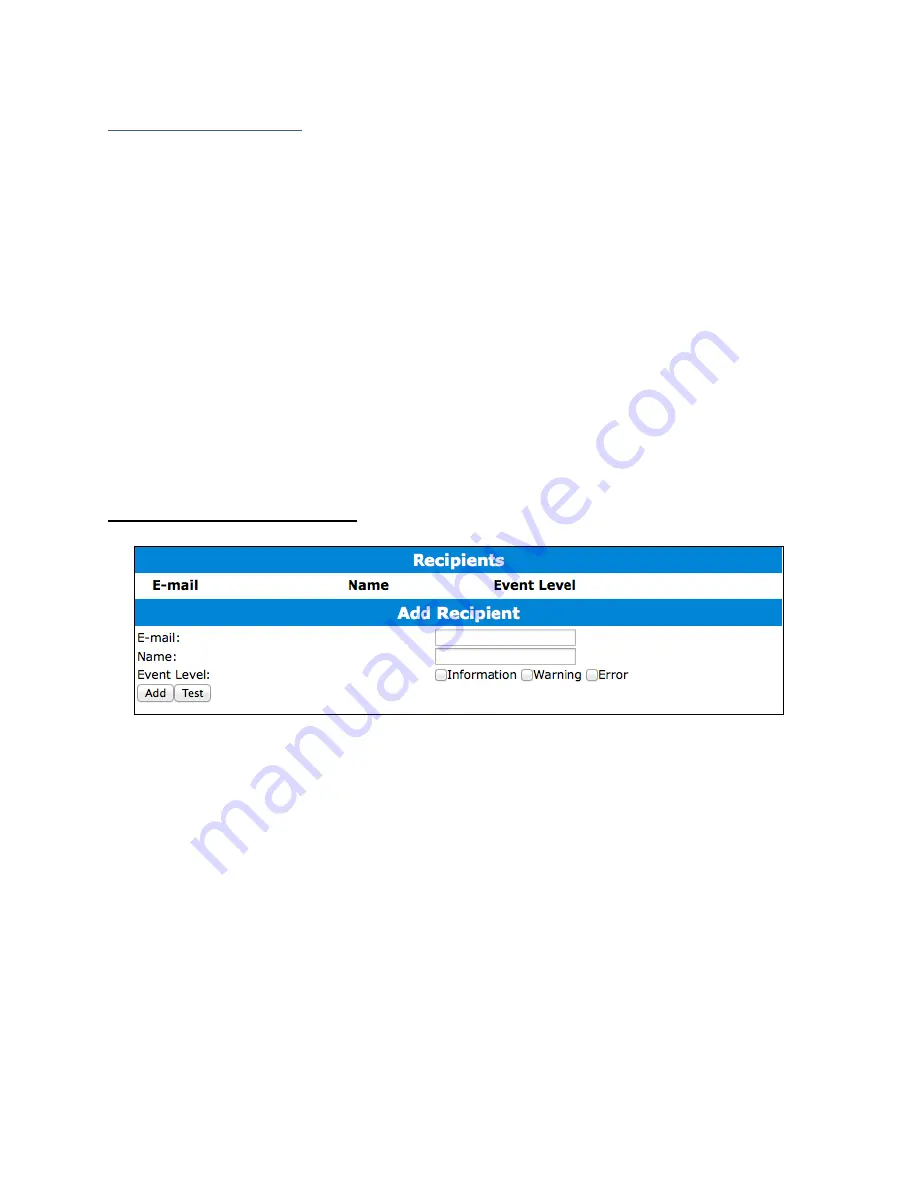
When enabled, all added recipients will receive an email notification for any event log 
entries. (More information about events refer to pg.79) 


To set up email alerts: 
 
1.


Check the Enable Event Notification box. 

2.


Enter the ISP server address name or SMTP name. 

3.


Type  in  the  email  address  of  the 

sender

  (email  account  that is  going  to 

send

  the 

alert). 

4.


Type in the account name and password of the sender. 

5.


Type in the SMTP port (default: 

25

). 

6.


Check  support  SSL  box  if  SSL  is  supported  by  your  ISP  (port  value  will  change  to 

465

, refer to your ISP if you have a specific SMTP port. 


Note

: After you click ‘Change Setting’ the password box will become blank. 


Adding Email Recipients 


You can add multiple email addresses as receivers of a notice. 


1.


Type the email of the recipient in the 

E

-

mail

 text box. 

2.


Type the name of the recipient in the 

Name

 text box. 

3.


Check  which  type(s)  of  events  will  trigger  an  email  in  the  respective 

Event  Level


check boxes. 

4.


(

Optional

) Click 

test

 to confirm settings are correct by sending out a test email. 

5.


Click 

add

 to add the recipient to recipient list. 

6.


The added recipient will display in under 

Recipients.


The email will send to your recipients the output recorded in the event log. 


Summary of Contents for RocketRAID 4520

Page 1: ...1 RocketRAID 4520 4522 Series User Manual February 12th 2018 Revision 1 3 HighPoint Technologies Inc...

Page 2: ...C Rules These limits are designed to provide reasonable protection against harmful interference in a residential installation This equipment generates uses and can radiate radio frequency energy and i...

Page 3: ...D Array 30 Manage your RAID array 36 RAID Spare Pool 36 Email Notifications 37 WebGUIRemote Login 38 Storage Health Inspection SHI 40 Utilizing the Health Inspector Scheduler 41 RAID Expansion OCE ORL...

Page 4: ...gin HighPointWebGUI 63 Appendix B 1 Global Tab 64 Appendix B 2 Physical Tab 65 Appendix B 3 Logical Tab 68 Appendix B 4 Setting Tab 76 Appendix B 5 Recover Tab 78 Appendix B 6 Event Tab 79 Appendix B...

Page 5: ...ction with Write Journaling feature NVRAM keeps tracks I O transaction logs S M A R T Support Auto Rebuild on spare drive Hot Plug and Hot Swap support Larger than 3 TB drive support Bootable RAID Arr...

Page 6: ...2 RocketRAID 4522 RocketRAID 4522 Key PORT1 mini SAS SFF 8088 Connection Corresponds to channel 1 4 PORT2 mini SAS SFF 8088 Connection Corresponds to channel 5 8 BEEP Alarm Beeper J9 I2 C Bus PIN 1 i...

Page 7: ...ng HighPoint Technologies RocketRAID 4522 You are only a few steps away from utilizing RAID storage using the industry s most affordable hardware RAID solution To start using your RocketRAID 4522 take...

Page 8: ...manual for instructions on how to access your motherboard Note 2 Refer to your motherboard manual for instructions on how to locate your PCI Express slot 2 Align the RocketRAID4522 with the PCI Expres...

Page 9: ...our product has the latest performance stability and compatibility improvements Drivers are updated regularly at www highpoint tech com For Windows Users 1 Download the latest driver files from our we...

Page 10: ...10 6 Click Browse my computer for driver software...

Page 11: ...igate to where you saved the driver files 8 Click OK 9 Click Next Windows security will prompt to ask if you are sure you want to install HighPoint Software 10 After clicking Install driver will be in...

Page 12: ...t For Mac Users 1 Obtain latest driver online at www highpoint tech com 2 Click the downloaded file 3 A mounted volume will appear on the desktop Click the icon to open the volume 4 Click the driver p...

Page 13: ...13 5 Follow the on screen instructions of the installer 6 Reboot computer for changes to take effect 7 Make sure Driver Installed is Yes...

Page 14: ...ues take the following steps 1 Visit www highpoint tech com Support Documents and Downloads RocketRAID 4500 Series 2 Click Download located next to Linux opensource driver 3 Start Terminal and navigat...

Page 15: ...set the drivers to automatically load on startup type the following command echo hptiop_load YES boot defaults loader conf For more information refer to the FreeBSD Manual at http highpoint tech com B...

Page 16: ...Management exe 4 Follow the on screen instructions to complete the WebGUI installation 5 Double click the HighPoint RAID Management desktop icon to start the WebGUI Alternatively type http localhost...

Page 17: ...Downloads RocketRAID 4500 Series 2 Double Click the downloaded Mac WebGUI file 3 Double click the HighPointWebGUI pkg to start the WebGUI installer 4 Follow the installer on screen instructions to co...

Page 18: ...contents by typing the following commands filename varies gunzip RAID_Manage_Linux_v2 3 1_14_10_20 tgz tar xvf RAID_Manage_Linux_v2 3 1_14_10_20 tar 5 Read the README txt file for specific instruction...

Page 19: ...Windows platform WebGUI installation Follow the steps outlined in step 3A to install the CLI To run CLI on Windows 1 Run hptraidconf 2 Click hptraidconf to open a cmd terminal 3 Input your username a...

Page 20: ...ate RAID Arrays using WebGUI For both Mac and Windows users 1 Login to WebGUI Default username RAID password hpt 2 Once logged in click the Logical tab Click Logical to go to create array page 3 Click...

Page 21: ...t as the initialization method 8 Select Write Back as the Cache Policy for better disk write performance 9 Select 64K as the Block Size 10 Select all 4 available disks 11 Leave the Capacity Sector Siz...

Page 22: ...22 Mac OS X Array successfully created New volume needs to be initialized before use Windows Array successfully created...

Page 23: ...0_0 this will help identify which volume to initialize Tutorial_Array is now created and can be seen in Logical tab Step 4B Create RAID Array using RocketRAID BIOS PC only RAID arrays can also be crea...

Page 24: ...anel selected The gold frame represents your current selection By default you start on the disk panel 1 Press ALT W to access Window tab 2 Select disk s 3 Use keyboard arrow keys to navigate and press...

Page 25: ...25 Four disks are selected and about to be initialized 6 Press Enter 7 A prompt will warn you that data will be erased 8 Select Yes 9 Once initialized you can proceed to create an array...

Page 26: ...reate Arrays 1 Navigate to the disk panel ALT W then press 1 2 Select each disk you wish to include in your array Each selected disk has symbol on the left 3 Press ALT A to open array panel 4 Press Cr...

Page 27: ...Press Spacebar to navigate and make selections TAB also navigates between windows RocketRAID BIOS create array option menu 6 Press Create ALT E 7 A prompt about sector size will pop up select a sector...

Page 28: ...28 8 Your created array will show up in the Array Window Array RAID5_00 has been created 9 Exit the BIOS ALT X Alternatively ALT S to open System Tab then select Exit...

Page 29: ...s On the command line type hptraidconf to start HighPoint CLI Enter your login credentials when prompted default username RAID password hpt In order to see the devices connected to the controller type...

Page 30: ...int CLI information type help in the command line or refer to the documentation included in the software package Step 5 Initialize and format the RAID Array Before using the newly created RAID array y...

Page 31: ...tialize the disks before use As a general rule select MBR for disks less than 2TB and GPT for disks greater than 2TB 3 Right click the new disk and click properties 4 In properties check and make sure...

Page 32: ...ght click the unallocated space and click New Simple Volume Right Click unallocated space then click New Simple Volume 6 Follow the on screen instructions to configure and format the drive 7 Once fini...

Page 33: ...letter E For Mac Users 1 After creating a RAID array click Initialize when prompted Note If you ignored the prompt simply open Disk Utility Disk Utility for Mac 2 In Disk Utility select the Volume yo...

Page 34: ...34 3 Select the desired disk format and disk name then click Erase Note All previous data on disks will be erased 4 When finished your new RAID volume will be available for use...

Page 35: ...mounted on desktop For Linux Users 1 After creating a RAID array open your disk utility program to view the logical volume 2 Click Format drive to create an MBR or GPT partition table on the drive 3...

Page 36: ...e it reduces the time an array is in critical status Add Remove Spare Using WebGUI 1 Log in WebGUI 2 Click Logical 3 Click Spare Pool 4 Check the box for the disk you want as a spare from Available Di...

Page 37: ...port value will change to 465 refer to your ISP if you have a specific SMTP port Note After you click Change Setting the password box will become blank Adding Email Recipients You can add multiple em...

Page 38: ...n your IP address For Windows Users 1 Open a command prompt window on the host computer 2 Type ipconfig 3 Look for the section that contains your network adapter information 4 Note the IP address Exam...

Page 39: ...n a terminal window on the host computer computer that is connected to the RR4522 2 Type ifconfig 3 Look for the connection that has status active 4 Write the IP address located after inet Example en2...

Page 40: ...Threshold Enabling SMART Monitoring To access the SMART attributes of an individual disk 1 Log in to WebGUI default user RAID password hpt 2 Select the proper controller using the drop down menu on t...

Page 41: ...To ensure hard disk temperatures remain cool enable SMART to monitor disk temperatures In SHI you can set a threshold so that the WebGUI or controller alarm if enabled can warn you when physical disks...

Page 42: ...entry will appear under Tasks List Note New Verify Task box only appears if you have normal status arrays If you have a critical array New Rebuild Task will replace New Verify Task RAID Expansion OCE...

Page 43: ...M created successfully The Logical Device Information for the migrating expanding array will change status to migrating expanding Updating RocketRAID HBA BIOS Firmware Having the latest BIOS ensures y...

Page 44: ...ebGUI Physical Tab 4 Locate the proper firmware file 5 Login to WebGUI then click the Physical tab 6 Under Update Firmware click Browse and browse to your firmware file 7 Click Submit 8 Reboot for cha...

Page 45: ...or disk drives refer to the following sections for troubleshooting tips For all other problems submit a support ticket at www highpoint tech com websupport PC hangs during Boot Up The most commons sym...

Page 46: ...eport Mac to verify the device and drivers are installed and detected by the OS a For Windows Users i Open Device Manager ii Click on the Storage Controller tab iii Check to see if RocketRAID 4522 SAS...

Page 47: ...this situation 1 Backup your existing data 2 Identify which disk is faulty You can refer to the LED lights on the enclosure Refer to the WebGUI Logical tab and Event tab 3 Re insert the faulty disk o...

Page 48: ...including the removed disks back to original array configuration 3 Boot up PC 4 Once array is back to critical status identify the correct disk using the event log and replace it Disabled Arrays If t...

Page 49: ...you cannot use the conventional method of installing drivers the drive must be loaded during installation Prepare the following items for installation Operating System Install CD Driver files for Roc...

Page 50: ...of the Mac operating system installed 2 Set up the RR4522 by following the steps outlined in Getting Started 3 Once an array is created the logical volume can be seen by your operating system 4 Use a...

Page 51: ...ded Information 5 For CLI type query controllers Online Array Roaming One of the features of all HighPoint RAID controllers is online array roaming Information about the RAID configuration is stored o...

Page 52: ...tivity of up to 40 hard drives Example Connected to 1 port on the RocketRAID 4522 the port multiplier split the signal to 4 other targets Under Physical Device Information Location the 1 represents th...

Page 53: ...ut the need to install HighPoint WebGUI application During boot up you will see a RocketRAID splash screen prompting you to press CTRL H to enter the BIOS The following keys will help you navigate thr...

Page 54: ...ions eg creating arrays ESC Exits a selection menu Snapshot of RocketRAID BIOS menu bar Table 2 Menu Bar Key System Exits the BIOS ALT X Disk Displays disk Information Initialize disks Add disks to sp...

Page 55: ...pendix A 2 Disk Tab Access disk tab by navigating to disk and pressing enter or press ALT D Information Device Type SATA or SAS Model Number Serial Number Firmware Revision Capacity in sectors Read Ah...

Page 56: ...disk panel 1 Press ALT W to access Window tab 2 Select disk s 3 Use keyboard arrow keys to navigate and press enter to select desired disk s 4 Press ALT D to activate disk tab 5 Select Initialize Four...

Page 57: ...ess 1 2 Select desired disks 3 Press ALT D to open disk tab 4 Select Turn on off write cache Rescan Triggers motherboard to rescan the connection Appendix A 3 Array Tab Array Information Will disk the...

Page 58: ...resulting in better I O performance at the risk of data failures due to power outages Data will be stored as cache before it is physically written to the disk when a power outage occurs any data in t...

Page 59: ...time will be longer Keep Old Data This option skips the initialization process and all data on each physical disk of the array will be untouched Name Create array name Capacity Designate array capacit...

Page 60: ...res Celcius Board Temperature Celcius Controller voltage levels Setting Configures certain settings Enable audible alarm Enable Staggered spin up Spin down idle disk minutes Enable automatic rebuild C...

Page 61: ...or Disk bad sectors can interrupt the RAID rebuild process Enabling this option will allow rebuilding to continue ignoring bad sectors Rebuild Priority This setting determines how HBA resources should...

Page 62: ...hes panels Appendix B Navigating the HighPoint WebGUI The HighPoint WebGUI management utility allows you to do several key things View general system overview see pg 64 Update firmware and BIOS see pg...

Page 63: ...line Web Support How to Login HighPoint WebGUI You can reach the HighPoint WebGUI log in page either by Double clicking on the HighPoint RAID Management icon created on your desktop Opening your prefe...

Page 64: ...have multiple HighPoint controllers connected HBA Properties Host Adapter model the model name of the controller Enclosure Count number of external enclosures detected Physical drives number of drive...

Page 65: ...make sure you have the most updated version available The physical tab contains the following information Controller Information Extended Information Update Firmware Physical Devices Information Contr...

Page 66: ...M Size SDRAM size of the HighPoint controller card Battery Installed Battery Backup Unit information Firmware Version Firmware version of the HBA SAS address the SAS address Update Firmware Allows you...

Page 67: ...toggle the IDENTIFY RED on the front panel Unplug Safely ejects selected disk Other methods of disk removal will trigger alarm if enabled Disk properties that can be adjusted Read Ahead Enabling disk...

Page 68: ...adding drives to your spare pool The logical tab has the following settings Create Array Spare Pool Logical Device Rescan Beeper Mute An array is a collection of physical disks that will be seen as on...

Page 69: ...69 Array Type JBOD Just a Bunch of Disks RAID0 Striping RAID 1 Mirroring RAID 5 Rotating Parity bit RAID 1 0 Striping of Mirrored Drives RAID 5 0 Striping of Distributed Parity RAID6 Double Parity Bit...

Page 70: ...ximately 2 hours per 1 TB Cache Policy Default Write Back Write Back Any data written to the array will be stored as cache resulting in better I O performance at the risk of data failures due to power...

Page 71: ...olumes and introduce a partitioning method known as GPT GUID partition table This option also known as VSS Variable Sector Size allows you to specify the sector size of the array for use with older Wi...

Page 72: ...ray Logical Device Information Logical device tab is the default page upon clicking the Logical tab of the WebGUI This page contains information about your RAID arrays and individual disks your system...

Page 73: ...wers off the selected RAID array Verify verifies the integrity of the RAID array Change Cache Policy Toggles between Write through and Write back cache Change Margin Adjust margin when DV mode is enab...

Page 74: ...n the disk would be recognized If you insert a new disk clicking add disk will give you the option to select that disk and add it to the array Disabled Status A disabled status array means that your R...

Page 75: ...Clicking rescan will force drivers to report array status For any disk s you hot plug into the device do not click rescan until all physical drives are detected and appear under Logical Device Informa...

Page 76: ...ill take the drive offline Once you re insert or replace the disk the controller will not automatically rebuild the array unless this option is enabled Enable continue rebuilding on error default Enab...

Page 77: ...nabled other users in your network will be unable to remotely log in to the WebGUI Rebuild Priority default Medium You can specify the amount of system resources you want to dedicate to rebuilding the...

Page 78: ...Model of physical drives Important When recovering an array it is important to note the location and model of each physical drive because you can only recover using those exact positions and drive mod...

Page 79: ...endix B 6 Event Tab In the event tab you can see log entries associated with the HighPoint device The event log provides useful information when troubleshooting your set up In the event tab there are...

Page 80: ...WebGUI Appendix B 7 SHI Storage Health Inspector S M A R T Attributes HDD Temperature Threshold Storage Health Inspector Scheduling The SHI outputs information collected using SMART Self Monitoring An...

Page 81: ...ning more than one disk failed and the array is no longer accessible Initializing The array is initializing The two types of initialization is Foreground and Background See Initialization Uninitialize...

Page 82: ...is currently rebuilding Verifying The array is performing a data consistency check Array status will show verifying Disabled The array does not have enough disks to maintain the RAID level A disabled...

Page 83: ...e and medium write performance with data protection for up to 2 drive failures Useable storage capacity equals total capacity of all drives in the array minus two Fast database and application servers...

Page 84: ...every hard drive in the market can be tested this list is meant to be a general guideline for selecting hard drives operating in a RAID environment Regular desktop grade drives are highly not recomme...

Reviews: