16
NOTE:
Use only OEM replacement parts or approved
supplies. Do not subs tute materials when purchasing
parts or other materials. Contact your High Valley dealer
for assistance.
O
A K :
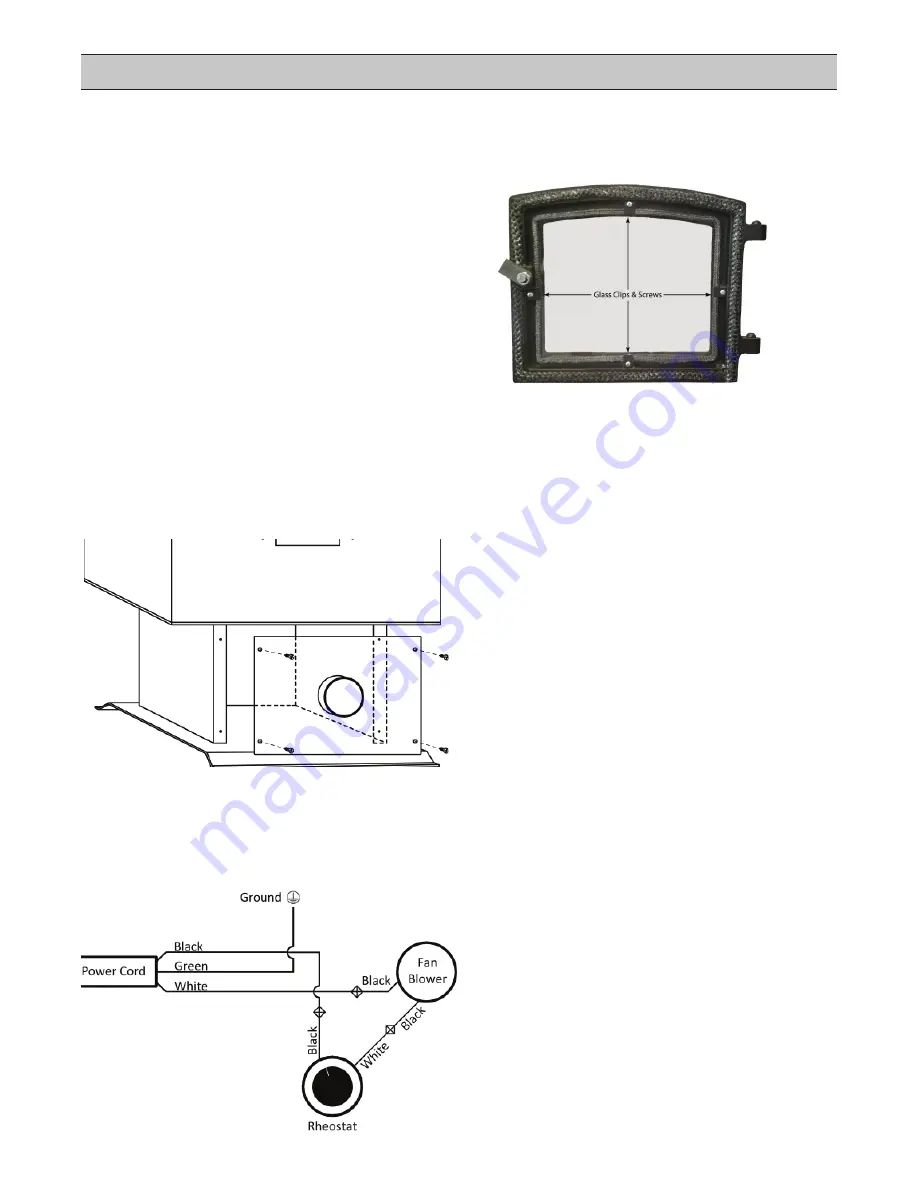
Outside combus on air is required in
mobile home installa ons and may be necessary in ght
homes to improve stove performance. An outside air kit
P/N AIRKIT) is available through your High Valley dealer.
The O/A kit mounts to the back of the pedestal, with the
four (4) #8 x ½" self-tapping screws provided, into pre-
punched holes. A 4" (102 mm) collar is provided for at-
tachment of 4" diameter metal duct (supplied by others).
Kits are available which include aluminum
fl
exible duct,
rain hood, and rodent screen as required by HUD regula-
ons. Consult your dealer. The duct termina on should
be lower than the duct collar on the wood heater pedestal
and in no case should the termina on be higher than the
wood heater itself. The maximum length of the 4 inch (102
mm) air intake duct should be no more than 12' (3.66 m)
Combus on air may be drawn from outside of the home
or from a ven lated crawl space. Combus on air must
not be drawn from an enclosed space such as a garage, or
an unven lated crawl space. If the combus on air duct
is to pass through the
fl
oor of the home, do not make a
hole in any
fl
oor protec on within the minimum
fl
oor
protector dimensions (8" [20.3 cm] to the sides and back
of the wood heater.). (See page 8) Seal wall or
fl
oor pen-
etra ons with waterproof
fl
exible sealer (not provided).
R
C
G
:
Never operate the wood
heater with damaged or broken ceramic glass. Never sub-
s tute window glass or tempered glass as a
fi
re may result.
Replacement 5mm high temperature ceramic, complete
with gasket, is available from your dealer. (P/N GLS1300)
• Remove the loading door from the wood heater and
lay it
fl
at on a well padded work surface.
• Remove the retaining screws from the door and, wear-
ing gloves, remove any remaining pieces of ceramic.
• Remove a short sec on of paper backing covering the
gasket adhesive from the gasket. Center gasket mate-
rial on the edge of the replacement ceramic and
fi
rmly
press the gasket onto the edge. Con nue around all
four sides of the ceramic. Trim o
ff
any excess gasket.
• Center the ceramic in opening, posi on brackets in
place, insert screws, and ghten evenly.
CAUTION:
Screws should be snug but not overly ght.
D
G
:
The Loading Door is equipped with
⅝
"
fi
berglass rope gasket. Check the condi on of the gasket
on a regular basis for signs of wear. Over me the gasket
will compress and the door may not seal ghtly. Replace
as necessary. A gasket kit (P/N GSKDOR) is available from
your dealer and includes silicone adhesive. Remove all old
silicone before installing a new gasket.
S
P
:
Your High Valley wood heater has been
painted with high temperature stove paint at the factory.
Over me the paint may lighten in color with heat expo-
sure or need touch-up. Stove Bright brand Sa n Black #
1900 spray paint (available from your dealer) is compat-
ible with the OEM paint. It is most o en imprac cal to
take the wood heater outside for pain ng. Open all win-
dows for ven la on and protect all exposed surfaces and
furnishings with drop cloths and/or plas c shee ng. Mask
any areas not requiring paint. Apply light coats and fol-
low all instruc ons and precau ons on the can. Allow the
paint to dry thoroughly before ligh ng a
fi
re. The fresh
paint produces an acrid odor as it cures. Open windows
as necessary.
B
W
:
The Model 1300 comes with a stan-
dard convec on blower pre-installed. If it is necessary
to remove the blower for service or replacement, follow
the wiring diagram below when reconnec ng wiring. A
replacement blower (P/N BLO1300) or a kit complete with
a new rheostat (BLO1300KIT) are available.
O
A M


