background image

46 


For additional technical information on this and all HIFONICS products, go to t

he “SUPPORT” tab at HIFONICS.com  

There you will find helpful, FAQ, TEQ Tips and you can contact Technical Support via email. 

©2018 Maxxsonics USA 


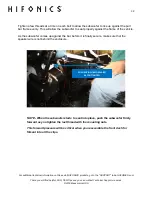
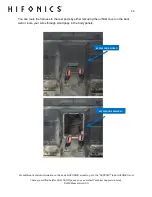
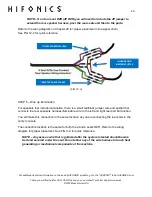
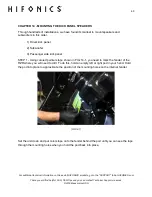
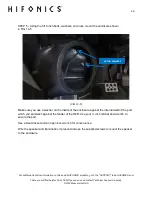
STEP 5 - Using the 5/16 inch bolts, washers, and nuts, mount the enclosure shown  
in FIG 14-5. 


(FIG 14-5) 

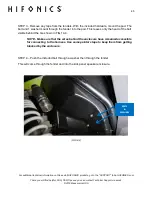
Make sure you use a washer on the inside of the enclosure against the internal wall of the pod 
which you sandwich against the fender of the RZR. Use your ½ inch ratchet and wrench to 
secure the pod.  

Use a small racket and an open box wrench for convenience. 

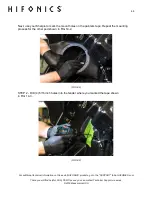
Wire the speaker and illumination if present and use the supplied screws to mount the speaker 
to the enclosure. 


NUTS & WASHERS 

Summary of Contents for HIF-STG3-1

Page 1: ...ll HIFONICS products go to the SUPPORT tab at HIFONICS com There you will find helpful FAQ TEQ Tips and you can contact Technical Support via email 2018 Maxxsonics USA HIF STG3 1 STAGE 3 1000 WATT FIVE SPEAKER RZR Tuned Audio Package Installation Manual ...

Page 2: ...ut in CHAPTERS for the STAGE 5 there are 20 CHAPTERS in total Within each CHAPTER there may or not be STEPS Do them in the order presented to avoid mistakes and frustration UPGRADES The up arrow denotes an upgrade to your STAGE system is available Different STAGE systems will be denoted within the CHAPTERS You can always upgrade STAGE 3 and 2 to add rear pods or the subwoofer to a STAGE 5 INSTALL ...

Page 3: ...boxes Make sure to account for all components before attempting installation Box 1 AM FM Bluetooth Source Unit with a mounting adapter Compact 2 channel amplifier Dual Amplifier Harness with mounting hardware Dual Amplifier Mounting Plate Kick Panel Pods Two cage mounted 8 inch Compression Horn Tower Speakers Two 8 inch compression horns kick panel speakers Two compression element diaphragm covers...

Page 4: ...ips and you can contact Technical Support via email 2018 Maxxsonics USA SAFETY Prepare your machine to safely work on it and add accessories Turn the ignition off and remove the key Remove the negative terminal of the battery FIG S 1 Use a packing blanket other soft material to protect your machine Safety Glasses always wear eye protection FIG S 1 ...

Page 5: ...u are installing you may or may not need all of them You might also find you own more specialized tools to get the job done Share the pics of your installation on our social channels to help others Besides the tools listed you will also find it helpful to have some music ready for the TEST TUNE step We recommend USB with Music pre loaded Bluetooth Device like a phone with music or music app TOOLS ...

Page 6: ...e CHAPTERS of the Installation Videos when completed Additionally it will make life less stressful to have everything ready when you are ready to put each component into the machine STEP 1 CONFIRMING POWER TO BUS BAR The Polaris RZR and our Tuned Audio System requires a harness that connects the battery under the seat to the busbar harness that is located under the hood The harness is shown in FIG...

Page 7: ...al called HIF POD You can also find this manual on line by searching the model number Shown in FIG 2 1 is one picture from the HIF POD manual which will guide you step by step through preparing the kick panel compression horn speakers for installation into the kick panel enclosure and the RZR FIG 2 1 Removing the large back plate and installing the special compression horn diaphragm covers dramati...

Page 8: ...EP SUBWOOFER ENCLOSURE MOUNT If your subwoofer is not preinstalled in the enclosure you will need to prepare the unit by installing the clips that will hold the door from your OEM glove box Next you will wire the subwoofers two voice coils and screw the subwoofer to the enclosure STEP 1 MOUNT CLIPS Mount the included hinge brackets for the OEM glove box door to be fitted on to your subwoofer as sh...

Page 9: ...USA PREPARATION Use the provided nuts to secure the hinge brackets from the inside of the subwoofer Do not over tighten FIG 3 2 The clip with the closed hole mounts on the driver side with the screws on the inside where the glove box door will cover the screws FIG 3 3 FIG 3 4 The hinge clip with the open hole mounts on the passenger side with the screws on the inside where the door will cover the ...

Page 10: ... TEQ Tips and you can contact Technical Support via email 2018 Maxxsonics USA PREPARATION CHAPTER 4 SUBWOOFER INSTALL INTO ENCLOSURE STEP 1 INSTALL THE SUBWOOFER Set your subwoofer enclosure on a flat surface as shown in FIG 4 1 Put the subwoofer enclosure on its back and extend the harness from inside the enclosure as shown in FIG 4 1 FIG 4 1 ...

Page 11: ...ake a mistake Wiring the subwoofer for 2 ohms 2Ω will allow the subwoofer to develop maxximum power from the amplifier by perfectly balancing the impedance with the amplifiers power output FIG 4 2 Use the connection where two wires will insert into one voice coil connector and then route the other end of the wire to opposite connector shown in FIG 4 3 and FIG 4 4 NOTE Wiring code is solid white co...

Page 12: ...all HIFONICS products go to the SUPPORT tab at HIFONICS com There you will find helpful FAQ TEQ Tips and you can contact Technical Support via email 2018 Maxxsonics USA FIG 4 3 FIG 4 4 PREPARATION DUAL WIRE ON ONE CONNECTOR SINGLE WIRE OPPOSITE CONNECTOR ...

Page 13: ...Technical Support via email 2018 Maxxsonics USA STEP 2 SECURE THE SUBWOOFER TO THE ENCLOSURE Due to the shape of the enclosure it can be very difficult to balance the subwoofer enclosure and screw in the speaker for one person shown in FIG 4 6 Consider having a friend hold the enclosure steady while you mount the subwoofer using HAND TOOLS with the screws provided FIG 4 6 ...

Page 14: ...SA PREPARATION CHAPTER 5 REMOVE REINSTALL THE GLOVE BOX DOOR With a small amount of pressure you can bend up on the center portion of your OEM glove box door and remove it from the brackets In a reverse movement you can now reinstall this door onto your new subwoofer glove box to give your subwoofer a stealth appearance as shown in FIG 5 1 The subwoofer is now complete Set aside until installation...

Page 15: ...ct Technical Support via email 2018 Maxxsonics USA VEHICLE DISMANTLE CHAPTER 6 VEHICLE DISASSEMBLY STEP 1 REMOVE HOOD Start with removing the hood This is where you will access the bus bar FIG 6 1 Confirm that your machine has the busbar installed by the dealer or by you If your busbar harness has not been installed see Chapter 1 of this manual for clarification FIG 6 1 ...

Page 16: ...n contact Technical Support via email 2018 Maxxsonics USA VEHICLE DISMANTLE STEP 2 REMOVE TOP OF DASH Remove the top of the dash shown in FIG 6 2 by removing the screws FIG 6 2 STEP 3 REMOVE THE GRAB BAR Remove the grab bar shown in FIG 6 3 by removing the retaining clip and pin and firmly pulling the grip toward the rear of the vehicle FIG 6 3 VEHICLE DISMANTLE ...

Page 17: ...cal Support via email 2018 Maxxsonics USA STEP 6 REMOVE SEATS Remove seats by pulling on the lock clip FIG 6 4 located between the bottom and upright portion of the seat FIG 6 4 Behind the seats behind the rear seat in the 4P in the center of the machine is the panel where you access the oil filter You will need to remove this in order to feed and secure the rear speaker harness ...

Page 18: ...NTLE STEP 7 REMOVE CENTER CONSOLE Use the painters tape to mark where you remove each of the push pins and or T 40 screws shown in FIG 6 5 It is wise to get some small disposable cups or sandwich bags to label the different screws to keep track of them FIG 6 5 There is a T 40 at the front of the center console in the dark Don t miss it FIG 6 6 FIG 6 6 REMOVE TORX AT FRONT USE TAPE TO MARK WHERE PU...

Page 19: ...ts go to the SUPPORT tab at HIFONICS com There you will find helpful FAQ TEQ Tips and you can contact Technical Support via email 2018 Maxxsonics USA VEHICLE DISMANTLE Gently push the shifter and seat belt boots back through the console as show as shown in FIG 6 7 FIG 6 7 ...

Page 20: ... PULLING DASH BOX To remove the DIN dash box from the dash there are three points to address First locate the rear support bracket the down bracket at the rear of the pocket and remove the T 40 Torx screw FIG 6 8 Remove the clip shown on the right from the back of this pocket and set aside for re use when mounting your new dash source unit You will reuse the screw that was in the OEM piece shown i...

Page 21: ...ICS products go to the SUPPORT tab at HIFONICS com There you will find helpful FAQ TEQ Tips and you can contact Technical Support via email 2018 Maxxsonics USA VEHICLE DISMANTLE STEP 9 PULLING FRONT DASH Remove 4 Torx screws from the front of the dash REMOVE TORX ...

Page 22: ... tab at HIFONICS com There you will find helpful FAQ TEQ Tips and you can contact Technical Support via email 2018 Maxxsonics USA VEHICLE DISMANTLE STEP 10 Using a large panel popper to release X clips from the front dash assembly PANEL POPPER TO POP THE DASH SLOWLY ACCOUNT FOR ALL DASH CLIPS ...

Page 23: ... you can contact Technical Support via email 2018 Maxxsonics USA VEHICLE DISMANTLE STEP 11 REMOVING THE GLOVE BOX Remove 2 10mm bolts on the top of the subwoofer where it is fastened to the internal framework See holes in FIG 6 9 The glove box will easily slide out We will use a different mounting method for the new subwoofer FIG 6 9 REMOVE GLOVE BOX BOLTS ...

Page 24: ... the amplifier plate with the amplifier in position you must prepare the mounting area in the vehicle STEP 1 Loosen the 16mm nuts that secure the steering column to the support frame shown in FIG 7 1 These nuts are very hard to loosen Be careful Do not remove these steering column nuts only loosen to create an 1 8 inch gap between the nut and the frame shown in FIG 7 2 You will not retighten these...

Page 25: ...tact Technical Support via email 2018 Maxxsonics USA PREPARATION CHAPTER 8 SOURCE UNIT DASH ADAPTER PREP NOTE Make sure you have removed the metal clip from the OEM dash pocket mentioned in the dismantle chapter You will need this metal clip for mounting the new dash pocket to the RZR Shown in FIG 8 1 and 8 2 FIG 8 1 FIG 8 2 PREPARATION MOVE METAL CLIP TO NEW ADAPTER ...

Page 26: ...ll find helpful FAQ TEQ Tips and you can contact Technical Support via email 2018 Maxxsonics USA STEP 1 Working on your bench or another flat surface install your new source unit into the dash plate adapter shown in FIG 8 3 Refer to the manual included in the source unit to mount and secure the unit into the adapter FIG 8 3 ...

Page 27: ...tab at HIFONICS com There you will find helpful FAQ TEQ Tips and you can contact Technical Support via email 2018 Maxxsonics USA PREPARATION STEP 2 Insert the long threaded bolts with the molded bolt closest to the source unit When set face down the source unit should look like FIG 8 4 FIG 8 4 ...

Page 28: ...ng up we need to prepare the power portion of the harness NOTE For any audio system and in fact electrical accessory for RZR you must have a busbar installed The busbar brings power from the battery up to the back side of the dash See Chapter 1 for busbar details STEP 1 You will start at the bus bar Lay the Power Ground and Accessory portion of the harness in the vehicle and you begin to run each ...

Page 29: ...o the dash and up to the amplifiers You can use black electrical tape to seal the slice in the grommet now or during final inspection FIG 9 2 STEP 2 Push the radio and amplifier connections through the grommet Leave them accessible while you complete the connections at the busbar shown in FIG 9 2 FIG 9 3 NOTE In some vehicles there is an unused grommet near the passenger foot well shown in FIG 9 3...

Page 30: ...plete the connection at the busbar as shown in FIG 9 4 Mount the audio harness first with the OEM RZR connections on top This allows you to use the red boot on the powerline keeping your install clean and looking factory installed FIG 9 4 Zip tie this power portion of the harness into place Assure that no added wiring is near any moving parts or components that generate large amounts of heat SECUR...

Page 31: ...subwoofer enclosure up to the grab bar pipe FIG 10 1 Mount the subwoofer to the RZR using the supplied steel plates 2 the 8 nuts and 8 washers shown in FIG 10 1 Use your inch socket with a small ratchet tool to start to tighten the nuts Space is tight for any larger tools a smaller ratchet will work best NOTE Make sure the wiring harness from the subwoofer does not get pinched behind the enclosure...

Page 32: ... pull bar frame evenly This will allow the subwoofer to seat properly against the frame of the vehicle As the subwoofer comes up against the bar before it is finally secure make sure that the speaker wire is not behind the enclosure NOTE When the subwoofer starts to seat into place push the subwoofer firmly forward as you tighten the last thread with the mounting nuts This forward pressure will be...

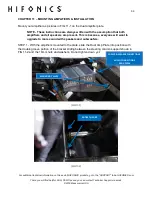
Page 33: ...ese instructions are always written with the assumption that both amplifiers and all speakers are present This is because everyone will want to upgrade to more sound with speakers and subwoofers STEP 1 With the amplifiers mounted to the plate slide the Dual Amp Plate into position with the double groove portion of the bracket sliding between the steering column support shown in FIG 11 2 and the 16...

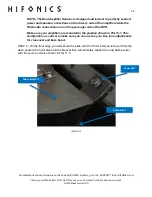
Page 34: ...e of the amplifiers while the RCA audio connections are on the passenger side of the RZR Make sure your amplifiers are mounted in the position shown in FIG 11 1 This configuration is critical to make sure you can access your fine tune adjustments for crossover and bass boost STEP 2 On the front edge you will secure the plate with the 10mm bolt you removed from the dash pocket which will also hold ...

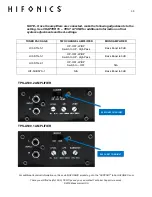
Page 35: ...lowing adjustments to the setting See CHAPTER 16 TEST TUNE for additional information on final system adjustments and best settings TUNED PACKAGE TWO CHANNEL AMPLIFIER MONO AMPLIFIER HIF STG 5 1 HP OFF LP BP Switch to HP High Pass Bass Boost to 0dB HIF STG 3 1 HP OFF LP BP Switch to HP High Pass Bass Boost to 0dB HIF STG 2 1 HP OFF LP BP Switch to OFF N A HIF SUBSYS 1 N A Bass Boost to 0dB TPS A50...

Page 36: ...u are working on your system we recommend covering the amplifiers to avoid scratching them or inadvertently hitting the crossovers with a wrench or screw driver STEP 1 Plug in the power ground connector of the two channel and the mono amplifier At the same time if you have illumination connect the red black Additionally you can connect the subwoofer and full range speaker connectors See FIG 12 1 N...

Page 37: ... We will mount and wire the pods in an upcoming step NOTE The harness that will go to the Right Front kick panel needs to be routed over the subwoofer not behind This will cause the subwoofer enclosure to not fit properly against the front wall of the RZR STEP 3 Push the rear harness with the illumination wires through grommet toward the bus bar and down into to the center console NOTE Consider us...

Page 38: ...mpression horn speakers Skip to CHAPTER 14 STEP 4 Route the rear pods harness Now that you have run the rear speaker wire harness through the grommet near the bus bar from the top of the dash we can route the rear pods harness the rear of the vehicle as shown in FIG 12 3 NOTE Make sure that you avoid all moving parts I the suspension and avoid all heat generating components in the engine area FIG ...

Page 39: ...com There you will find helpful FAQ TEQ Tips and you can contact Technical Support via email 2018 Maxxsonics USA You can route the harness to the rear pods by either removing the oil filter cover on the back wall or route your wires through small gaps in the body panels ACCESS DOOR CLOSED ACCESS DOOR REMOVED ...

Page 40: ...clude illumination there is a small red black jumper wire and splitter that connects the rear speakers harness illumination wire to the left and right rear pod illumination You will make this connection in the same location as you are connecting the rear pods in the center console The connection location is the same for both the 2 and 4 seats RZR Refer to the wiring diagram for proper placement Se...

Page 41: ...u should take the time to install the swivel mount brackets We suggest you do this on a flat surface or work bench These brackets are designed to allow 180 degree tilt This guaranties that the speaker points directly forward This position will improve sound quality and overall volume Refer to instructions for the swivel bracket Also ensure that the adjustment Locking Screw is at the rear of the as...

Page 42: ...nts included in the box with the pods Refer to the manual included with your pods for additional details on mounting and wiring Once the speakers are on the pipe you can gently slide your pod up or down on the tube to determine where your final height will be Do not fully tight the pods as you may want to adjust for your ear height after the seat is in position and the system is playing music NOTE...

Page 43: ...akers and subwoofers in this order 1 Driver kick panel 2 Subwoofer 3 Passenger side kick panel STEP 1 Using colored painters tape shown in FIG 14 1 you need to mark the fender of the RZR where you will need to drill To do this hold an empty left or right pod in your hand Hold the pod into place to approximate the position of the mounting holes on the internal fender FIG 14 1 Set the unit down and ...

Page 44: ...nd helpful FAQ TEQ Tips and you can contact Technical Support via email 2018 Maxxsonics USA Next use your Sharpie to mark the mount holes on the painters tape Repeat the mounting process for the other pod shown in FIG 14 2 FIG 14 2 STEP 2 Drill 4 5 16 inch holes into the fender where you marked the tape shown in FIG 14 3 FIG 14 3 ...

Page 45: ...he pod The bolt and 1 washer mount through the fender into the pod This leaves only the head of the bolt visible behind the tire shown in FIG 14 4 NOTE Make sure that the wires behind the enclosure have remained accessible for connecting to the harness Use some painters tape to keep them from getting blocked by the enclosure STEP 4 Push the included bolt through a washer then through the fender Th...

Page 46: ...h bolts washers and nuts mount the enclosure shown in FIG 14 5 FIG 14 5 Make sure you use a washer on the inside of the enclosure against the internal wall of the pod which you sandwich against the fender of the RZR Use your inch ratchet and wrench to secure the pod Use a small racket and an open box wrench for convenience Wire the speaker and illumination if present and use the supplied screws to...

Page 47: ...ntify the harness wires from inside of each pod and connect the wires to the back of the compression horn speakers Connect speaker and illumination wires as shown in FIG 14 6 To illuminate speakers red connect the RED speaker wire to the RED wire NOTE Connect the RED wire to the BLUE illumination wire for a BLUE effect Do not connect the red illumination wire if you prefer to have no illumination ...

Page 48: ...xsonics USA STEP 7 With the speakers now properly wired you can mount the speaker to the enclosure NOTE The speakers shown being mounted here have already had their compression horn covers installed This dramatically reduces the depth of the speaker ultimately allowing our kick panel enclosure to be shallower Refer to the compression horn diaphragm replacement manual included with the speakers cal...

Page 49: ...can contact Technical Support via email 2018 Maxxsonics USA STEP 8 With the compression horn wired properly you can position the speaker and mount with the included hardware We suggest you mount with hand tools to avoid blowing out the screws Final speaker position is shown in FIG 14 7 FIG 14 7 Repeat the process from STEP 1 8 for the passenger side kick panel ...

Page 50: ... DASH REASSEMBLY Now you will do a partial reassembly of the front dash and loosely set into the vehicle This will allow the source unit mount to be to be installed in place so the harness can be finished in the proper location You will button up all panels in the last step STEP 1 With the harness routed through the vehicle the next step will be to bring the source unit connectors and RCA cables t...

Page 51: ...d you can contact Technical Support via email 2018 Maxxsonics USA NOTE Make sure you retained the metal clip mentioned in CHAPTER 8 Your source unit will not mount properly in the dash pocket it without it The final trim should look perfect with all dash panels in place and your new source unit mounted in the dash adapter CLIP MOVED FROM OEM TO NEW MOUNT ...

Page 52: ...ou will find helpful FAQ TEQ Tips and you can contact Technical Support via email 2018 Maxxsonics USA After all your connections have been made gather all the cables and set into the dash pocket Make sure the metal clip stays at the top where you will secure to the bracket coming down from the dash DO NOT LOSE THE CLIP ...

Page 53: ... go to the SUPPORT tab at HIFONICS com There you will find helpful FAQ TEQ Tips and you can contact Technical Support via email 2018 Maxxsonics USA STEP 2 Push the dash assembly into place until you feel and hear a snap as the entire assembly seats into place FINAL POSITION ...

Page 54: ...atter how you connect your audio system or which RZR you have you have plenty of connections NOTE The included USB and 3 5mm will require a 1 inch hole There is a 10 foot 3 0 meters cable that will extend the USB and AUX input from your source unit Mount the USB 3 5mm adapter somewhere in the vehicle that it will be accessible but not too low in the vehicle where it can be submerged in deep water ...

Page 55: ...le in the mounting surface make sure to pull all the wires through the rubber grommet with the small door for the front This seals the USB and 3 5mm input on the front face Additionally there will be a rubber grommet on the rear of the mounting surface all secured by the large nut See FIG 15 1 FIG 15 1 NOTE The large thumb nut only needs to be finger tight Two rubber grommets help the unit seal to...

Page 56: ...port via email 2018 Maxxsonics USA FIG 15 2 Dual Accessory Mounted with after market voltage meter mounted above Once your dual input and USB charge port are installed as shown in FIG 15 2 you can connect the USB to the source unit connector and the 3 5mm RCA connectors to the source unit AUX 1 input After the TEST TUNE chapter has been completed you should zip tie up any excess cables ...

Page 57: ... confirming connectivity of the system you just installed Refer to the full manual for the source unit to use features like Bluetooth pairing adjusting treble and bass or working with the EQ Here is a check list so you know you did not forget something With the power ON use the list here to check the system for all of the following Make sure you are using the controls on the source unit to confirm...

Page 58: ...e each amplifier However through hundreds of installations we have determined the following settings are ideal for the following STAGE Tuned Audio Packages NOTE Gain control it is important to adjust each amplifier gain as described in the manual Remember these settings are NOT volume controls Gain controls properly adjusted help properly balance the system sound between lows highs and minimize di...

Page 59: ...the machine to assure it doesn t come loose during rides Once your harness is secure you can begin reassembling all the panels Here is a checklist so you do not forget anything o OIL COVER ON ENGINE COMPARTMENT BEHIND THE SEATS o CENTER CONSOLE o SEATS o NUTS ON STEERING WHEEL COLUMN o FRONT OF DASH CHECK YOUR ALIGNMENT ON WHERE THE DASH MEETS TO THE SUBWOOFER o TOP OF DASH o HOOD NOTE It is criti...

Page 60: ...HE SPLICE AT THE FIREWALL GROMMET o SUBWOOFER MOUNT o SUBWOOFER GLOVE BOX DOOR o LEFT KICK PANEL ENCLOSURE MOUNT AND WIRED o RIGHT KICK PANEL ENCLOSURE MOUNT AND WIRED o AMPLIFIERS MOUNTED AND ALL 8 NUTS ARE SECURED TO DUAL AMPLIFIER PLATE o NUTS ON STEERING WHEEL COLUMN o HARNESSES TO AMPLIFIERS o SUBWOOFER SPEAKER HARNESS AT AMPLIFIER o FRONT AND REAR SPEAKER HARNESS AT AMPLIFIER o HIDE HARNESSE...

Page 61: ...d helpful FAQ TEQ Tips and you can contact Technical Support via email 2018 Maxxsonics USA CHAPTER 19 SHOW YOUR FRIENDS Congrats on a great install and an awesome RZR audio upgrade Get on the trails show your friends and show us too We are all over social media just like you We use HIFONICSUSA HIFONICS POWERFROMTHEGODS RZRLIFE RZR ...

Page 62: ...ntact Technical Support via email 2018 Maxxsonics USA CHAPTER 20 LAYOUT HARNESS In our design you absolutely cannot make a mistake Speaker connectors are color coded for front rear left and right If you accidently make a mistake it will not fit into the connector or bullet plug Refer to the harness layout shown on the next page to plug everything into the components ...

Page 63: ...to the SUPPORT tab at HIFONICS com There you will find helpful FAQ TEQ Tips and you can contact Technical Support via email 2018 Maxxsonics USA For speakers with Illumination follow the instructions in the speaker manual to properly wire and select the color for the illumination ...

Page 64: ...___________ _________________________ MODEL NUMBER SERIAL NUMBER Amplifier 2 channel ________________ _________________________ MODEL NUMBER SERIAL NUMBER Amplifier Mono ________________ _________________________ MODEL NUMBER SERIAL NUMBER Front Speakers Pr ________________ _________________________ MODEL NUMBER SERIAL NUMBER Rear Pod 1 ________________ _________________________ MODEL NUMBER SERIA...

Page 65: ...al technical information on this and all HIFONICS products go to the SUPPORT tab at HIFONICS com There you will find helpful FAQ TEQ Tips and you can contact Technical Support via email 2018 Maxxsonics USA NOTES PAGE ...

Page 66: ...al technical information on this and all HIFONICS products go to the SUPPORT tab at HIFONICS com There you will find helpful FAQ TEQ Tips and you can contact Technical Support via email 2018 Maxxsonics USA NOTES PAGE ...

Page 67: ...al technical information on this and all HIFONICS products go to the SUPPORT tab at HIFONICS com There you will find helpful FAQ TEQ Tips and you can contact Technical Support via email 2018 Maxxsonics USA NOTES PAGE ...

Page 68: ...ditional technical information on this and all HIFONICS products go to the SUPPORT tab at HIFONICS com There you will find helpful FAQ TEQ Tips and you can contact Technical Support via email 2018 Maxxsonics USA ...

Reviews: