background image

SAFETY 

A fireguard conforming to BS 8423:2002 
should be used in the presence of children 
and old or infirm people.
Please note, this appliance should be used 
with the fire door closed at all times except 
when re

-

fuelling or de

-

ashing.

Do not use aerosol sprays or any other
flammable materials near the appliance 
under fire.
Do not fit an extractor fan in the same 
room as the appliance.
Fire cement is caustic, hand and eye 
protection should always be worn, 
prolonged contact with the skin should be 
avoided.

The manufacturer will not be responsible 
for any consequential or incidental loss or
injury however caused. 

Before continuing any further, with the 
installation of this appliance please read the 
following guide to manual handling.

x

Always obtain assistance when lifting the 
appliance

x

When lifting always keep your back straight, 
bend your legs not your back

x

Avoid twisting at the waist. It is better to 

  reposition your feet.

x

Avoid upper body/top heavy bending. Do 
not lean forwards or sideways when         
handling the fire

x

Always grip with the palms of your hands               
do not use your fingertips for support

x

Always keep the stove as close to the body 
as possible as this will minimise the 

    cantilever action.

x

Use gloves to provide additional grip.

INTRODUCTION

4

FITTING THE FLUE OUTLET AND 
HOT PLATE

The flue outlet spigot is found packed inside the 
appliance . The hot plate (blanking plate) is       
supplied fitted to the top opening and is removed 
by turning anti

-

clockwise (as is the flue outlet). 

Smear a very thin layer of fire cement on the 
mating faces of the flue outlet and the hot plate.  
Fit the outlet to the appliance in the desired       
position.

Lock into place by rotating clockwise and tighten 
by tapping with a block of wood and mallet from 
inside of the appliance. Similarly, fit the hot plate 
(blanking plate) to the unused opening. Clean off 
any surplus fire cement.
Place appliance on the hearth and make sure that 
it is level and does not rock.
Connect the chimney ensuring all joints are sealed 
with fire cement.

Note : The flue pipe must be fitted inside the outlet 
spigot. Failure to do so could result in the spillage 
of condensation running down the flue.


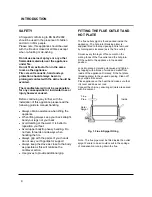
Fig. 1. Flue & Spigot Fitting

Inside

Flue
Pipe

Outer
Spigot

Summary of Contents for BK132

Page 1: ...PLEASE RETAIN THIS GUIDE FOR FUTURE REFERENCE Operating Installation Manual BK132 Rev 03 August 2011 Part No AFS1574 Multifuel Stoves AX The AX Multifuel Stove Range British Made AX1M S2 AX2M S2...

Page 2: ...ing the grate 6 Firebox Liner Panels 7 Final Check 8 OPERATION Air wash control 9 Primary air control 9 Multipurpose operating tool Ash pan 10 MAINTENANCE Cleaning the stove 11 Summer Storage 12 Adjus...

Page 3: ...AS OPERATED BY HETAS IF IN DOUBT CONTACT HETAS LIMITED TELEPHONE NUMBER 0845 634 5626 www hetas co uk THIS STOVE MUST NOT BE CONNECTED TO A SHARED FLUE SYSTEM TO ALL USERS PETROLEUM COKE SOME OF WHOSE...

Page 4: ...andling the fire x Always grip with the palms of your hands do not use your fingertips for support x Always keep the stove as close to the body as possible as this will minimise the cantilever action...

Page 5: ...Room Heater Only Output kW 1 4 1 5 Height mm A 458 475 Width mm B 330 370 Depth mm C 323 333 Height to Centre of Rear Flue mm D 370 387 Depth from Back to Centre of Flue mm E 93 5 93 5 Flue Diameter...

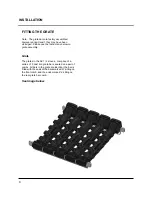
Page 6: ...s below on grate assembly Grate The grates in the AX1 2 stoves comprise of a series of 5 cast iron grate bars seated on a pair of combs All bars in the grate are identical the bar is fitted with the e...

Page 7: ...ide liner panels See Fig 2 x Fit the throat plate with the projecting lugs sitting on top of the side liners The long centre tab on the back edge rests on the rear liner The shorter turn down tabs aga...

Page 8: ...ocal building control department FINAL CHECK Note All local regulation including those referring to National and European standards need to be complied with when installing the appliance We strongly a...

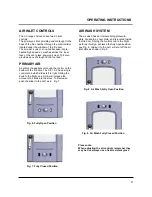
Page 9: ...a single control knob which slides left to right Sliding the knob to the Right see Fig 6 will increase the amount of air intake to the stove To Decrease push the slider to the Left as in Fig 7 AIR WAS...

Page 10: ...the fire door Fig 10a Operating Tool Ash pan 10 OPERATING INSTRUCTIONS Please Note A stove mitten is supplied with your AX stove Fig 10b this is provided for the operation of the fire door handle and...

Page 11: ...season It is important that the flue ways flue pipe and chimney be cleaned prior to lighting the appliance after a prolonged shut down period DOOR GLASS The door glass should remain clear during norma...

Page 12: ...door aperture or catch This is quite normal and due to the settling of the casting The fire door can be re aligned as follows x When the appliance is cold open the fire door so that it is at right ang...

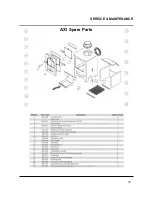
Page 13: ...13 SERVICE MAINTENANCE AX1 Spare Parts...

Page 14: ...14 SERVICE MAINTENANCE AX2 Spare Parts...

Page 15: ...ommence on the date of purchase and are non transferable Our guarantee is offered as an addition to your statutory rights The guarantee is applicable to the original purchaser only and is non transfer...

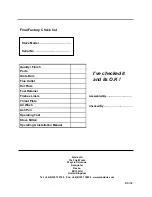
Page 16: ...Bars Flue Outlet Hot Plate Fuel Retainer Firebox Liners Throat Plate Air Wash Ash Pan Operating Tool Stove Mitten Operating Installation Manual Assembled By Checked By Arada Ltd The Fire Works Weycro...

Reviews: