©2018 Hestan Commercial Corporation
10
EN
FINAL SETUP
CLEANUP, VERIFY POWER
Remove any final packaging materials and protective film from all exterior areas.
Check the electrical requirements for the correct electrical supply and that the cooktop is properly
grounded.
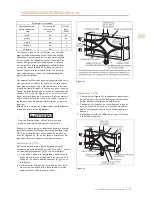
Check power at the junction box wires using a voltmeter having a range of 0-250 VAC.
• A 240 Volt supply should read 220 to 240 Volts between the black and red wires (Line to Line).
• A 208 Volt supply should read 190 to 208 Volts between the black and red wires.
FUNCTIONAL TEST
When the cooktop is connected to the electrical voltage supply all lights and digits turn on to
indicate a proper activation. This operation will be completed after few seconds, the control turns
off automatically. Then the cooktop is ready for operations.
1. Switch the Control ON
• If the commands are locked, touch the [LOCK] key for a few seconds. (See that the LOCK led is
on and turns off after a few seconds.)
2. Touch the main [ON/OFF] key to enable the single zones for selection.
• All the displays show power level “
0
”. If you don’t touch anything else, the control shuts down
again after about 10 seconds.
3. Select a zone and set power
• Touch the ON key (2) for the desired zone: the HOT SURFACE (3) indication starts flashing,
waiting for user input.
4. Touch the slide bar (7) to set the power level (levels 0 to 9). You
can slide your finger along the bar to select the desired value.
• The display (4) and the “Peacock Tail” (6) shows the power level,
updated in real time.
• After a 5 seconds time-out the value is accepted and the HOT
SURFACE led stops flashing.
• The “Peacock Tail” disappears after some seconds more.
5. Verify that the indications perform as above and that the
selected zone begins heating up.
6. Touch the OFF key for the selected zone to turn it off.
7. Touch the main [ON/OFF] key to turn the cooktop off.
Verify that the controls respond as above.
4
1
2
3
TRIPLE DUAL
TIME
OFF
ON
7
6


