background image

©2015 Hestan Commercial Division


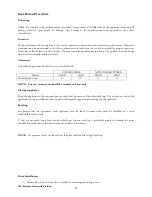
Riser Support Bolts 

2)


Remove the four bolts at the rear of the appliance holding on the side panels (two on each side, see 
diagram below). 

3)


Place riser on support brackets on back of the appliance. 

4)


Re-install the four bolts into the back of the appliance through the riser channels, do not tighten. 

5)


Attach the bottom supports with supplied bolts, two on each side. 

6)


Tighten the four bolts that attach riser to appliance. 

7)


Tighten the four bolts that attach riser to bottom supports. 

8)


Re-install back cover. 


   Range Top Bolts 


NOTE:  

Failure to re-install back cover could cause improper venting of exhaust gases/heat from the appliance,


creating soot that clogs the burner(s) and flue and/or creates a temperature risk to cabinet and  

                components.  


Statutory Regulations


(Install Codes) 


The installation of this appliance must be carried out by a properly trained and qualified installer and in 
accordance with the relevant regulations, codes of practice and the related publications of the Country, State, 
County and City of destination. 


United States of America 


1)


Local Codes 

2)


In the absence of local codes, installation must conform to the National Fuel Gas Code, ANSI 
Z223.1/NFPA 54, or the Natural Gas and Propane Installation Code, CSA B149.1, as applicable. 
Copies may be obtained from the American Gas Association, Inc., on their web site: 
http://www.aga.org/ 

3)


National Electrical Code, ANSI/NFPA-70, or latest edition. Copies may be obtained from the 
National Fire Protection Association, on their web site: http://www.nfpa.org/ 

4)


Vapor Removal From Cooking Equipment, NFPA-96, or latest edition. Copies may be obtained from 
the National Fire Protection Association, on their web site: http://www.nfpa.org/ 

Canada  


1)


Local Codes 

2)


CSA B149.1 Natural Gas and Propane Installation Code. 

3)


CSA C22.1 Canadian Electrical Code 

4)


CSA C22.2 Canadian Electrical Code 
 

Canadian codes can be found on the CSA website: http://www.csa.ca           


Summary of Contents for HMB Series

Page 1: ...ner s Guide Installation Operation Sealed Burners HMB Series HSB Series HSP Series Hestan Commercial Corporation 3375 E La Palma Ave Anaheim CA 92806 888 905 7463 RETAIN THIS MANUAL FOR FUTURE REFEREN...

Page 2: ...VENT A GAS ODOR IS DETECTED SHUT DOWN UNITS AT MAIN SHUTOFF VALVE AND CONTACT THE LOCAL GAS COMPANY OR GAS SUPPLIER FOR SERVICE FOR YOUR SAFETY DO NOT STORE OR USE GASOLINE OR OTHER FLAMMABLE VAPORS O...

Page 3: ...stallation 5 Statutory Regulations 5 United States of America 5 Canada 5 Gas Supply 6 Gas Pressure Regulator 7 Ventilation Air Flue Connections 7 Electrical Supply 8 Model Serial Rating Plate Location...

Page 4: ...ng minimum clearances must be followed COMBUSTIBLE NON COMBUSTIBLE Model BACK SIDE BACK SIDE Sealed Burner Top 5 10 0 0 NOTE For use on non combustible counters or bases only Placing Appliance Place t...

Page 5: ...t by a properly trained and qualified installer and in accordance with the relevant regulations codes of practice and the related publications of the Country State County and City of destination Unite...

Page 6: ...lation valve is fitted or the automatic system can be reset this notice must be posted ALL DOWNSTREAM BURNER AND PILOT VALVES MUST BE TURNED OFF PRIOR TO ATTEMPTING TO RESTORE THE SUPPLY AFTER EXTENDE...

Page 7: ...ter solution Do not use an open flame After piping has been checked for leaks all piping receiving gas should be fully purged to remove air Ventilation Air Flue Connections The following notes are int...

Page 8: ...e Appliances equipped with a flexible electrical supply cord are provided with a three prong grounding plug It is imperative that this plug be connected into a properly grounded three prong receptacle...

Page 9: ...appliance A 5 minute complete shutoff period is required before the appliance is re lighted Sealed Top Burners HSP Series 1 Turn main gas supply on Turn burner valve knob s to the ON position for 5 se...

Page 10: ...p cleaning solutions and dry 6 After cleaning burner bowl run a brush through the venturies scrapping off any soot or debris 7 DO NOT CLENA BRASS BURNERS IN A LOW TEMPERATURE DISH WASHER 8 DO NOT USE...

Page 11: ...e All warranty and non warranty repairs should be performed by qualified service personnel To locate an authorized service agent in your area contact your dealer local representative or the manufactur...

Reviews: