background image

WCP-232-EXL 


5

Installation Method 

5-1

Machine Installation 

For WCP-EXL and WCP-232, use the mounting holes on the main unit and fix them in a safe stable place. 
Also, WCP-EXL and WCP-232 are not dust-proof / drip-proof structures. 
Do not install in the following places 

Places exposed to direct sunlight 

Places where the humidity is high 


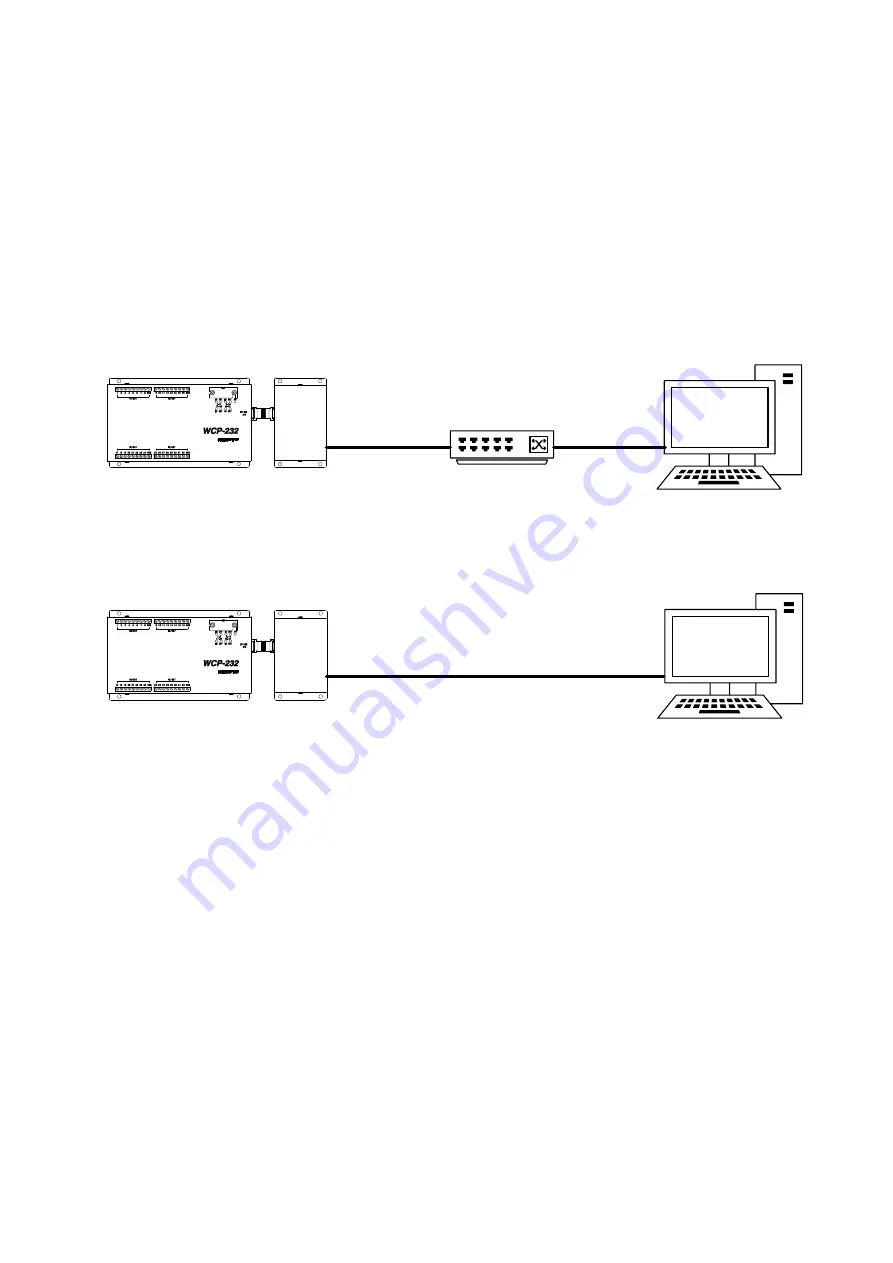
Connect the LAN port of WCP-EXL to the LAN port of HUB or PC with a LAN cable


WCP-EXL  does  not  have  the  AutoMDI  /  MDI-X  function  to  determine  the  LAN  port,  so  it  is  directly 
connected to the PC LAN port. 
When connecting, use a cross-connected LAN cable. 


LAN cable

HUB

LAN cable

LAN cable(cross-wired)

Summary of Contents for WCP-232-EXL

Page 1: ...LAN Connection Type I O unit WCP 232 EXL INSTRUCTION MANUAL V1 00 Please use this operation manual correctly on reading well Please keep it carefully to be able to read immediately when required ...

Page 2: ......

Page 3: ...s 8 4 1 WCP EXL 8 4 2 WCP 232 8 5 Installation Method 9 5 1 Machine Installation 9 5 2 LAN Port 10 5 3 Communication connector 11 5 4 Installation of WCP EXL and WCP 232 12 5 5 Connection to I O terminal block 12 5 6 I O terminal block circuit configuration 13 6 Prepare to Start Communication 14 6 1 Installation of Device Installer 14 6 2 Factory Default IP Address 14 6 3 IP Address Settings and P...

Page 4: ...dy so that you can take it out immediately Do not use this product for the application that may cause harm to human body or damage to other devices and equipment Do not use this product near the devices that may malfunction due to radio waves emitted from this product 1 2 Main Unit and Accessories LAN conversion unit WCP EXL I O unit WCP 232 Conversion unit body 1 AC adapter ADB12100L 1 Cable Appr...

Page 5: ...is the wireless communication equipment made of precision parts Do not disassemble or modify it Or the accident or fault may occur Handling this product Do not use this product for application that requires the extremely high reliability affecting the human life Do not use this product in the area which the radio wave reaches or not Handling the power supply Be sure to observe the followings in or...

Page 6: ...r the accident or fault may occur Do not charge the main body at the location where the flammable gas is generated Or the ignition accident may occur Never disassemble the AC adapter Or the accident or fault may occur Never disassemble the AC adapter Remove the power plug from the outlet because it may cause fire and electric shock Request the dealer or our company to repair it When smoke comes or...

Page 7: ...rate with manufacturing facilities such as output work status PASS FAIL to manufacturing equipment and real time notification of input from manufacturing equipment to watch type transmission and reception device In addition by connecting with WCL plus it is possible to link with manufacturing facilities by notifying the signal input from the manufacturing equipment and PLC with vibration message t...

Page 8: ...terminals Block 16 input points terminals 1 8 terminals 17 24 16 output points terminals 9 16 terminals 25 32 COM 4 points I O Terminal Specifications Input Specifications Non Voltage Contact Input Photocoupler current drive input Input Logic OFF OPEN ON Short Circuit with COM Output Specifications Transistor s Output Open Collector Output Output Logic OFF OPEN ON Short Circuit with COM Communicat...

Page 9: ...Φ4 5 holes DC jack Connect the included AC adapter to supply operating power for WCP EXL and WCP 232 The polarity of the DC jack is center minus LAN Port Connect the LAN cable and perform network communication Communication Connector RS 232C Interface Also used for power supply Connect to WCP 232 with the attached cable ...

Page 10: ... time of input and the red LED lights up at the time of output I O Monitor Indicator 9 16 I O Monitor Indicator 17 24 I O Monitor Indicator 25 32 I O Terminals 1 8 COM Screw Type Terminal Block Tighten the screw with a flat blade screwdriver Input terminals 1 8 17 24 Output terminals 9 16 25 32 I O Terminals 9 16 COM I O Terminals 17 24 COM I O Terminals 25 32 COM Connection Connector RS 232C Inte...

Page 11: ...WCP 232 EXL 8 4 Dimensions 4 1 WCP EXL 4 2 WCP 232 ...

Page 12: ...of structures Do not install in the following places Places exposed to direct sunlight Places where the humidity is high Connect the LAN port of WCP EXL to the LAN port of HUB or PC with a LAN cable WCP EXL does not have the AutoMDI MDI X function to determine the LAN port so it is directly connected to the PC LAN port When connecting use a cross connected LAN cable LAN cable HUB LAN cable LAN cab...

Page 13: ...eceived Data 7 Not Used 8 Not Used Use a category 5 or higher standard for the LAN cable Also the modular jack has a built in LED lamp that allows you to check the communication status Link LED Activity LED LED Data LED Data Off Not Connected Off No Connection Orange 10Mbps Orange Communicating in Half Duplex Lights only when communication occurs Green 100Mbps Green Communicating in Full Duplex Li...

Page 14: ...far as it will go Then pull the cable lightly and make sure the connector does not come off Please Turn of the power when connecting the communication connector The pin specifications are as follows WCP EXL Pin No WCP 232 Pin No Signal Name Description 1 10 Vin Power output 5V 2 9 TXD Output Data 3 8 RXD Input Data 4 7 DSR In WCP EXL DSR 4 and DTR 6 is shorted 5 6 GND Power Signal ground 6 5 DTR I...

Page 15: ...able connected to the I O terminal block Connection wire range 0 14mm2 to 1 5mm2 common to single wire stranded wire AWG26 to AWG16 Peeling wire length 6 0 mm pre soldering of the tip of the wire is not possible The tightening torque of the terminal block screw is 0 5Nm to 0 6Nm Tighten with a flat blade screwdriver When checking the continuity with the head of the terminal block screw make sure t...

Page 16: ... drive current per terminal If the specified power supply voltage or drive current is exceeded please connect a drive circuit such as a relay before use Especially when controlling an inductive load such as a lamp or relay consider the inrush current and take appropriate measures on the load side Example of countermeasures on the load side at the time of contact output Switch input COM I O I O COM...

Page 17: ...LAN cable be sure to use a cross LAN cable Check the left LED on the LAN connector RJ 45 of WCP EXL to see if the Link LED is ON When connected to 10Base T the Link LED lights up in orange When connected to 100Base TX the Link LED lights up in green If the Link LED is not ON WCP EXL cannot communicate with the network Confirm if the LAN cable and HUB are correctly connected 6 2 Factory Default IP ...

Page 18: ... the screen is displayed as shown in Fig 3 Select to assign an IP address automatically or specify an IP address directly This document explains about specifying an IP address Check Assign a specific IP address and click the Next button IP assignment button Select IP address to change Device details IP address assignment method Automatic IP address acquisition Allocation of specific IP address Nex...

Page 19: ...nment input screen Enter the IP address subnet mask and default gateway Before setting an IP address obtain permission from the network administrator Click Next Button Click Assignment button IP address Subnet mask Default gateway Next IP settings Assignment ...

Page 20: ... and the screen is displayed as shown in Fig 7 Confirm if the IP address has changed properly CAUTION If the IP address set by the customer is already used on the network the signals will run into each other Set another IP address CAUTION This product is intended to be used on a closed network that is not connected to the internet Do not use this product in an open network environment that is conn...

Page 21: ... Leaving the default password can cause a security risk to the product Be sure to change the default password Click the WEB configuration tab on the screen in Fig 7 and the screen in Fig 8 is displayed Click the Navigate button and the password entry screen in Fig 9 is displayed Please leave the user name blank Enter the following password When the entry is completed click the OK button Initial Pa...

Page 22: ...WCP 232 EXL 19 Server Button Fig 10 Web Manager initial screen On the Web Manager screen in Fig 10 click the Server button ...

Page 23: ...try again is displayed Retry and again Click Apply Settings button When the process is completed the password entry screen is displayed Enter the set password and press the OK button Please leave the user name blank If login is successful the settings are complete Press the x button on the top right of the screen and the application exits CAUTION When reconfirming the changes made to the settings ...

Page 24: ...please refer to Production Process Support Software for Pokayoke Tools POKAYOKE plus Instruction Manual and Production Process Support Software for WCL Series WCL plus Instruction Manual When connecting to POKAYOKE plus and WCL plus WCP 232 EXL operates with the following settings fixed settings I O Terminal Block Setting Input Terminals 1 8 17 24 Output Terminals 9 16 25 32 Input Terminals Please...

Page 25: ... the Warranty Period please contact your dealer or our Sales Department Scope of Warranty In case any failure occurs attributable to the Company during the Warranty Period the defect will be remedied free of charge either by repair or replacement with a substitution To obtain warranty service contact your dealer or our Sales Department The Warranty Period after repair or replacement is 13 months f...

Page 26: ...e responsible for any direct or indirect damage and financial loss caused by malfunction or failure of the Product or its use Period for Charged Repair After the Warranty Period expires the Company will repair the Product for a fee on customer s request during a 5 year period after termination of the Product on the condition that spare parts are available in stock at the Company However in case of...

Page 27: ......

Page 28: ...UTU ELECTRONICS CORPORATION 422 1 Higashimikata cho Kita ku Hamamatsu Shizuoka 433 8104 Japan Sales dept TEL 81 53 438 3555 FAX 81 53 438 3411 Website URL https www herutu co jp en E mail info herutu co jp ...

Reviews: