background image

For any of your service related query/requirements you may contact the respective 

Zonal/Regional/Area Offices

Hero MotoCorp Ltd

., Flat No: 1002. 10th Floor, Martin Burn Business Park, BP3, Salt Lake, Sector-V, Kolkata-700091, 

West Bengal, India. Tel : +91-33-4491-33-44026830, E-mail : [email protected]

Hero MotoCorp Ltd

., Odyssa Business Centre, Plot no. 30, 30/982, 172/1030, 4th Floor Cuttack, Bhubaneshwar highway road, 

Rasulgarh, Bhubaneswar-751010, Odisha, India. Tel: +91-674-2581161, 62, 63, 64, E-mail: [email protected]

Hero MotoCorp Ltd

., Yash Heights, 1st Floor Bariatu Road, Above Basudeb Tata Showroom Ranchi-834009, Jharkhand, 

India. Tel: +91-651-2542222, 2542224, 2542225, E-mail: [email protected]

Tel: +919334280555/7004569648 E-mail: [email protected]

Hero MotoCorp Ltd

., Sai Corporate Park, A Block, 6th Floor, Rukanpura, Bailey Road Patna, Bihar – 800014

EAST ZONE

Hero  MotoCorp  Ltd

.,  3rd  Floor,  Tower-A,  DLF  Centre  Court,  Sector-42,  Golf  Course  Road,  DLF  Phase  5,                  

Gurgaon -122002, Haryana, India. Tel: 0124-4754800, E-mail: [email protected]

Tel: +91-172-2623773, 2623774, 2623775, E-mail: [email protected]

Hero MotoCorp Ltd

., S.C.O-367-368, First Floor, Sector-34A, Chandigarh-160022, India.

Tel:0135-2714661,2713662,2714663, E-mail: [email protected]

Hero MotoCorp Ltd

., Kapoor Towers, Plot No- 284, 15-B, Rajpur Road, Dehradun-248001, India.

NORTH ZONE

Hero MotoCorp Ltd

., No. 209-210, Ganpati Plaza, M.I. Road, Jaipur-302001, (Rajasthan).

Tel: +91 141 2389031, +91 141 2389156, E-mail: [email protected]

Hero MotoCorp Ltd

., Third Floor, Alankar Palace, Plot No. 11, Zone II, M.P. Nagar Bhopal-462011, India. 

Tel: +91-755-4203160, 2553697, 4272429, 2550086, E-mail: [email protected] 

Tel: +91-731-4978269, 70, E-mail: [email protected] 

Hero MotoCorp Ltd

., Maloo-01, 601-602, 6th Floor, Plot No. 26C, Scheme No. 94, Ring Road, Indore, M.P.-452010,

CENTRAL ZONE

Hero MotoCorp Ltd

., Office. No.401, 4th Floor, Offizo, Magneto Mall, Labhandi, G.E. Road, Raipur -492 001, (Chhattisgarh)

Tel: +91-771-4034749,  E-mail: [email protected]

Hero MotoCorp Ltd

., Office No. 705-706, 7th Floor, Fun Square, Durga Nursery Road, Udaipur -313001 (Rajasthan). 

Tel: +91 0294-2980578, 79, E-mail: [email protected]

Hero MotoCorp Ltd

., 602, 6th Floor, Office Tower-1, Plot No BW58, Logix City Center, Sector-32, Noida – 201301.  

Tel: 0120-4631000, E-mail: [email protected]

ZONAL/REGIONAL

/AREA

 OFFICES

Summary of Contents for MAESTRO EDGE 125 PROGRAMMED FI

Page 1: ...re helps in conspicuity for improving rider safety The headlamp of this vehicle will always be lit ON when theenginegetsON This booklet is your guide to the basic operation and maintenance of your new Please take time to Hero MotoCorp MAESTRO EDGE 125 PROGRAMMED FI vehicle read it carefully As with any fine machine proper care and maintenance is essential for trouble freeoperationandoptimumperform...

Page 2: ... DIRECTIONS SPECIFICATIONS AND OTHER CONTENTS COVERED IN THIS OWNER S MANUAL ARE BASED ON THE LATEST PRODUCT INFORMATION AVAILABLE AT THE TIME OF ITS PRINTING APPROVAL AND THE ACCURACY OR CORRECTNESSOFTHESAMEISNOTUNDERTAKENORGUARANTEED NOTE ACCESSORIES SHOWN MAY NOT BE THE PART OF STANDARD FITMENT IT IS OUR ENDEAVOUR TO CONSTANTLY IMPROVE OUR PRODUCTS THIS COULD LEAD TO CHANGE IN PRODUCT SPECIFICA...

Page 3: ...ROL 25 USB charger 28 Luggage hooks 29 Side stand indicator switch Optional 30 Pillion footrest 31 PARKING 48 Center compartment 32 Front cover 37 PRE RIDE INSPECTION 41 Rear view mirror Headlamp case 39 STARTING THE ENGINE 42 ANTI THEFT TIPS 41 BODY PARTS REMOVAL 32 Front center cover 36 Floor side cover 38 Body cover 33 Headlamp focus adjustment 40 RUNNING IN 43 RIDING 44 MAINTENANCE 51 MAINTENA...

Page 4: ...berequired 1 Duringregistrationofthevehicle 2 Fordealingwithlegal insurancedepartments 1 MBLJAW14 Model MAESTRO EDGE 125 PROGRAMMED FI VIN Engine Variant JAW14 JF17EC Disc Cast wheel Integrated brakes MBL JAW14 Manufacturer code Vehicle Description Model Year Plant Code Month of Manufacturing Production Serial Number Check Digit Engine No JF17EC JF17EC Engine Description Year of Manufacturing Asse...

Page 5: ...tre at draining 5 0 litres 6 7000 r min 8 kW 9 1 BHP 10 2 N m 50 r min 2 00 52 4x57 8 mm 9 9 1 124 6 cc Champion RG8YC Federal Mogul Capacities Engine Spark plug gap Valve clearance Idle speed Front suspension Rear suspension Caster angle 0 8 0 9 mm 0 14 mm 0 14 mm 1 00 7 150 r min 28 Intake cold Exhaust cold Chassis and suspension Spark plug Chassis type High rigidity under bone Telescopic hydrau...

Page 6: ...osition lamp Meter illumination 12V 10Wx4 nos MFR Clear lens Amber bulb 4 7Wx9nos LED 12V 80mWx3 nos LED Amber Turn signal indicator 12V 105mWx2 nos LED Green Hi beam indicator Licence plate Side stand indicator Boot lamp 12V 133mW LED Blue 12V 5W 12V 80mW LED Red 12V 30mW LED MF stands for Maintenance Free MFR stands for Multi Focal Reflector VEHICLE SPECIFICATION Front Disc type Rear Drum type I...

Page 7: ...on on holding onto the grab rail or your waist leaning with you in turns and keeping their feet on the foot pegs evenwhenthevehicleisstopped Keepyourvehicleinsafecondition Makeyourselfeasilyvisible Pushing the limits is another major cause of vehicle accidents Never ride beyond your personal abilities or faster than conditions demand Remember that fatigue and negligencecansignificantlyreduceyourab...

Page 8: ... whether itissafetocontinueriding Callforemergency assistance if needed Also follow applicable laws and regulations if another person or vehicleisinvolvedinthecrash Ifyouareinvolvedinacrash If you decide to continue riding first evaluate the condition of your vehicle If the engine is still running turn it off Inspect for fluid leaks check the tightness of critical nuts and bolts and check the hand...

Page 9: ...6 PROTECTIVE APPAREL Always wear HELMET Wear bright or reflective clothing Wear a face shield or goggles Shoes should be close fitting low heels and offer ankle protection Wear gloves ...

Page 10: ...ing too much weight in individual storage compartments can also affect stability and handling So be sure to stay within the limits givenbelow Frontinnerbox 1 5Kg Centercompartment 10 0Kg Rearluggagehook 1 5Kg Frontluggagehook 3 0Kg Maximumweight Maximumweightcapacity 130Kg Followingaretheloadlimitsforyourvehicle Includes the weight of the rider pillion all cargoandallaccessories Load limits Your v...

Page 11: ...t exceed the vehicle s electrical system capacity page 3 A blown fuse can cause lossoflights We strongly advise you not to remove any original equipment or modify your vehicle in any way that would change its design or operation Such changes could seriously impair your vehicle s handling stability and braking makingitunsafetoride Do not pull a trailer or sidecar with your vehicle This vehicle is n...

Page 12: ...e throttleincloseposition Always wear a helmet ISI marked with chin strap securely fastened and insist on a helmetforyourpillionrider Always conduct simple pre ride inspection page41 During night time dip headlamps of your vehicle for oncoming traffic or when followinganothervehicle Give way to others on the road and signal beforeyoumakeaturn Never touch any part of the hot exhaust systemlikemuffl...

Page 13: ...ormance Genuine spares Always insist on Hero MotoCorp genuine parts as spurious or incompatible spares and accessories can upset or deteriorate your vehicle s running condition Thefollowingtipsshallensureahealthyvehicle healthyenvironment andahealthyyou Noise pollution Noise beyond a certain decibel is pollution Whether it is from horns or defectivemufflers excessivenoisewillcauseheadachesanddisco...

Page 14: ... Service reminder 3 Turn signal switch 4 Integrated brake lever 8 Hi beam indicator 1 Turn signal indicator 20 MIL indicator 18 Ignition switch with steering lock seat lock and fuel lid opener 19 Mode button 12 Tripmeter 13 Master cylinder inside 14 Front brake lever 15 Throttle grip 16 Starter switch 17 Odometer TOP VIEW VEHICLE VIEWS 10 7 8 11 9 6 1 2 3 4 5 12 13 18 14 15 16 17 20 19 ...

Page 15: ...Sidestand optional 5 Sidestandswitch optional 6 Mainstand 12 Rear grip 13 Seat 14 Boot lamp inside 15 Rear luggage hook 16 Headlamp 17 Front reflex reflector LEFT SIDE VIEW 7 Pillionstep 9 Women pillion step optional 10 Rear turn signal lamp 11 Tail stop lamp 8 Kick starter pedal 12 16 13 15 14 11 10 6 7 8 3 4 1 2 5 9 17 ...

Page 16: ...rd fitment 4 Front inner box optional 2 Oilleveldipstick 1 Exhaustmuffler 3 Pillionstep 6 Position lamp 7 Front luggage hook 5 Front turn signal lamp RIGHT SIDE VIEW 9 Center compartment inside 8 USB charger inside 10 Rear reflex reflector 6 9 7 8 4 2 1 3 10 5 ...

Page 17: ...erated PARTS FUNCTION InstrumentsandIndicators The indicators are in the speedometer panel above the headlamp The functions are as below Sl No Description Function Programmed FI 1 malfunction indicator lamp MIL When the ignition switch is turned ON the programmed FI malfunction indicator lamp MIL glows continuously until the vehicle starts It indicates that programmed FI system is OK If MIL remain...

Page 18: ...reafter a Odometer Tripmeter Theodometerdisplaysfrom 0to999999 km LCDPANEL The odometer 1 shows accumulated distance travelled The tripmeter 2 shows distance travelled sincetripmeterwasresetlasttime Tripmeter displays upto 999 9 km If the tripmeter exceeds 999 9 km it will return to 0 0 kmautomatically Whentripmeterisselectedlongpressthereset button 3 willresettripmetertozero If all the vertical b...

Page 19: ...e a key Store the plate in a safe place Information you need to operate this vehicle BRAKES INTEGRATEDBRAKING Brakes are items of personal safety and should alwaysbemaintainedwithproperadjustments Your vehicle is equipped with hydraulic integratedbrakingsystem disc braketype When one applies the left brake lever front rearbrakesactivatejointly After getting the vehicle serviced make sure thatthese...

Page 20: ... safety exercise extreme caution whenbraking accelerating or turning When riding in wet or rainy conditions or on loose surfaces the ability to stop the vehicle reduces Wherever possible reduce speed or apply brake before entering a turn closing the throttle or braking in mid turn may cause wheel slip Wheel slip will reduce control overthevehicle Extreme braking may cause wheel locking andreduceco...

Page 21: ...eated 3 4 3 4 If proper adjustment cannot be obtained by this method visit your Authorised Hero MotoCorp workshop If the free play is more than 20 mm further turn the adjuster nut to obtain desired free play Visit your Authorised Hero MotoCorp workshop forthebrakepadreplacement Make free play adjustment by turning the adjusternut 1 inthebrakearm 2 Adjustment Check the free play of integrated brake...

Page 22: ...apbyturningitcounterclockwise a Fuel tank Thefueltankcapacityis5 0litres FUEL 1 Fuel tank lid 2 Fuel filler cap 3 Ignition key N O ITI N O IGNITI FUEL OPEN H S U P S H U P 2 3 1 Do not overfill the tank There should be no fuel 4 inthefillerneck 5 4 Fuel 5 Filler neck 4 5 We recommend that you use unleaded petrol because the muffler in the vehicle is fitted with a catalytic convertor it also produc...

Page 23: ...t coveredunderHero MotoCorp warrantypolicy NOTE Never use petrol containing more than 5 methanol even if it has cosolvents and corrosioninhibitors When a problem resulting from the use of petrol containing alcohol occurs contact yourAuthorisedHero MotoCorp workshop If you notice any undesirable operating symptoms while using the petrol that contains alcohol try another station or switchtoanotherbr...

Page 24: ...islow Over inflated tyres make your vehicle ride harshly are more prone to damage from road hazardsandwearunevenly Keeping tyres properly inflated provides the best combination of handling tread life and ridingcomfort Generally under inflatedtyres wear unevenly adversely affect handling and aremorelikelytofailfrombeingoverheated leakage is often very slow you should look closely for punctures when...

Page 25: ...y inspect the tyres for any damage ifthevehiclehitsapotholeorhardobject Treadwear Minimumtreaddepth Checkthetreadwearindicatorfortyrewear 1 Tyre wear indicator 2 Arrow mark TWI 1 1 2 Unidirectionaltyres Tyrerepair Whenever the tyre is removed and put back in case of puncture ensure the arrow mark 2 on the tyre is in the same direction as that of forwardrotationofwheel Repairing a puncture or remov...

Page 26: ...re slippingonortyrecomingofftherim Always use the size and type of tyres recommendedinthisowner smanual Operation with excessively worn tyres is hazardous and will adversely affect traction andhandling Riding on tyres that are excessively worn or improperly inflated can cause a crash in whichyoucanbeseriouslyhurtandkilled WARNING The imported tyre s if fitted without ISI mark are in compliance of ...

Page 27: ...andcannotbeoperated LOCK Key cannot be removed Key can be removed Key can be removed Seat can be opened by rotating the key counterclockwise SEAT OPEN Key can be removed 24 FUEL OPEN Fuel tank lid can be opened by pushing the key inandrotatingitclockwise Key can be removed Steering can be locked by pushing the key in and rotating it counterclockwise SEAT OPEN L O C K PUS H PU SH FUEL OPEN IG ON OF...

Page 28: ...ebarcontrols 1 Dimmerswitch Passingswitch Press the switch upwards for high beam 2 Turnsignalswitch HANDLEBARSWITCHESCONTROLS Presstheswitchtooperatethehorn 25 The starter switch 1 is next to the throttle grip 1 Starterswitch When the starter switch is pressed the starter motor cranks the engine See page 42 for thestartingprocedure Righthandlebarcontrols 1 Dimmer switch Passing switch 2 Turn signa...

Page 29: ...ontrol CAUTION Gently close the lid by hand Sudden dropping ofthelidmayresultinbreakingthelidlockand malfunctionofthelock c Seat lock The seat lock is provided along with the ignitionswitch 1 To open the seat insert the key 2 and turn it counterclockwise to SEAT OPEN position The seat will release from its catch To lock the seat close and push down on the rearoftheseatuntillocks Makesuretheseatiss...

Page 30: ...water may enter intothecompartment f Document compartment First aid kit Tool kit holder Never exceed the maximum weight limit handling and stability may be severely affected The center compartment may become heated by the engine Do not store food and other articles which are flammable or susceptible to heat damage The document compartment 2 and first aid kit tool kit holder 3 is located in the cen...

Page 31: ...lamp will be functional only when the seat is open Opening and closing the seat lock see page26 CAUTION Before the vehicle is pressure washed the items kept inside the center compartment should be removed to prevent consequential damage A USB charger 1 with a cap 2 located insidethecentercompartment 3 isprovided in your vehicle to charge your mobile phone safelywhileriding h USB charger 1 USB char...

Page 32: ...oisturefreecompressedairbeforeuse Any personal belongings have to be removed before water washing to avoid damage Do not apply any soap solution oil or greaseinsidetheUSBcharger Always keep the USB port cap closed after use to prevent dust or water entry during rains waterwash NOTE i Luggagehooks Two luggage hooks are provided in your vehicle to carry a light luggage like shopping bagsorcarrybags ...

Page 33: ...ise handling and stabilitymaybeseverelyaffected MAXIMUMWEIGHTLIMIT 1 5Kg k Side stand indicator switch Optional For the safety of the customer a side stand indicator 1 isprovided 2 1 Side stand indicator 1 A side stand switch 2 is provided in the side stand when the side stand is down Ignition switch ON the switch enables the side stand indicator lamp to glow on the speedometerpanel 2 Sidestandswi...

Page 34: ...the side stand indicator 1 does not operate as described in above steps please visit your Authorised Hero MotoCorp workshop CAUTION Ensure that adequate care should be taken whilecleaningthesidestandswitch Movetherightandleftfootrestinthedirection shownbyarrowstoopen Foldingcanbedone bymovingfootrestinthereversedirection l Pillionfootrest 1 Left footrest 1 2 Right footrest 2 m Womenpillionstep Opt...

Page 35: ... USB charger connector 2 Boot lamp connector 4 Center compartment 4 3 2 1 lamp connector 2 and USB charger connector 3 Removethecentercompartment 4 Slightly lift up the center compartment from the rear and disconnect the boot Move the women pillion step to open Folding canbedonebymovingthewomenpillionstep inreversedirection ...

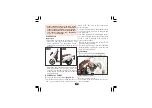
Page 36: ...rews 4 Center cover 4 3 Removethereargripbolts 2 1 Bolt 1 Removethecentercompartment page27 Removal Removethetrayfuelsubassemblybolt 1 b Bodycover Installationisinthereverseorderofremoval Installation Park the vehicle on its main stand when servicing the vehicle with the center compartmentremoved NOTE ...

Page 37: ...34 7 Screws 6 Bolts Removethebolts 6 Remove the screws 7 from left and right sideofthebodycover 7 6 5 Screws 5 Removethebodycoverbolts 8 8 Body cover bolts 8 Disconnectthefueltanklidlockcable 9 ...

Page 38: ...he tail stop lamp connector 10 10 Tail stop lamp connector 10 Pull the body cover slightly backwards and release the tabs 11 from it slots 12 frombothsidesofthevehicle 11 11 Tabs 12 Slots 12 Disconnect the drain tube from the joint 13 Release the body cover from its frame 9 ...

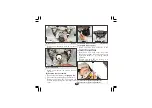
Page 39: ...ews 2 near the front fender 2 Screws 2 c Frontcentercover Remove the two screws 1 on the inner coverside Removal While removing the front centre Cover make sure to open the cover cautiously to avoid positionlampwirebreakage NOTE Disconnect the position lamp connector 3 and release the front center cover lugs 4 from the mounting clips Remove the 13 ...

Page 40: ...innerbox Removefrontinnerbox d Frontcover 3 position lamp connector 4 Lugs 3 Screws 2 Bolts Removethetopandbottomscrews 3 Remove the four bolts 2 from the front cover 1 Screws 1 4 Screws Remove the screws 4 from the floor side covers 4 Remove the front cover and disconnect the frontturnsignallampconnectors 5 4 3 front center cover by pulling it axially downwardstowardsfront 2 3 ...

Page 41: ...al 5 Front turn signal lamp connectors 5 5 To dislodge the tabs 3 slide the floor side coverstotherearside Installation Installationisinthereverseorderofremoval Leftfloorsidecover Removetherightfloorsidecover Remove the three screws 1 from left floor sidecover 2 Openthepillionfootrest page31 Removal 1 1 Screws 2 Right floor side cover 2 3 3 Tabs 1 1 Screws 2 Left floor side cover 2 ...

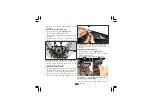
Page 42: ...iew mirror until it will nolongerturn Loosentherearviewmirrorapproximately2 turns Adjust the rear view mirror Tighten the lock nut 1 Dust cover 2 Lock nut 3 Rear view mirror 2 3 1 Removal f Headlampcase Removetherearviewmirror page39 Removescrew 1 Removetheleftfloorsidecover Installation Installationisinthereverseorderofremoval To dislodge the tabs 3 slide the floor side coverstotherearside 3 3 Ta...

Page 43: ...llation Park the vehicle on main stand on a levelsurfaceinfrontofawall g Headlampfocusadjustment Verticaladjustment Headlamp focus is factory preset However in case of adjustment required please follow the stepsasgivenbelow Pull the headlamp case 2 slightly up carefullyreleasethetabs 3 fromtheslots Removethescrews 4 A B 1 5 1 Screw 2 Headlamp case 3 Tabs 2 1 3 ...

Page 44: ...ming driver or it may fail to light the road forsafedistance WARNING Throttle Check for smooth opening and fullclosinginallsteeringpositions Lamps and horn Check that headlamp tail stop lamp turn signal lamps indicators andhornfunctionproperly Fitting fasteners Check tighten if necessary Steering Checkforsmoothactionforeasy maneuverability Programmed FI malfunction indicator lamp MIL When the igni...

Page 45: ...onger than usual without opening the throttle if the vehicle has been left standing for a long time or when the fuel tank hasjustbeenrefilled Do not use the electric starter for more than 5 seconds at a time Release the starter switch forapproximately10secondsbeforepressing itagain NOTE open run the engine only long enough to moveyourvehicleoutofthegarage Your vehicle s exhaust contains poisonous ...

Page 46: ...ch NOTE The engine will not start if the throttle is fully open as programmed FI system will cut off the fuelsupply WARNING Snapping the throttle or fast idling for more than 5 minutes at normal air temperature maycauseexhaustpipediscolouration Do not leave the vehicle unattended while theengineiswarmingup With the throttle closed operate the kick starterwitharapidandcontinuousmotion Continue warm...

Page 47: ...e left side keeping at least one foot on the ground tosteadythevehicle Before starting indicate your direction with the turn signals and check for safe traffic conditions Grab the handle bars firmly with both hands Never attempt one handed operation this could lead to loss of vehiclecontrol To accelerate open the throttle 1 gradually the vehicle will move forward Do not BLIP the throttle open and ...

Page 48: ...ion of front and rear brakes simultaneously However for more effective braking it is advised to apply both front and rear brake simultaneously keepingthethrottleincloseposition Todecelerate closethethrottle Do not accelerate with the brakes applied this may lead to premature wear of brakes andtransmissionparts OPEN CLOSE 1 1 Throttle CLOSE 3 4 Front brake 5 Rear brake SEAT OPEN LOC K PUSH PUS H FU...

Page 49: ...icle by applying both front 4 and rear 5 brakesatthesametime After completing the turn open the throttle gradually to accelerate the vehicle 3 Throttle CLOSE SEAT OPEN LOC K PUSH PUS H FULL OPEN IG PASS 20 0 40 00 20 F E TRIP ODO km km 888 8 888888 km h 3 4 Front brake 5 Rear brake 5 4 ...

Page 50: ...close throttle 3 fully and by applying both front 4 and rear 5 brakes at the same time Avoid continuous use of the brakes which may result in overheating and reduction of brakingefficiency 4 Front brake 5 Rear brake 3 Throttle CLOSE 5 3 4 ...

Page 51: ...low for extra stoppingdistance Be cautious when riding over slippery surfaces such as railway tracks iron plates manholecovers paintedlines etc Lockthesteeringtopreventtheft 1 Ignition key A Push in B Turn to lock STEERING LOCK 48 HOW TO USE MAIN STAND A B CAUTION The exhaust pipe and muffler become very hot during operation and remain sufficiently hot to inflict burns if touched even after turnin...

Page 52: ... designed for vehicle or automobile surfaces They may contain harsh detergents or chemical solvents that could damage the metal paintandplasticpartsonyourvehicle Wrenchplug16mm 1No The tool kit 1 is located in the center compartment 3 Toolbag 1No TOOL KIT FIRST AID KIT Someroadsiderepairs minoradjustmentsand parts replacement can be performed with the toolsavailableinthekit No 2driver 1No Grip 1No...

Page 53: ...beam NOTE After cleaning rinse the vehicle thoroughly with plenty of clean water Strong detergent residue can corrode alloy parts Dry the vehicle with pressurized air start theengineandletitrunforseveralminutes Braking efficiency may be temporarily impaired immediately after washing the vehicle Anticipate longer stopping distance to avoid a possibleaccident Test the brakes before riding the vehicl...

Page 54: ...rly maintaining this vehicle or failing to correct a problem before you ride can cause an accident in which you can be seriouslyinjured Always follow the inspection and maintenance recommendations and schedulesinthisowner smanual WARNING Always follow the procedures and precautions inthisowner smanual Failure to follow maintenance instructions and precautions properly can seriously injureyou WARNI...

Page 55: ...less instructed todoso Let the engine and exhaust system cool beforetouching vehicle To help prevent the from falling over park it on a firm level surface on the mainstand To ensure best quality and reliability it is recommended to use Hero MotoCorp genuinepartsforrepairandreplacement Read the instruction before you begin and make sure you have the tools and skills required Burnsfromhotparts Be su...

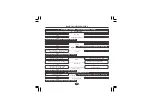
Page 56: ...Replacethefrontforkoilonceinevery2yearsor20000km whicheverisearlier Note 4 Servicemorefrequentlywhenridinginrainoratfullthrottle Note 12 Inspectforanyplayinthemountingbushes replaceifnecessary Note 13 Inspectthebearingsfreeplay replaceifnecessary Note 14 Inspectifsidestandswitchisinstalled In the interest of safety we recommend that these jobs are carried out only by your Authorised Hero MotoCorp ...

Page 57: ...ES FIRST ITEMS DURING FREE SERVICE PERIOD SERVICE st 1 nd 2 rd 3 th 4 th 5 AFTER FREE SERVICE ONCE IN EVERY 6000 9000 12000 15000 DAYS KM Note 1 500 750 R C C C C I A I A I A I A I A I A I C A I C A I C A I C A I C A R I A I A I A I A I A I I I I I I I A 3000 Next 100 Next 100 Next 100 1st 60 Next 100 Note 3 I C Drain Crankcase Breather Tube I C I C I C Note 4 I C I C Engine Oil R T R R T T R Fina...

Page 58: ...steners I I I I I I Wheel Tyres I I I I I I I E I E I E I A I A I A I L A I L A Steering Head Bearings I A I A Muffler Catalytic Converter Main Stand Side Stand Switch Optional Battery Voltage Note 11 L L L L L L Side Stand Optional Note 14 I I I I I I Headlamp Focus I Drive Belt I I C L C L C L C L C L C L Belt Case Kick Starter Driven Gear Front Suspension Oil I I I I I I Rear Suspension I I I I...

Page 59: ...page54 Removethebodycover page35 The air cleaner element is of viscous type it should be replaced at regular intervals pages 55 Early replacement may be required when riding in unusually wet or dusty areas Removetheaircleanercover 2 Remove the air cleaner assembly 3 from housing 4 2 3 Air cleaner assembly 4 Air cleaner housing 3 4 ...

Page 60: ...lement once in every 15000 km or early replacement may be requiredwhenridingindustyareas At 12000 km inspect if air cleaner element is choked If found choked replace the air cleanerelementtokeeptheenginehealthy NOTE Donotwashusinganysolvent Donotblowcompressedair CAUTION Inspect the air cleaner element for any dust ordirtaccumulation Replace the air cleaner element if found choked 4 Air cleaner ho...

Page 61: ...chafed or improperly routed it should be replaced or rerouted Standard throttle grip free play 1 isapproximately2 6mmofgriprotation Check for smooth rotation of the throttle grip Ifthespecifiedfreeplayisnotachieved adjust thefreeplayonthrottlebodyside Removethecentercompartment page29 Loosen the lock nut 5 Turn the adjusting nut 6 to obtain the specified free play Tightenthelocknutandchecktheadjus...

Page 62: ...hicle on its main stand on a level surface Remove the oil level dipstick wipe it clean and reinsert the oil level dipstick without screwingitin Stoptheengineandwaitforfewseconds If required add recommended oil up to the upperlevelmark Donotoverfill Reinstall the oil level dipstick Check for oil leaks Start the engine and let it idle for few minutes 3 1 2 59 SavitaOilTechnologyLimited JASOMB BRAND ...

Page 63: ...e crankcase and remove the oil drain bolt 1 with sealingwasher Oil strainer cleaning 1 Drain bolt 1 Remove the oil strainer screen cap 2 The spring 3 and oil strainer screen 4 will come out when the oil strainer screen cap is removed Cleantheoilstrainerscreen Check that the oil strainer screen sealing rubber and cap O ring 5 are in good condition 2 Oil strainer screen cap 2 4 4 3 3 5 5 3 Spring 4 ...

Page 64: ...ly basis it is still advisable to thoroughly wash your hands with soap and water as soon as possibleafterhandlingusedoil Please dispose used engine oil in a manner that is compatible with the environment We suggest you take it in a sealed container to your local recycling center or service station for reclamation Donotthrowitinthetrash orpouritonthegroundordownadrain The final drive oil should be ...

Page 65: ...chplugprovidedinthetoolkit 1 Noise suppressor cap 1 0 8 0 9 mm 2 Side electrode 2 WARNING The spark plug must be securely tightened An improperly tightened plug can become veryhotandpossiblydamagetheengine Never use a spark plug with an improper heat range Severe engine damage could result Tighten a new spark plug 1 2 turn with a wrench plug to compress the washer If you are reusing a plug it shou...

Page 66: ...o the environment and human health Always confirm local regulations for batterydisposal Battery is a Maintenance Free sealed type and can be permanently damaged if the sealingstripisremoved Refertothesafetyprecautions page54 It is not necessary to check the battery electrolyte level or add distilled water as the battery is of Maintenance Free sealed type If your battery seems weak and or electroly...

Page 67: ...Always ensure the battery is fully charged beforeinstallation Ensure the battery leads are properly connected to the battery terminals during installation Batteryremoval Removethefrontcentercover page38 Remove the battery band 1 by removing the 2 bootbandclip frombothsidesofthe battery WARNING Thebatterygivesoffexplosivehydrogengas duringnormaloperation A spark or flame can cause the battery to ex...

Page 68: ...ever use a fuse with a different rating from thatspecified Itmayleadtoseriousdamage to the electrical system or a fire due to short circuit Battery fives off explosive gases Keep sparks flames cigarettesaway A B Fuse holders 1 Main fuse 15A 10A 2 Spare fuse 15A 10A 3 Main fuse 10A 7 5A 4 Spare fuse 10A 7 5A GOOD FUSE BLOWN FUSE 3 4 B 2 1 A CAUTION Turn the ignition switch OFF before checking or re...

Page 69: ...ery hot while the lamp is ON and remains hot for a while after it is BULBREPLACEMENT Removethedustcover 2 Loosen the screw and release the clip 3 fromitsposition 1 Headlamp connector If the replacement fuse of the same rating burns out in a short time there is probably a serious electrical problem on your vehicle Leave the blown fuse in that circuit and have your vehicle checked by your Authorised...

Page 70: ... Front turn signal bulb Remove the bulb 2 by turning it to counterclockwisedirection b Position lamp assembly Disconnectthepositionlampconnector 1 Removethefrontcentercover page38 Remove the screws 2 and remove the positionlampassembly 3 fromfrontcenter cover 1 Front turn signal lamp holder 1 2 Front turn signal lamp bulb 2 2 1 4 Headlamp bulb 4 Install a new bulb in the reverse order of removal 1...

Page 71: ...n e Rearturnsignalbulb Inserthandfrombodycoverrearside above rearfenderareaandremoveturnsignalbulb holder 1 byturningcounterclockwise Install a new tail stop lamp unit in the reverseorderofremoval 1 Fuel drain tube 2 Guide 3 Screws 3 1 2 Remove the fuel tank lid lock cable from the guide 2 Install a new bulb in the reverse order of removal Removethefueldraintube 1 Remove the tail stop lamp unit fr...

Page 72: ...finish the job Use only a non abrasive polish or wax made specifically for automobiles Apply the polish or wax accordingtotheinstructionsonthecontainer Changetheengineoil The road may contain salt which was sprayed as an anti freezing agent during winter and theseawaterarethecausesofrust these repairs may be forgotten by the time the vehicleisremovedfromstorage REMOVINGROADSALT Wash your vehicle w...

Page 73: ... inhibiting oil from the fuel tank Fill the fuel tank with freshpetrol b Removalfromstorage Check the battery voltage and charge the batteryasrequired Installthebattery d Crank the engine several times to distributetheoil Remove the battery Store in an area protected from freezing temperatures and direct sunlight Charge the battery once a month To prevent rusting in the cylinder perform thefollowi...

Page 74: ...t Authorised Hero MotoCorp Workshop Check spark plug for fouling Improper electrode gap Replace spark plug adjust Spark plug gap 0 8 0 9 mm Loose contact Check for poorly connected Or loose spark plug wire Secure properly Check fuel in fuel tank Ok Ok Check fuel lines Leakage air lock Refill Rectify No fuel A Fuel System Consult Authorised Hero MotoCorp Workshop 1 STARTING TROUBLE ENGINE DOES NOT ...

Page 75: ...nnections Consult Authorised Hero MotoCorp Workshop Consult Authorised Hero MotoCorp Workshop Spark plug loose in cylinder head Ok Check air cleaner element Ok Ok Check brake binding Improper Adjustment Tighten the spark plug Readjust free play of rear brake lever Loose 3 POOR PICK UP Ok Check tyre inflation pressure Under inflated Correct tyre pressure Consult Authorised Hero MotoCorp Workshop Di...

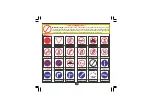
Page 76: ...ese signs as theyhelpavoidaccidents TheirviolationcanbepenalisedundertheMotorVehicleAct Mandatory Speed Limit No Hand Craft No Pedestrians No Right Turn No U Turn Overtaking Prohibited No Parking Length Limit High Limit Restriction Ends No Stopping or Standing Compulsory Ahead Only Compulsory Turn Left Compulsory Right Ahead Compulsory Ahead or Turn Right Compulsory Keep Left Compulsory Bicycle Tr...

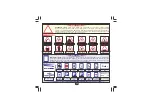
Page 77: ...tant information about road directions are maps of specific destinations On highways they provide information about the location of public telephones restaurants hospitals parking petrol pumps resting places and more These signs are usuallyrectangular withblackorwhitepicturesonabluebackground Signs and Signals are language of the road Learn them respect them Informatory Cautionary NEW DELHI 40 ROH...

Page 78: ... to be free from any defect both in material and workmanship under normal useandconditions subjecttothefollowingterms conditions a vehicle is warranted for a period of MAESTRO EDGE 125 PROGRAMMED FI 5 years or50000Km whicheverisearlier fromthedateofpurchase c If any is observed in vehicle problem MAESTRO EDGE 125 PROGRAMMED FI Hero MotoCorp s only obligation liability is to repair or replace that ...

Page 79: ... in any competitive events like races or rallies or for any MAESTRO EDGE 125 PROGRAMMED FI vehicle commercialpurposesastaxietc 9 Ifanydefectcropsorrepairsneededasaresultofusingadulteratedfuel 10 Ifanymaintenance repairsrequiredduetobadroadconditionsormisuseof MAESTROEDGE125PROGRAMMEDFIvehicle 6 Toanydamageon spaintedsurfacecroppingduetoindustrialpollutionorotherexternalfactors vehicle 3 To normal ...

Page 80: ...ing repaired replaced shall commence from the date of sale of the original battery as stated in the originalwarrantycard 5 All liabilities under this warranty will cease if the battery is used on the vehicle other than that on which the battery was originally fittedandontheexpiryofthewarrantyperiodasmentionedabove 6 Recharging is not covered under the purview of this warranty and shall be billed a...

Page 81: ...m subjecttofollowingterms conditions 30 g Please It is recommended to avail the services as per the recommended schedule to be eligible for the emission warranty benefits ensure that each paid service is availed within 90 days from the date of previous services or as per the recommended schedule whicheverisearlier Allservicedetailsshouldbecompletelyfilledbythedealer inthe givenintheowner s Service...

Page 82: ...mages other parts of clutch like clutch center and outerclutch Engineknocking Leadstoleakageandsmokyexhaust Impropersealing Higheremissionlevel Poorengineperformance Improperairfiltrationresultinginprematureenginefailure Affectsfuelefficiency Gasket Cylinder Head Element Air Cleaner Spark Plug Poor engine performance Frequentstallingofengine Affects fuel efficiency Higher emission level Poor braki...

Page 83: ... 2623774 2623775 E mail chandigarh heromotocorp com HeroMotoCorpLtd S C O 367 368 FirstFloor Sector 34A Chandigarh 160022 India Tel 0135 2714661 2713662 2714663 E mail dehradun heromotocorp com HeroMotoCorpLtd KapoorTowers PlotNo 284 15 B RajpurRoad Dehradun 248001 India NORTH ZONE HeroMotoCorpLtd No 209 210 GanpatiPlaza M I Road Jaipur 302001 Rajasthan Tel 911412389031 911412389156 E mail jaipur ...

Page 84: ...NH 5 Vijayawada 520008 AndhraPradesh India Tel 91 866 2546859 2546860 E mail vijayawada heromotocorp com HeroMotoCorpLtd 3 6 289 3rdFloor KareemManzil Hyderguda Hyderabad 500029 India Tel 91 40 23223735 23223727 23223570 E mail hyderabad heromotocorp com SOUTH ZONE Tel 91 44 24340974 24340977 24340978 E mail chennai heromotocorp com HeroMotoCorpLtd 9thFloorSeshachalamCentreNo 636 1 AnnaSalai Nanda...

Reviews: