background image

 eDriveTC User Guide

29

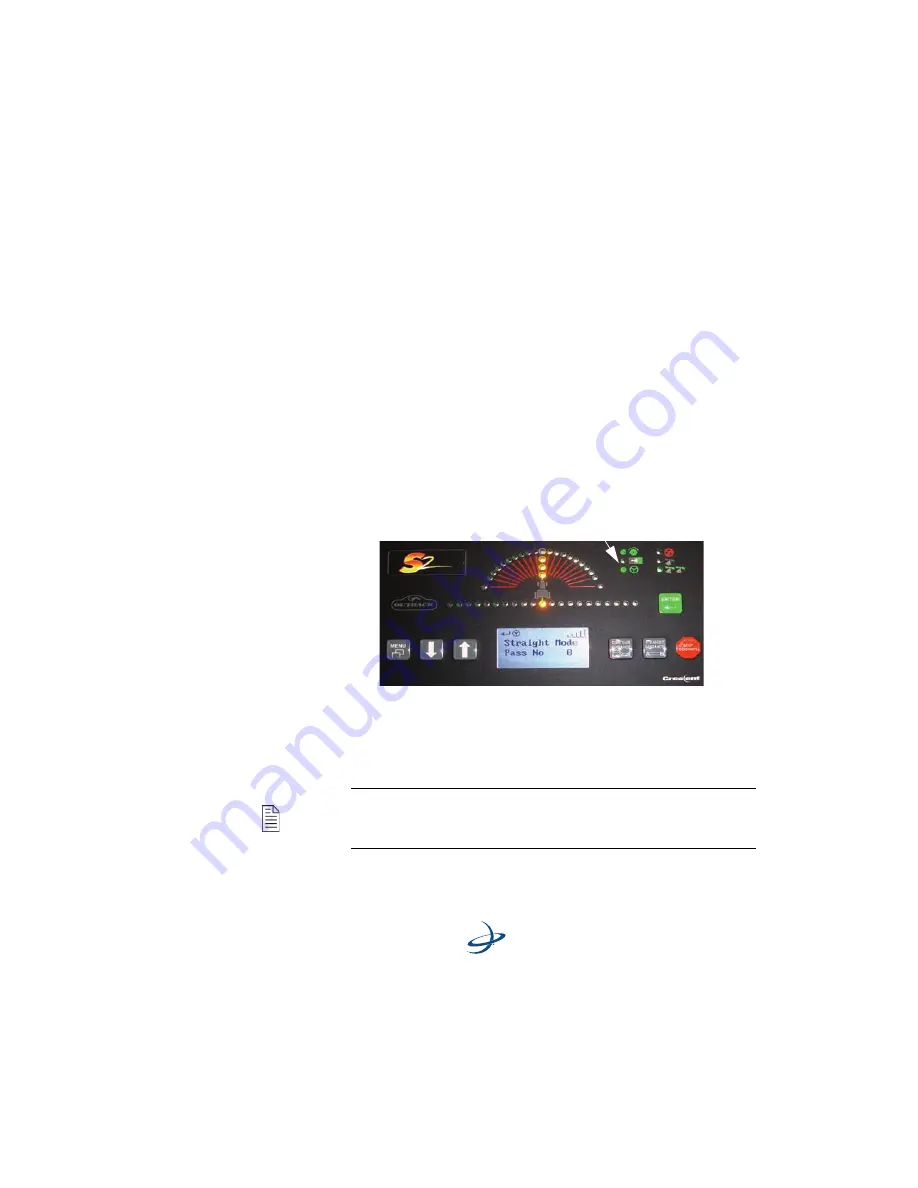
Auto-Engage

The Auto-Engage

TM 

feature is optional. It allows the vehicle operator to 

turn around at the end of one pass, line up on the next guideline, and 
automatically re-engage eDriveTC


without pressing the ENTER button. 

The auto-engage feature may be turned on or off through the eDriveTC 
setup menu.

To operate with the auto-engage:

1.

Initiate guidance and manually engage the eDriveTC, using the 
normal operating procedure.

2.

At the end of the pass, manually steer off the guideline to auto-
disengage eDriveTC. The eDriveTC indicator light will begin 
flashing.

3.

Turn the vehicle around and manually steer to the next pass. Center 
both the current position and steering guide

TM

 lights for one 

second. The eDriveTC


will automatically re-engage and the 

eDriveTC indicator light will turn on solid.

Note: 

If you continue to manually steer after the vehicle is on 

the guideline, the eDriveTC will sense the movements in the 
steering wheel and disengage. 

eDriveTC indicator light

Summary of Contents for eDriveTC

Page 1: ...Outback eDrive User Guide Part No 875 0171 Rev C1 ...

Page 2: ...rademarks of Hemisphere GPS Other trademarks are the properties of their respective owners Notice to Customers Contact your local dealer for technical assistance To find the authorized dealer near you call or write us at Footnotes OUTBACK OUTBACK Guidance OUTBACK Guidance Center OUTBACK S OUTBACK S Lite OUTBACK 360 OUTBACK Steering Guide OUTBACK Hitch eDrive eDriveTC Just Let Go and BaseLineHD are...

Page 3: ......

Page 4: ...ng Products Products are not intended for primary navigation or for use in safety of life applications The potential accuracy of Products as stated in Hemisphere GPS literature and or Product specifications serves to provide only an estimate of achievable accuracy based on Specifications provided by the US Department of Defense for GPS Positioning DGPS service provider performance specifications H...

Page 5: ...f purchase For any questions regarding warranty service or to obtain information regarding the location of any of Hemisphere GPS approved service centers contact Hemisphere GPS at the following address Outback Guidance Technical Support Hemisphere GPS 2207 Iowa Street Hiawatha Kansas 66434 USA Phone 800 247 3808 Fax 785 742 4584 outbackcs outbackguidance com http www hemispheregps com ...

Page 6: ... 2 Getting Started 7 Overview 8 Installing the eDriveTC 8 Powering the Unit 15 To power up both units 15 To power up the Outback S2 only 15 System Configuration 16 Using the menu 16 Initial system startup sequence 16 3 eDriveTC Operation 23 Guidance overview 24 General Operation 24 For Straight Driving 25 ...

Page 7: ... Tuning Performance 32 TroubleShooting Tips 34 Vehicle Type Setup Table 35 Appendices 37 A Making the Most of Automated Steering 38 GPS Signal Accuracy 38 Machine Vehicle Control 41 Implement Tracking 43 Field Conditions 45 Consistent Accuracy and Increased Productivity 46 B Frequently Asked Questions 47 ...

Page 8: ...eDriveTC User Guide iii C Sales and Service Information 51 Contacting the Factory 51 Outback eDriveTC Extended Service Plan ESP Summary 53 Limited Outback eDriveTC Extended Service Plan 54 ...

Page 9: ...iv ...

Page 10: ...1 Overview Product Overview What s Included Parts Listing ...

Page 11: ...nd detailed instructions to install the eDriveTC on specific equipment models A complete system consists of an Outback S2TM sold separately an equipment model specific eDriveTC install kit and the eDriveTC electronic components This manual covers the installation of the electronic components along with the eDriveTC setup and operation Note The equipment model specific kit should be installed first...

Page 12: ...Included The following equipment is included with the Outback eDriveTC eDriveTC console CAN Power cable CAN Expansion cable CAN Battery cable Auxiliary power cable Tie straps Screws 8 x 3 4 Figure 1 1 Outback eDriveTC and Equipment ...

Page 13: ...4 1 Overview Parts Listing ...

Page 14: ...ble OKB eDriveTC 10ft Lg 15ft Lg WP 1 4 051 0067 005 CAN Expansion Cable OBK eDriveTC 10ft 1 5 054 0065 000 CAN Battery Cable OBK eDriveTC 5ft Lg 1 6 806 1007 03A Console OBK eDriveTC 1 7 054 0044 003 Auxiliary Power Cable OBK eDriveTC 12ft Lg 1 8 677 2002 Tie Strap 7 Releasable 12 675 1138 000 SCR 8 18 x 3 4 SD HEX COMBO ZP 2 485 1154 Decal Outback Equipped reverse printed 1 ...

Page 15: ...6 1 Overview ...

Page 16: ...2 Getting Started Overview Installing the eDriveTC Powering the Unit System Configuration ...

Page 17: ...ill need to be replaced by the CAN Power cable in the eDriveTC package If the current power cable used with the S2 has a second CAN connector then proceed to the next page 1 Locate the CAN Power cable in the eDriveTC package 2 Install the right angle connector into the Outback S2 CAN Power port as shown 3 Twist the connector firmly until it locks into place 4 Secure the CAN Power cable and antenna...

Page 18: ... as shown 3 Twist connectors firmly until they lock into place 4 Secure the cables to the console mounting base with tie straps to provide strain relief Note The Outback eDriveTC may also be used in combination with an optional Outback external CAN device example Outback 360 If an external CAN device is already installed it is not necessary to exchange the power cable Instead a three connector CAN...

Page 19: ... both cables directly to the battery The red wire goes to the positive terminal and the black wire goes to the negative 4 Route both cables into the cab securing with tie straps Avoid sharp edges and pinch points which could damage the cables and cause a short circuit Note Outback electronic components are designed for 12 volt negative ground automotive systems Make certain there are good solid co...

Page 20: ... criteria when mounting the eDriveTC unit 1 Securely mount the eDriveTC unit to the vehicle with screws on the eDrive console flanges See Figure 2 2 on page 12 2 Have the top of the eDriveTC console face upwards according to the up arrow on the console See Figure 2 2 on page 12 CAN Power Cable CAN Battery Cable ...

Page 21: ...e machine is level with the ground See Figure 2 2 Follow the instructions on the new label with regards to the mounting orientation The default is to mount the eDriveTC unit parallel to the line of travel with the connectors towards the left See Figure 2 2 Figure 2 2 Mounting location Flange ...

Page 22: ...nnect the Auxiliary Power cable to the eDriveTC console 2 Twist the connector firmly until it locks into place Install CAN Power Cable 1 Connect the CAN Power cable to the eDriveTC console 2 Twist the connector firmly until it locks into place CAN Power cable ...

Page 23: ...y until it locks into place Install Steering Wheel Switch Cable 1 Connect the steering wheel switch cable supplied with the model specific installation kit to the eDriveTC console 2 Twist the connector firmly until it locks into place Valve Control Cable Steering wheel switch cable refer to the steering wheel kit instructions part number 876 0082 to install the steering switch cable ...

Page 24: ...eDriveTC will establish communication with the S2 and wait for the DGPS signal to be acquired The S present light on the eDriveTC console indicates that communication has been established To power up the Outback S2 only Turn the power switch of the Outback S2 on and leave the Outback eDriveTC off This causes the Outback S2 to operate as normal Refer to the Outback S2 manual for operation instructi...

Page 25: ...u item Press ENTER to select Initial system startup sequence After completing the eDriveTC system installation perform the following startup sequence prior to field operation 1 Select the eDriveTC STEERING ADJUST menu item Press the DOWN left steer arrow and verify steering moves left Reverse valve cable connections or output hoses if operation is backward 2 Determine the cycle time and adjust the...

Page 26: ... Wheel Mode Sensitivity 10 1 to 10 Default 10 Allows the user to adjust the sensitivity of the eDriveTC to prevent over reaction in difficult to control machines Dampening only in Wheel Mode Dampening Off On Off Default Off When turned ON it provides a smoothing effect to machines that have large amounts of body roll which may induce steering oscillations Steering Speed only in Track Mode Steering...

Page 27: ...g control rate knob to achieve desired end to end steering cycle time Auto Engage Auto Engage Off On Off Default Off Select ON if you want the Auto Engage feature to be enabled Diagnostics Ver 2 87 Gyro 0 Displays current eDriveTC console software version and internal gyro sensor data The number indicates vehicle turning rate in degree second negative to the left positive to the right Table 2 2 eD...

Page 28: ... button 6 Select Tilt Comp 7 Press the ENTER button to select On or Off if you want to turn tilt compensation off 8 Press the ENTER button 9 Scroll down to Antenna Height 10 Press the ENTER button 11 Use the UP and DOWN ARROW buttons to select the antenna height 12 Press the ENTER button Note Be sure the vehicle is parked on a level surface before calibrating the accelerometer value It may be nece...

Page 29: ... adjust the mounting screws to tilt the eDriveTC console so this value is as close 0 0 degrees as possible 17 Press the ENTER button to calibrate the eDriveTC unit This will provide the degree of level 18 Scroll down to Diagnostics 19 Press the ENTER button to show the eDriveTC version and tilt angle The angle value displayed is the calibrated vehicle slope from level The version number is the cur...

Page 30: ...om the ground to the GPS antenna in feet or meters depending on the unit of measure mode for proper tilt compensation Calibrate if Tilt Comp ON Press Enter to Calibrate 0 24 Enter when Level 2 5 Retry when 2 Allows the user to see the current angle measurement of the tilt sensor for mounting adjustment and to enter a zero angle calibration point refer to tilt compensation setup sequence on page 19...

Page 31: ... power up while moving and using GPS data It requires some turns and straight runs to optimize its performance Users may find it beneficial to momentarily slow down beneath the minimum speed 1 M P H or 0 25 M P H for RTK after the first few U turns This ensures a more accurate gyro heading to give better on line tracking and speeds up the calibration ...

Page 32: ...3 eDriveTC Operation Guidance Overview Auto Disengage Auto Engage ...

Page 33: ...vehicle close to the guideline After a guideline is acquired the eDriveTC prompts the operator to engage 3 Press ENTER to engage the eDriveTC The console indicates that the eDriveTC is engaged 4 Just Let GoTM Warning ALWAYS KEEP ALERT eDriveTC cannot detect trees gullies fences and other field obstacles To avoid personal injury and or significant property damage stay alert at all times Disengage t...

Page 34: ...GHT GUIDANCE mode and establish the guideline following the prompts given by the guidance controller 2 Manually steer the vehicle close to the guideline and engage the eDriveTC 3 At the end of the pass manually turn the vehicle around and line up on the next pass ...

Page 35: ...deline and engage the eDriveTC For sharp turns slow down or manually steer the vehicle In either straight or contour mode the eDriveTC automatically disengages when manually steered off the guideline Warning Switch off power to the eDriveTC console when traveling between fields at road speeds This will prevent the chance of a false engagement of the automated steering which may cause unexpected st...

Page 36: ...er 1 The current position error exceeds 6 feet 2 meters or 10 of swath width whichever is larger 2 Manually turning the steering wheel This activates the switch sensor and disengages the auto sensor steering 3 The vehicle s ground speed is less than 1 m p h or greater than 20 m p h Note If your system has RTK corrections the eDriveTC will automatically disengage if your ground speed is less than 0...

Page 37: ... nearby the display will show LOGGING PASS and the eDriveTC is disabled Once a previous pass has been detected guidance indicators will be displayed and the eDriveTC can be engaged In complex contour terrace applications where multiple previous passes exist nearby the free style method selects the closest path This can result in unexpected eDriveTC auto disengage and or guiding along the wrong pas...

Page 38: ...ge the eDriveTC using the normal operating procedure 2 At the end of the pass manually steer off the guideline to auto disengage eDriveTC The eDriveTC indicator light will begin flashing 3 Turn the vehicle around and manually steer to the next pass Center both the current position and steering guideTM lights for one second The eDriveTC will automatically re engage and the eDriveTC indicator light ...

Page 39: ...y reasons there is a time out of 45 seconds for the auto engage to operate If the auto engage does not re engage with in this time the indicator light will stop flashing and eDriveTC must be manually re engaged by pressing the ENTER button ...

Page 40: ...4 Troubleshooting Fine Tuning Performance Troubleshooting Tips Vehicle Type Setup Table ...

Page 41: ...c equipment Figure 4 3 Control knob on steering block example Results in more aggressive steering corrections and reduced guidance tracking error Setting the control rate too high will result in unstable steering corrections and larger errors Refer to the specific equipment specific installation instructions for the proper adjustment procedure Decreasing the Steering Control Rate Results in more s...

Page 42: ...operating in straight guidance mode The eDriveTC tracking errors in contour guidance can be minimized by reducing travel speed on sharp curves Note The overall accuracy of the eDriveTC system depends on many factors Refer to Appendix A Making the Most of Automated Steering for more information ...

Page 43: ... voltage at the hydraulic valve solenoid connection Verify hydraulic operation refer to equipment specific installation sheet for details Erratic or No Steering Corrections While Engaged Verify eDriveTC console is securely mounted and correctly oriented in the upright position Check the gyro sensor data using eDriveTC Diagnostics Menu Drive the vehicle in a straight line Sensor data should be near...

Page 44: ...ensitivity to prevent erratic movements Start with the sensitivity at 10 and adjust the oil flow as close as possible then move the sensitivity down by 1 number at a time to reduce any jerking movements OFF Self Propelled Sprayers Back edge of the vehicle cab 10 OFF Some applications may require turning the dampening term ON to reduce oscillations In general these machines are CaseIH SPX Sprayers ...

Page 45: ...ering only use Track Mode A CaseIH QuadTrac is not considered a track machine because it does not use differential steering refer to Articulated 4WD tractors Leading edge of the vehicle cab N A N A Machine Type GPS Antenna Location Sensitivity Dampening ...

Page 46: ...Appendices A Making the Most of Automated Steering B Frequently Asked Questions C Sales and Service Information ...

Page 47: ...cy GPS Signal Accuracy GPS Antenna Location Make sure to install the GPS antenna on the vehicle in a location that will optimize its performance In most cases with exception of high speed self propelled sprayers it is best to have the GPS antenna mounted on the leading edge of the vehicle cab This usually provides an open view of the sky and prevents multi path reflections and signal masking from ...

Page 48: ...nto the S2 during setup Cable Installation To prevent problems with signal interference and power fluctuations give careful consideration when installing the GPS antenna cable rover radio cable and power cables Try to route antenna and radio cables away from any other RF radio frequency cables Also be careful to avoid any cables carrying high amperage electrical pulses Be sure that all cables are ...

Page 49: ...be sure to install the steering controller on a level cab surface with the connectors facing left with regard to the direction of travel Figure 5 3 Mounted automated steering controller The yaw left right turns sensor needs special consideration when choosing a mounting location Install the steering controller as far forward in the vehicle cab as possible in order to make the yaw sensor more sensi...

Page 50: ...n maintain the GPS guideline accurately without rapidly overshooting or sluggishness If the steering corrections are too rapid causing the machine to jerk erratically back and forth across the line the hydraulic steering speed is too fast If the machine slowly weaves down the guideline the hydraulic steering speed is too slow Figure 5 4 If the steering is causing the machine to jerk back and forth...

Page 51: ... an optimal level When preparing a vehicle for use with automated steering it is necessary to inspect all of the vehicle steering components including cylinders joints linkages wheels and tires All mechanical steering connections must be within the manufacturer s specifications for free play in order to achieve maximum machine control accuracy Wheels must be true properly aligned and spaced evenly...

Page 52: ...ential lock will improve vehicle traction and steering making it easier to maintain the guideline The use of differential lock may not be appropriate in some field conditions however most straight line guidance scenarios will have improved tracking with the use of differential lock Implement Tracking The tracking performance of the implement plays a major role in accuracy Implements can often move...

Page 53: ... proper adjustment It is common for items such as cultivator shanks or bedder row units to gradually slip left or right on a tool bar causing uneven draft Regular checking and adjustment will minimize this problem In addition on 3 point implements it is necessary to adjust the sway blocks on the vehicle draft arms Allow only a very small gap at the sway blocks to prevent large side to side movemen...

Page 54: ...mooth flat fields with uniform tilth will obviously allow for the best possible accuracy However this ideal scenario is usually not reality Many fields have rolling terrain contour terraces old crop rows varying soil conditions and other characteristics Understanding these elements and how they effect steering will help to maximize the guidance accuracy Rolling Terrain Be sure the implement is set...

Page 55: ...e draft uniformity In some cases it may be necessary to completely work down old rows in order to develop new very accurate rows Soil Conditions Very loose soil may require more steering effort and traction from the guided vehicle To improve accuracy it may be necessary to add weight over the steering wheels use mechanical front wheel drive and or differential lock Irregular and tight soil conditi...

Page 56: ...e A and B ports of the eDriveTC hydraulic block No the steering outputs of the eDriveTC hydraulic block can be reversed and easily corrected When performing the steering adjust function the vehicle steering should turn left with the down arrow and right with the up arrow If the steering direction is reversed simply switch the two connectors on the eDriveTC valve interface cable and confirm proper ...

Page 57: ...he eDriveTC is disengaged then the system is reset and must go back through the auto engage routine See pages 27 to 30 in the eDriveTC User Guide for eDriveTC auto disengage manual disengage and auto engage criteria 6 Why are the lights on the valve interface cable connectors flashing When eDriveTC is engaged the hydraulic valve is pulsed at a high rate Each time a pulse is sent to turn left or ri...

Page 58: ...ld operation the vehicle steering wheel should not turn when eDriveTC is steering When performing the steering adjust function the steering wheel may begin to turn if eDriveTC after the steering cylinders have reached the end of their stroke If the vehicle steering wheel is turning as the machine is auto steering through the field then you need to make sure that you have a counterbalance valve pro...

Page 59: ...l is significantly colder than operating temperature it does not flow through the system as easily which temporarily changes the auto steering characteristics The solution is to change the eDriveTC steering speed setting until the hydraulic oil warms up then return the setting to its previous location 15 How do I arrange the steering wheel switch magnets in a track machine application since it onl...

Page 60: ...y will receive a response from one of our Customer Support Representatives within one business day Sales outbacksales outbackguidance com Customer Service outbackcs outbackguidance com Website Feedback outbackweb outbackguidance com FAX 24 hours 7 days a week your inquiry will receive a response from one of our Customer Support Representatives within one business day 1 785 742 4584 U S Outback Gui...

Page 61: ...ndices U S REGIONAL SALES OFFICES Outback Nebraska Hastings NE 1 877 777 6142 Outback Texas Hewitt TX 1 866 857 4448 Outback Dakotas Watertown SD 1 888 825 6031 Outback Illinois Jacksonville IL 1 888 477 6070 ...

Page 62: ...nge Service Yes Yes Software Revision Updates No Charge No Charge Software Revision Installation Provided by Customer or OGCTM Provided by Customer or OGCTM Damage During Shipments Covered Covered Damage After Customer Receipt Not Covered Not Covered Shipping Outback to Customer Outback Paid Next Day Air Saturday Delivery Outback Paid Next Day Air Saturday Delivery Shipping Customer to Outback Out...

Page 63: ...ot supplied by Hemisphere GPS This limited plan does not cover any items that are in one or more of the following categories software except for Hemisphere GPS authorized revision updates external devices except as specifically noted accessories or parts added to an Outback eDriveTC system after the system is shipped from Hemisphere GPS accessories or parts that are not installed in the Hemisphere...

Page 64: ...the invoice or return the part s will result in cancellation of this limited plan Hemisphere GPS owns all parts removed from repaired products Hemisphere GPS uses new and reconditioned parts made by various manufacturers in performing service repairs and building replacement products If Hemisphere GPS repairs or replaces a product its plan term is the remainder of the limited plan term These provi...

Page 65: ...56 Appendices ...

Page 66: ...www hemispheregps com e mail info hemispheregps com ...

Reviews: