background image

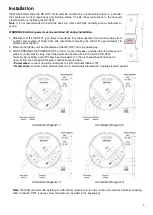
4.  If using the HE-HT01 for radiant floor heating, connect the NTC temperature sensor 

wire to the terminals labeled “NTC.” A 10 kΩ NTC sensor is included inside the HE

-

HT01 packaging, but any NTC sensor can be used. 


Note:

 If an NTC sensor other than 10 k

Ω

 is used, sensor Parameter value should be 

changed  in  the  settings  menu  (Parameter  10 

  FSr) 


see “Settings Menu” section 

below.


5.  If you will be using an external device to select modes for the HE-HT01 (such as a 

security system), connect wires from the ex

ternal device’s dry contacts 

according to 

connection diagrams 1 (or 2 or 3 or 4). 

Note

: There could be “EXT” label instead of “S1”, ”Sx”.


6.  Making  sure  the  HE-

HT01  backplate  is  oriented  on  the  wall  with  the  word  “TOP” 

pointed upwards, secure the backplate onto the electrical junction box using the four 
provided  screws  (do  not  overtighten).  Once  the  backplate  is  secured  onto  the  wall, 
assemble the HE-HT01 display unit onto the backplate by first carefully aligning the 
two top snap connectors, and then gently p

ushing the entire display unit until it ‘snaps’ 

into position all the way around.


7.  Next, switch On the main  power  at the circuit breaker (see photo above).  The  HE-HT01 will start  up showing the 

original default factory settings.


8.  Remove the clear protective film from the display unit and frame by pulling on the top right-hand orange color tabs.


Disassembly 

1.  To disassemble, ENSURE POWER IS SWITCHED OFF at the main circuit breaker AND THE LCD SCREEN IS 

BLANK. 

2.  To remove the HE-HT01 display unit grasp firmly at the bottom and pull backwards while tilting outwards until all 

tabs disconnect. 

3.  Remove screws from backplate and disconnect the wires by inserting a small Phillips-head screwdriver into the slot 

beneath each wire to release. 

Touch Panel Operation 

The touch panel has six capacitive-touch buttons which require minimal pressure to operate.


Symbol:


Name:


Plus


Minus


Time


Settings


Manual Heating 


Mode 


Function:


Increase Set Point Temperature 


Decrease Set Point Temperature 


Change Schedule


Open Parameters Menu


Manually Switch Heating Element ON or OFF


Change the Operational Mode: (COM, TIME, DRY, ECO, VAC, MAN)


The Plus “

+

” button will increase Set Point temperature by 0.5°C with each touch. The Minus “

“ button will decrease Set 

Point temperature by the same 0.5°C. The Set Point temperature is displayed in the bottom left corner of the LCD display 

under “SET TEMP.”


Summary of Contents for HE-HT01

Page 1: ...HEATING THERMOSTAT HE HT01 USER MANUAL for Hardware v 12 Firmware v 2 2...

Page 2: ...k 9 Adding to Z Wave network 9 Removing from Z Wave network 9 Security 9 SmartStart 9 Firmware OTA Update 10 Z Wave Plus V2 Specifications 10 Associations 11 Settings Menu 11 Settings available throug...

Page 3: ...ng it always easy to read Highly configurable with automatic safety You can select one of six operation modes with individual set points either manually or by using a Z Wave controller gateway As a sa...

Page 4: ...NTC sensors range 1k to 100k Periodic measurements from o Internal temperature sensor o External floor temperature sensor o Internal humidity sensor o Internal ambient light sensor o Energy consumptio...

Page 5: ...ve the display unit and backplate of the HE HT01 from the packaging 3 FIRST ENSURE THE POWER IS OFF at the main circuit breaker and then test the wires with a probe or multimeter to verify Insert the...

Page 6: ...xt switch On the main power at the circuit breaker see photo above The HE HT01 will start up showing the original default factory settings 8 Remove the clear protective film from the display unit and...

Page 7: ...s for Morning Daytime Evening and Night For example the Morning Schedule could be set to 22 0 C starting at 6 00 The Day Schedule could then be set to 17 0 C at 9 00 when everyone has gone to work or...

Page 8: ...from all or part of the property for a length of time The factory default ECO Set Point is 20 0 C Note In your Z Wave gateway this mode will be shown as Energy Save Heat VAC Vacation Mode Away Use Va...

Page 9: ...wn 3 The current state of the network will display in the Parameter Value position upper right It should display InC Note If E L is displayed the HE HT01 is already Excluded 4 Start the Exclusion Mode...

Page 10: ...nauthenticated or S0 Association Group Info V3 highest granted S2 Authenticated S2 Unauthenticated or S0 Multi Channel Association V3 highest granted S2 Authenticated S2 Unauthenticated or S0 Thermost...

Page 11: ...corner of the LCD The top left corner will display the Parameter Number And the top right corner will display the Parameter Value To scroll through the menu press the Heating Element button to go up...

Page 12: ...cy list below Modification is possible only while the HE HT01 is not included to Z Wave network While the device is included the Antenna Icon is shown at the bottom right corner of the LCD main screen...

Page 13: ...e from the device menu Parameter 04 LPc Energy Consumption values This Parameter allows you to check the Cumulative and Real Time Energy Consumption of the connected load Display information follows t...

Page 14: ...h IDLE state OFF when the external input is open released If Parameter value 2 the external input will operate in Toggle Switch Reverse mode if the external input is shorted the Thermostat switches to...

Page 15: ...even though the floor temperature is higher than 30 C d If the room temperature is higher than 27 C the Heating Thermostat will enter IDLE mode even though the floor temperature is lower than 30 C Fac...

Page 16: ...set the value 12 The factory default value is 0 5 C 5 through Z Wave network Time Configurations Parameter 19 tCr Time Correction by Main Controller If this Parameter value 1 and the HE HT01 is connec...

Page 17: ...142 Note In order not to increase traffic on your network it is not recommended to reduce the value of this Parameter We recommend reducing the value of this Parameter only in case of poor connection...

Page 18: ...and is received If the Basic Set command value is 0 OFF state the HE HT01 will go to Manual MAN mode and switch Off the heating element IDLE mode If the Basic Set command is value is 0xFF ON state the...

Page 19: ...70 50 2 bytes Tuesday Day temperature valueX10 200 10 370 51 2 bytes Tuesday Evening temperature valueX10 230 10 370 52 2 bytes Tuesday Night temperature valueX10 180 10 370 53 2 bytes Wednesday Morni...

Page 20: ...be sent to you EXCEPT AS MAY BE OTHERWISE PROVIDED BY APPLICABLE LAW THIS LIMITED WARRANTY IS IN LIEU OF ALL OTHER COVENANTS AND WARRANTIES EITHER EXPRESS OR IMPLIED INCLUDING WITHOUT LIMITATION ANY I...

Reviews: