15
Größe /
Size
3
Größe 2,5 / 3
Size 2,5 / 3
SW 8 /
AF 8
8
9
Wichtig: Die Laufflächen der Schiene und die Rollen vor
dem Einsetzen des Türblattes säubern. Die Rollapparate
sind mit wartungsfreien Kugellagern ausgestattet und
dürfen nicht nachgefettet werden.
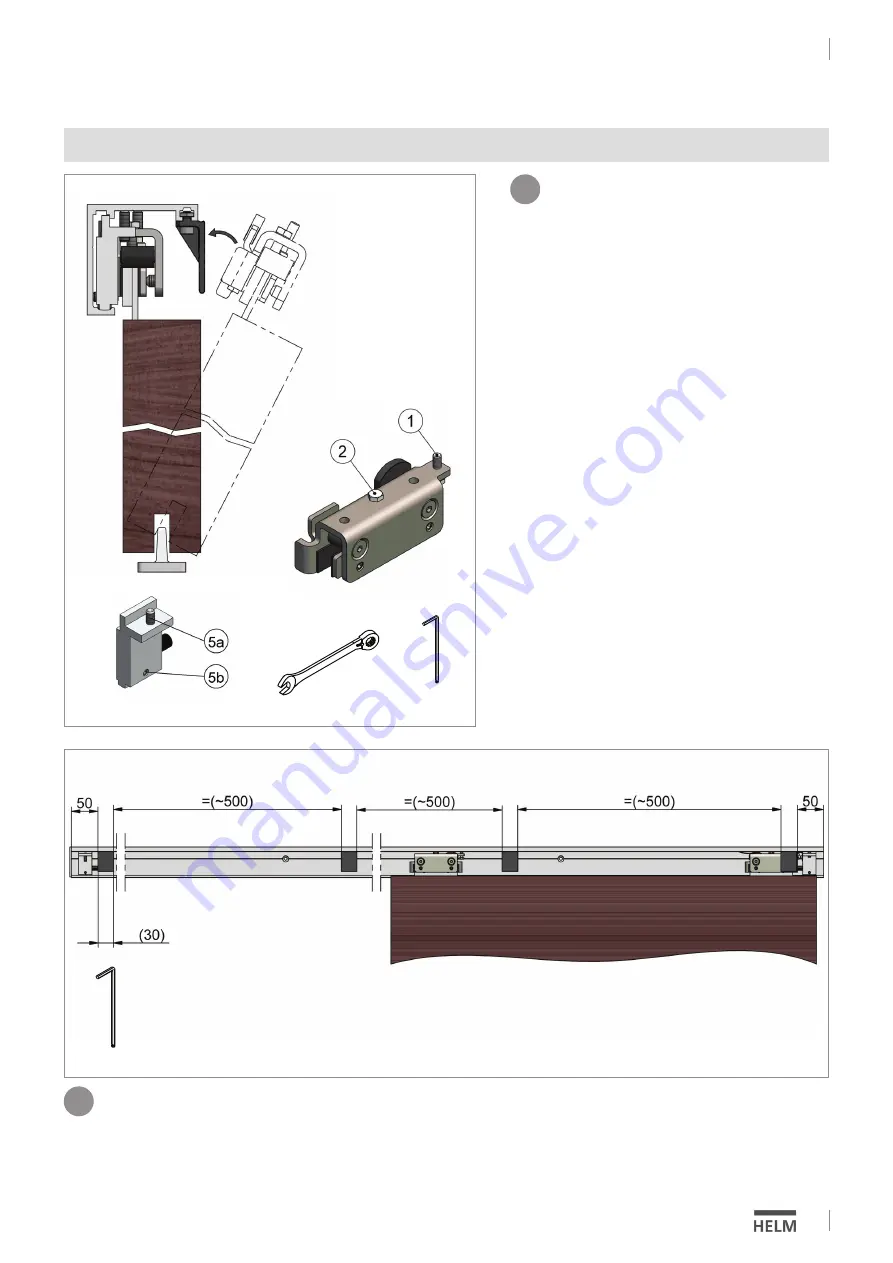
as Türblatt in die Laufschiene hängen und über die Sechs-
kantschraube (2) mit Hilfe einer Wasserwaage ausrichten.
Die Sicherungsschrauben (1) soweit hoch drehen, bis ein leichter
Kontakt zur Laufschiene besteht, dann diese wieder um eine
½ Umdrehung zurück drehen.
Wichtig: Die Sicherungsschrauben verhindern das Aushe-
ben der Tür bei unsachgemäßer Betätigung.
Die Stopper in der Laufschiene am jeweiligen Schienenende so posi-
tionieren, dass die gewünschte Türöffnung freigegeben wird und wie
folgt klemmen: zuerst die obere Schraube (5a) des Stoppers anzie-
hen, bis sich das Bauteil in der Schiene gesetzt hat. Nun die untere
Schraube (5b) leicht anziehen. Anschließend beide Schrauben eine
¼ Umdrehung nachziehen.
Important: Clean running surface before inserting door.
All trolleys are equipped with maintenance free bearings
and should not be greased.
Position the door panel in the track and align using the hexagon
screw (2) and a level. Turn the locking screws (1) until they are in light
contact with the track, then turn them back again by ½ a turn.
Important: The locking screws serve as the anti-jump sys-
tem and prevent the door from jumping if improperly
used.
Position the trolley stops in the track at the respective end of the
track so that the required door opening is achieved and clamp as
follows: screw the top screw (5a) on the stopper until the component
has set in the track. Now tighten the bottom screw (5b) slightly. Then
retighten both screws by turning them a additional ¼ turn.
Montage
Installation
Die Klemmadapter wie dargestellt an der Laufschiene verteilen und fixieren.
Spread the clamp adapters on the track and fix them.
DS032023/04.2017
HELM GT-L 50
Montage /
Installation


