background image

48

48

49

2.4  Switching on the Device

When all connections have been 

made:


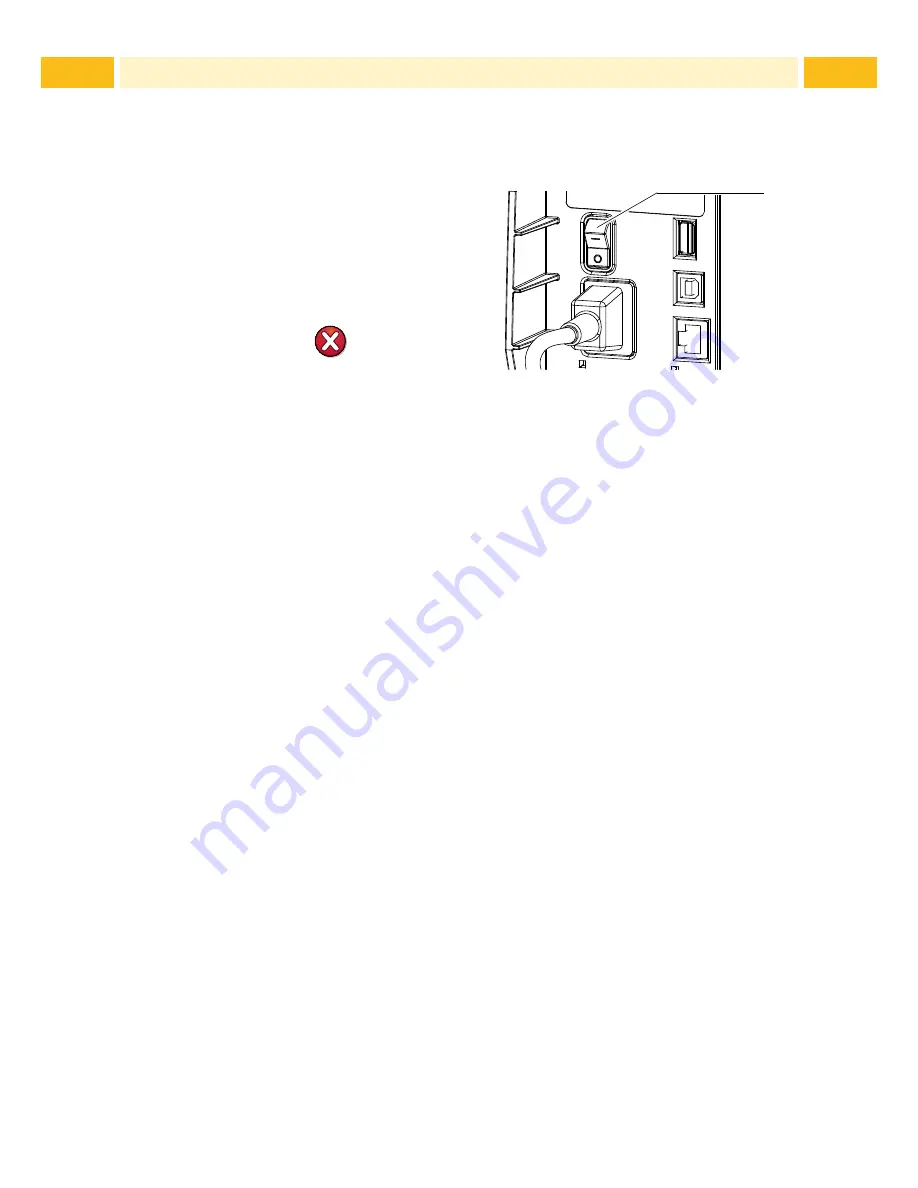
Switch the printer on at the 

power switch (1). 

The printer performs a system 

test, and then shows the system 

status 

Ready 

in the display.

If an error occurs during the system 
test, the symbol 

 , 

Critical 

fault 

and type of error are 

displayed.

1


Fig. 7  Power Switch

Installation

Summary of Contents for TT430

Page 1: ...Etikettendrucker Label Printer Bedienungsanleitung TT430 Operator s Manual...

Page 2: ...3 XP sind eingetragene Warenzeichen der Microsoft Corporation TrueTypeTM ist ein eingetragenes Warenzeichen von Apple Computer Inc Redaktion Bei Fragen oder Anregungen bitte an HellermannTyton Adresse...

Page 3: ...3 4 Druckerzust nde 15 4 Material einlegen 16 4 1 Rollenmaterial einlegen 16 4 2 Leporello Material einlegen 17 4 3 Etikettensensor einstellen 18 4 4 Transferfolie einlegen 19 4 5 Transferfolienlauf e...

Page 4: ...4 4 5 Inhaltsverzeichnis 9 Zulassungen 34 9 1 EG Konformit tserkl rung 34 9 2 FCC 35 9 3 GPL Code Statement 35 10 Stichwortverzeichnis 36...

Page 5: ...f r Gesundheit oder Leben aufmerksam Warnung Weist auf eine gef hrliche Situation hin die zu K rperverletzungen oder zu Sch den an Sachg tern f hren kann Achtung Macht auf m gliche Sachbesch digung o...

Page 6: ...ngen vorschriften i Hinweis Alle Dokumentationen sind auf DVD im Lieferumfang enthalten und aktuell auch im Internet abrufbar 1 4 Sicherheitshinweise Das Ger t ist f r Stromnetze mit Wechselspannung v...

Page 7: ...rnhinweis Aufkleber angebracht die auf Gefahren aufmerksam machen Keine Warnhinweis Aufkleber entfernen sonst k nnen Gefahren nicht erkannt werden Der maximale Emissionsschalldruckpegel LpA liegt unte...

Page 8: ...te bersicht 1 2 3 4 5 6 7 8 1 Deckel 2 Randsteller 3 Rollenhalter 4 Transferfolienabwickler 5 Transferfolienaufwickler 6 Umlenkrolle 7 Druckmechanik 8 Touchscreen Display Bild 1 TT430 mit Abrei kante...

Page 9: ...tionsmesser 13 15 12 10 11 16 17 14 10 Etikettensensor 11 Kopfhalter mit Druckkopf 12 Randsteller 13 Drehknopf zur Einstellung der Randsteller 14 Drehknopf zur Einstellung des Etikettensensors 15 Hebe...

Page 10: ...el abh ngig vom Druckertyp Abrei kante montiert Schneide oder Perforationsmesser X X je nach Druckertyp Schneide oder Perforationsmesser montieren 5 1 auf Seite 21 i Hinweis Bewahren Sie die Originalv...

Page 11: ...bis 240 V ausger stet 1 Sicherstellen dass das Ger t ausgeschaltet ist 2 Netzkabel in Netzanschlussbuchse 5 stecken 3 Stecker des Netzkabels in geerdete Steckdose stecken 2 3 2 An Computer oder Comput...

Page 12: ...lter 1 einschalten Der Drucker durchl uft einen Systemtest und zeigt anschlie end im Touchscreen Display den Systemzustand Bereit an Wenn w hrend des Systemstarts ein Fehler aufgetreten ist werden das...

Page 13: ...gen an Durch Ausw hlen der Schaltfl chen auf dem Touchscreen Display 1 k nnen Einstellungen vorgenommen werden Unterhalb des Touchscreen Displays 1 befinden sich zwei USB Master Schnittstellen 2 Imax...

Page 14: ...ck des letzten Etiketts wiederholen Drucke Etikett Druckauftrag unterbrechen Drucker geht in Zustand Pause Pause Druckauftrag fortsetzen Drucker geht in Zustand Drucke Etikett Bereit Druckpuffer l sch...

Page 15: ...rot Es ist ein Fehler aufgetreten der durch den Bediener behoben werden kann ohne den Druck auftrag abzubrechen Nach Behebung des Fehlers kann der Druckauftrag fortgesetzt werden Nicht beheb barer Fe...

Page 16: ...zu ffnen 6 Falls der Drucker mit einem Schneide oder Perforationsmesser ausge r stet ist Messer abklappen 7 Randsteller 5 durch Drehen des Drehknopfes 7 so positionieren dass ihr Abstand einige Millim...

Page 17: ...esser abklappen 5 Randsteller 3 durch Drehen des Drehknopfes 5 so positionieren dass ihr Abstand einige Millimeter mehr als die Materialbreite betr gt 6 Material unterhalb der Umlenkrolle 4 durch die...

Page 18: ...al mit unregelm ig geformten Etiketten verwendet wird 1 3 2 Bild 11 Etikettensensor einstellen Die Sensorposition 3 ist mit einer gelben LED markiert 1 Mit einem spitzen Gegenstand auf den Drehknopf 1...

Page 19: ...tung A entriegeln Randsteller 1 in Richtung B schieben und mithilfe der Skala auf Folienbreite einstellen Wickler festhalten und Randsteller 1 durch Drehen in Richtung C verriegeln 4 Folienrolle 4 so...

Page 20: ...rehen um den Druckkopf zu verriegeln 4 5 Transferfolienlauf einstellen Faltenbildung im Transferfolienlauf kann zu Druckbildfehlern f hren Zur Vermeidung von Faltenbildung kann die Transferfolienumlen...

Page 21: ...ahme an den Drucker montiert werden 1 4 5 1 3 2 Bild 15 Schneide oder Perforationsmesser montieren 1 Rasthaken 5 des Messers mit der Nut 4 zuerst in die F hrung am Tr ger 2 stecken 2 Messer 1 nach unt...

Page 22: ...bol drehen und Randsteller 1 vom Rollenhalter 3 ziehen 2 Materialrolle 4 so auf den Rollenhalter 3 schieben dass die zu bedruckende Seite des Materials nach oben zeigt 3 Randsteller 1 wieder aufsetzen...

Page 23: ...bzw perfo riert werden i Hinweis Der Schneidemodus muss in der Software aktiviert werden In der Direktprogrammierung erfolgt dies mit dem C Kommando Programmieranleitung Achtung Funktionsbeeintr chti...

Page 24: ...erwenden X X Staub und Papierfusseln im Druckbereich mit weichem Pinsel oder Staub sauger entfernen X X Au enfl chen mit Allzweckreiniger s ubern 7 2 Druckkopf reinigen Reinigungsabst nde Thermodirekt...

Page 25: ...egen den Druckkopf 1 dr cken Halterungsnase 2 ber den Steg 6 schieben und durch den Schlitz im Kopfhalter ziehen 4 Druckkopf aus der F hrung 7 im Kopfhalter ziehen 5 Steckkontakte 3 und 4 am Druckkopf...

Page 26: ...d 19 Druckwalze 1 Hebel 2 gegen den Uhrzeigersinn drehen um den Druckkopf zu ffnen 2 Etiketten aus dem Drucker nehmen 3 Blende 5 mit Abrei kante bzw Schneide oder Perforationsmesser abschwenken 4 Druc...

Page 27: ...n wird lagern sich an den Klingen Kleberreste ab Beim Schneidmodus mit R cktransport gelangen Kleberpartikel ebenso an die Druckwalze X X Druckwalze und Klingen des Messers in k rzeren Abst nden reini...

Page 28: ...eten Tuch entfernen X X Wenn n tig Klingen austauschen X X Untere Klinge von oben in die Halterungen 11 einsetzen X X Gegebenenfalls Federn 12 wieder in die Federtaschen 13 legen X X Zum Einbauen der...

Page 29: ...Temperatur zu hoch Temperatur ber Software verringern Ung nstige Kombi nation von Etiketten und Transferfolie Geeignete Kombination verwenden Drucker druckt Folge von Zeichen anstelle des Etikettenfo...

Page 30: ...efekt Ausfall von Heizpunkten Druckkopf wechseln Serviceanleitung Wei e Linien im Druckbild quer zur Transportrichtung Drucker wird im Schneidemodus mit der Einstellung R cktransport optimiert betrieb...

Page 31: ...kauftrag neu starten Thermoetiketten sollen verarbeitet werden in der Software ist aber auf Trans ferdruck geschaltet Druckauftrag abbrechen In Software auf Thermodruck schalten Druckauftrag neu start...

Page 32: ...Messer schneidet Material nicht durch kann aber in Ausgangsstellung zur ckkehren Druckauftrag abbrechen Material pr fen Klingen sind stumpf Klingen reinigen oder wechseln 7 5 auf Seite 27 Medium voll...

Page 33: ...Schreib gesch tzt Schreibschutz des Speicher mediums aktiviert Schreibschutz deaktivieren Schrift unbekannt Fehler in der gew hlten Downloadschriftart Druckauftrag abbrechen Schriftart wechseln Speich...

Page 34: ...einer nicht mit uns abgestimmten nderung des Ger ts oder des Verwendungszwecks verliert diese Erkl rung ihre G ltigkeit Ger t Etikettendrucker Typ TT430 Angewandte EG Richtlinien und Normen Richtlinie...

Page 35: ...tware code subject to the GNU General Public License GPL or GNU Lesser General Public License LGPL As applicable the terms of the GPL and LGPL and information on obtaining access to the GPL Code and L...

Page 36: ...t 8 L Leporello Etiketten einlegen 17 Lieferumfang 10 Lithium Batterie 7 N Nicht behebbarer Fehler 15 P Pause 15 Problembehebung 29 R Randsteller 8 9 Reinigen 24 Druckkopf 24 Druckwalze 25 Messer 27 R...

Page 37: ...Operator s Manual TT430 Label Printer...

Page 38: ...000 2003 XP are registered trademarks of the Microsoft Corporation TrueTypeTM is a registered trademark of Apple Computer Inc Editor Regarding questions or comments please contact HellermannTyton Topi...

Page 39: ...inter States 51 4 Loading Material 52 4 1 Loading Media from Roll 52 4 2 Loading Fanfold Labels 53 4 3 Adjusting the Label Sensor 54 4 4 Loading Transfer Ribbon 55 4 5 Setting the Feed Path of the Tra...

Page 40: ...40 40 41 Table of Contents 9 Licences 70 9 1 EC Declaration of Conformity 70 9 2 FCC 71 9 3 GPL Code Statement 71 10 Index 72...

Page 41: ...Warning Indicates a hazardous situation that could lead to injuries or material damage Attention Draws attention to possible dangers material damage or loss of quality i Notice Gives you tips They mak...

Page 42: ...on DVD and can also currently be found in the Internet 1 4 Safety Instructions The device is configured for voltages of 100 to 240 V AC It only has to be plugged into a grounded socket Only connect th...

Page 43: ...y be injured The maximum sound pressure level is less than 70 dB A Danger Danger to life and limb from power supply X X Do not open the device casing 1 5 Environment Obsolete devices contain valuable...

Page 44: ...1 Device Overview 1 2 3 4 5 6 7 8 1 Cover 2 Margin stops 3 Roll retainer 4 Ribbon supply hub 5 Ribbon take up hub 6 Roller 7 Print mechanics 8 Touchscreen display Fig 1 TT430 with Tear off Plate 2 In...

Page 45: ...r or Perforation Cutter 13 15 12 10 11 16 17 14 10 Label sensor 11 Printhead retainer with printhead 12 Guides 13 Knob for adjusting the guides 14 Knob for adjusting the label sensor 15 Lever for lock...

Page 46: ...dows driver and documentation USB Cable depending on the type of printer tear off plate mounted cutter or perfo ration cutter X X depending on the type of printer mount cutter or perforation cutter 5...

Page 47: ...pply voltage of 100 V to 240 V 1 Check that the device is switched off 2 Plug the power cable into the power connection jack 5 3 Plug the power cable into a grounded socket 2 3 2 Connecting to a Compu...

Page 48: ...X X Switch the printer on at the power switch 1 The printer performs a system test and then shows the system status Ready in the display If an error occurs during the system test the symbol Critical f...

Page 49: ...d shows the printer settings in the menu By selecting the buttons on the touchscreen display 1 settings can be made Two USB master ports 2 Imax 100 mA are positioned under the touchscreen display 1 Fi...

Page 50: ...abel Printing label Interrupt print job printer goes into Pause state Pause Continue the print job printer goes into Printing label state Ready Delete internal memory the last label can no longer be r...

Page 51: ...s red An error has occurred that can be rectified by the operator without interrupting the print job The print job can be continued after the error has been rectified Irrecoverable error and the type...

Page 52: ...ever 8 counterclockwise to open printhead 6 If the printer is equipped with a cutter or perforation cutter fold it down 7 Position guides 5 by turning the knob 7 so that they are several milli meters...

Page 53: ...own 5 Position guides 3 by turning the knob 5 so that they are several milli meters wider than the material 6 Position material below the roller 4 and guide it through the print unit Attention X X Gui...

Page 54: ...irregularly shaped labels are used 1 3 2 Fig 11 Adjusting the Label Sensor The sensor position 3 is marked with a yellow LED in the sensor retainer 1 Press on the knob for adjusting the label sensor 1...

Page 55: ...e guide in direction B and adjust guide to ribbon width using the scale Hold hub and lock guide by turning it in direction C 4 Load transfer ribbon 4 on the hub 5 until it reaches the guide in a way t...

Page 56: ...down and turn lever 6 clockwise to lock printhead 4 5 Setting the Feed Path of the Transfer Ribbon Transfer ribbon wrinkling can lead to print image errors Transfer ribbon deflection can be adjusted...

Page 57: ...ust be mounted to the printer during the initial start up 1 4 5 1 3 2 Fig 15 Mount Cutter or Perforation Cutter 1 Put snap arm 5 of the cutter with the groove 4 first into the guide on the retainer 2...

Page 58: ...e symbol and thus release the margin stop 1 from the roll retainer 3 2 Load label roll 4 on the roll retainer 3 in such a way that the printing side of the labels is visible from above 3 Re mount the...

Page 59: ...activated in the software With direct programming it is controlled with the C command Programming Instructions Attention Functional impairment due to dirt X X When using label material do not cut thro...

Page 60: ...ning the external surfaces or modules X X Remove dust and paper fluff from the print area with a soft brush or vacuum cleaner X X The cover of the printer can be cleaned with a standard cleanser 7 2 C...

Page 61: ...ainer slide the holding lug 2 over the web 6 and pull it out of the slit in the printhead retainer 4 Remove printhead from the guide 6 in he printhead retainer 5 Detach the cables 3 and 4 from the pri...

Page 62: ...nt Roller 1 Turn lever 2 counterclockwise to open printhead 2 Remove material and transfer ribbon from the printer 3 Fold down cover 5 with tear off plate cutter or perforation cutter 4 Lift print rol...

Page 63: ...l instead of the label gap remains of adhesive may accumulate on the blades If operating in backfeed mode such remains of adhesive may be deposited on the drive roller as well X X Clean the drive roll...

Page 64: ...abel remover and a soft cloth X X If necessary replace blades X X Push lower blade down into the guides 11 X X If necessary put springs 12 back into spring retainers 13 X X To re mount the upper blade...

Page 65: ...in the setup Configuration Manual not for devices with perforation cutter Print image has smears or voids Printhead is dirty Clean the printhead 7 2 on page 24 Temperature too high Decrease temperatu...

Page 66: ...edy Vertical white lines in the print image Printhead is dirty Clean the printhead 7 2 on page 24 Printhead is defective failure of heat elements Change the printhead 7 3 on page 25 Table 4 Problem So...

Page 67: ...al position Switch off the printer Remove material Switch on the printer Restart print job Check material No cutter function Switch the printer off and then on If error recurs call service Device not...

Page 68: ...t job Change the label format set in the software Restart print job Printer is loaded with conti nuous paper but the software is set on labels Cancel current print job Change the label format set in t...

Page 69: ...uncertain Format data medium System Error e g FPGA defective invalid setup voltage error Switch the printer off and then on Please note error details shown on the display If error recurs call service...

Page 70: ...e event of any alteration which has not been approved by us being made to any device as designated below this statement shall thereby be made invalid Device Label Printer Type TT430 Applied EC Regulat...

Page 71: ...ftware code subject to the GNU General Public License GPL or GNU Lesser General Public License LGPL As applicable the terms of the GPL and LGPL and information on obtaining access to the GPL Code and...

Page 72: ...hium Battery 43 Loading Continuous Media from Roll 52 Loading Fanfold Labels 53 Loading Material 52 Loading Transfer Ribbon 55 M Margin stops 44 45 Modifications 43 P Pause 51 Power Save Mode 51 Power...

Reviews: