background image

14

1.  Connect a fully charged battery.
2.  Turn the transmitter ON first the ESC, noting that the transmitter should always 

be ON if the ESC is ON.

3.  Keep the throttle stick at its neutral position, wait for 3 seconds to let the ESC 

perform its self test and automatic throttle calibration.

4.  When the ESC is ready to run, a long beep will sound.
5.  This calibration will be performed every time the ESC is powered on. If you are 

touching the trigger during this process the ESC will not calibrate or function, 

simply release the trigger and wait for the audible chime.

6.  Check the ESC operation to ensure you have full throttle and brake before 

driving the vehicle.

Note that you’ll need to calibrate the throttle range again when using a new 

transmitter or when changing the settings of the neutral position of the throttle 

channel, D/R, ATV, ATL or EPA. If this is not carried out the ESC may not work properly.

Understanding the LED Status Light and Alert Tones

Your Helion 40A ESC is programmed to communicate with you to let you know its 

status. 
LED in normal use

•  If the throttle trigger is in the neutral range the LED will be off.

•  The red LED blinks when the car is running forward, backward or braking.

•  The red LED lights solid when the throttle trigger is moved to the full throttle or 

full reverse position.

Summary of Contents for conquest 10MT XB

Page 1: ...Owner s Manual Technical Information HLNA0766 Conquest 10MT XB US HLNA0776 Conquest 10MT XB UK EU HLNA0786 Conquest 10MT XB AU ...

Page 2: ...er birth defects and other reproductive harm This product is not a toy 14 Recommended for ages 14 and up Adult supervision required for ages under 18 years old Contains small parts keep out of reach of children 3 years of age and younger Important Information Throughout this manual you will see different notes cautions and warnings to help alert you to important information about the section you a...

Page 3: ...rted 7 IKONNIK ET3 Radio Sysytem 12 Helion 40A ESC 12 Helion Brushed System Troubleshooting 16 Adjusting and Tuning Your Vehicle 17 General Care Maintenance 18 Storage and Disposal 21 Troubleshooting Problems 22 Troubleshooting Tables 23 Exploded Views 25 Spare Parts List 34 Warranties 37 Declaration of Conformity 40 ...

Page 4: ...sed improperly Always use caution and common sense as failure to operate your product in a safe and responsible manner can result in damage to the product or other properties Therefore this product is not intended for use or maintenance by children without direct adult supervision Helion RC and your hobby dealer shall not be liable for any loss or damages whether direct indirect special incidental...

Page 5: ...ly Always allow the motor in your vehicle to cool completely before using it again R C models are an extremely fun hobby but safety should never be ignored or taken lightly Always take caution when operating your model as damage to property and injury can result from careless operation Please consult your local hobby dealer with any questions or troubleshooting issues And of course don t forget to...

Page 6: ...er clutch the authentic high grip long wear V tread tires and the durable high torque servo But there s more Easy to access electronic components make maintenance simple and keep upgrade options varied while a Helion 2000mAh 7 2V rechargeable NiMH battery offers sensible run times It s what you might call a total solution not least because it s supported by a high performance 550 brushed motor Hel...

Page 7: ...r has been damaged or if the battery has experienced a short Incorrect use of the battery connections or charging equipment can cause personal injury or property damage Never allow batteries or charger to come in contact with moisture at any time Stop charging immediately if the battery or charger becomes hot or changes form during use WARNING WHEN USING LIPO BATTERIES ONLY USE CHARGERS DESIGNED F...

Page 8: ...y clips that secure the dust cover and lift the cover clear 4 Locate the battery cradle in the center of the car release the hook and loop tape and withdraw the battery pack 5 Plug the charger into a wall socket connect the battery to the charger and place the battery on a non flammable surface Switch the wall socket ON noting that a fully discharged battery will be charged in approximately 3 hour...

Page 9: ... from the underside of the ET3 transmitter and insert four AA alkaline cells Take care to ensure that the correct polarity is observed 8 Ensure the radio switch is in the OFF position then connect the battery to the ESC 9 Replace the dust cover and secure it with the two body clips 10 Replace the body and secure it with the four body clips ...

Page 10: ... event that the car does not operate see the PAIRING BINDING instructions on page 11 13 Check the operation of the throttle and steering Pulling the throttle trigger back will drive the car forward pushing the trigger forward once will apply the brakes while pushing the trigger forward twice will drive the car in reverse Turning the wheel to the right will cause the car to turn right and vice vers...

Page 11: ...ress and hold the PAIR BIND button on the receiver then switch the receiver on The receiver s LED will flash to indicate that it is in PAIR BIND mode 4 Press and hold the PAIR BIND button on the transmitter then switch the transmitter on Release the PAIR BIND button only when the transmitter s LED begins flashing 5 When the LED on the receiver lights solid red your ET3 transmitter and Conquest wil...

Page 12: ...d receiver 2 4GHz operation avoids conflicts with other users Easily pairs with vehicles pre equipped with IKONNIK Krypton technology Proportional steering and throttle control Rotary steering and throttle trims End point adjust on channel 2 Handy switched third channel for ancilliary controls Adjustable steering rate perfect for reducing the steering sensitivity for younger or new drivers Specifi...

Page 13: ... easy to use Low Voltage Cut off LVC protection for LiPo or NiMH battery Overheat protection Throttle signal loss protection Motor blocked protection Easily programmed with jumpers Your ESC has been pre installed at the factory but before using your vehicle each time it is good to double check the wiring for damage or loose connections to ensure everything is in working order before Refer to the d...

Page 14: ...ble chime 6 Check the ESC operation to ensure you have full throttle and brake before driving the vehicle Note that you ll need to calibrate the throttle range again when using a new transmitter or when changing the settings of the neutral position of the throttle channel D R ATV ATL or EPA If this is not carried out the ESC may not work properly Understanding the LED Status Light and Alert Tones ...

Page 15: ...ow Voltage Cut off LVC Protection Please note the following with regard to the pre programmed LVC settings 5 9 NiMH cells Output reduces to 50 at 4 5V Output cuts off at 4 0V no recovery 2S LiPo Output reduces to 50 at 6 5V Output cuts off at 6 0V no recovery 3S LiPo Output reduces to 50 at 9 75V Output cuts off at 12V no recovery Overheat Protection When the internal temperature of the ESC is hig...

Page 16: ...et the TRIM of throttle channel to 0 or turn the knob to its neutral position The car can t go forward but can go backward The direction of throttle channel is not correct Reset the direction of throttle channel from original NOR to REV or from original REV to NOR The motor doesn t work but the LED in the ESC works normally The connections between motor and ESC are broken Check the connections and...

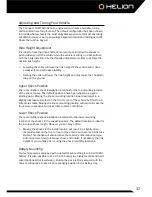
Page 17: ...good starting point Moving the shock mounting location inward will result in a slightly less responsive feel on the front or rear of the vehicle but it will be a little more stable Moving the shock mounting location outward will make the truck more responsive but less stable in some conditions Lower Shock Position There are multiple shock installation locations for the lower mounting location of t...

Page 18: ...use damage Always remove excess water snow from your vehicle after running to help prevent corrosion Using an air compressor is effective but please use eye protection Transmitter Although the receiver included with your radio system is rated for all weather use the transmitter is not The transmitter should not be used in the rain or other wet environment to avoid damage to the sensitive electroni...

Page 19: ...tating the spur gear approximately 1 6 rotation and rechecking 3 If the spur gear is allowed to move more than a very small amount or if it there is no backlash the gear mesh must be adjusted If there is a lot of movement it is recommended to attempt to tighten the mesh Attempted adjustment should only improve the situation if the mesh was correct to begin with you will know what that feels like a...

Page 20: ...o damaged O rings which will need replacing See your local hobby dealer for replacement parts Refilling your shocks 1 Remove shock from vehicle remove spring and top cap Remove the bleed screw from the cap 2 With shock shaft extended add oil to top of body use only 100 silicone oil and reinstall the shock cap Be sure the o ring stays seated and does not squeeze out 3 Slowly compress the shock shaf...

Page 21: ...eck that the wheel nuts are tight every time you run your vehicle Consequently running your vehicle will cause the tires to eventually wear out Be sure to obtain and use genuine replacement parts from your local hobby dealer when necessary General Wear and Tear Using your vehicle will cause general wear and tear which is not covered under warranty yet may necessitate replacement of components Cont...

Page 22: ...e of the product Running in various debris may cause foreign objects to snag on wires causing connections to come loose It is a good idea to unplug and reconnect motor and battery connections when beginning power related troubleshooting Also inspect for any damage caused to the antenna Drivetrain issues can mask themselves as power related Fully inspect the wheels driveshafts and motor for foreign...

Page 23: ...e electronics ie move from grass to asphalt Reduce pinion gear size on the motor to reduce load on the ESC Car doesn t accelerate Ensure the proper running mode is used Change running mode based on battery you are using Reverse not working Reverse mode has been disabled in ESC Follow setup instructions to run back on ESC was improperly set to transmitter Re set to transmitter ensure Th channel is ...

Page 24: ...r left bias Binding in steering system Inspect and correct any binding components or loosen screws if over tight Front wheels too tight Check and adjust wheel nuts to ensure the wheels are not too tight Vehicle top speed and acceleration is slow Battery voltage too low Charge battery Drivetrain has too much friction Check for debris excessive wear on gears inspect bearings Gear mesh too tight Loos...

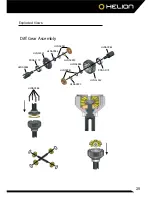
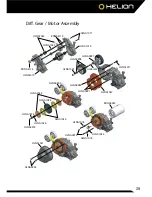
Page 25: ...25 Diff Gear Assembly HLNA0981 HLNA0981 HLNA0984 HLNA0984 HLNA1022 HLNA1022 RDNA5119 RDNA5119 HLNA0983 HLNA0983 HLNA0990 HLNA0990 HLNA0988 Exploded Views ...

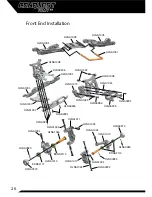
Page 26: ...5 HLNA1007 HLNA1007 HLNA0996 HLNA0993 HLNA0985 HLNA1043 HLNA1008 HLNA1043 HLNA0993 HLNA0996 HLNA0986 HLNA1043 HLNA1014 HLNA0974 HLNA0980 RDNA5115 HLNA0980 HLNA0992 HLNA1043 HLNA1010 HLNA1045 HLNA1011 HLNA0974 HLNA1044 RDNA5115 HLNA1010 HLNA0980 HLNA1043 HLNA1043 HLNA1043 HLNA1011 HLNA1045 RDNA5115 ...

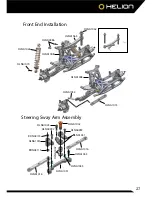
Page 27: ...ering Sway Arm Assembly HLNA1062 HLNA1063 HLNA0986 HLNA1026 HLNA1070 HLNA1008 HLNA1054 HLNA1015 HLNA1008 HLNA1042 HLNA1043 HLNA0992 RDNA5115 RDNA5115 HLNA1031 HLNA0992 HLNA1031 HLNA1016 HLNA1043 HLNA1031 HLNA1042 HLNA1016 HLNA1045 ...

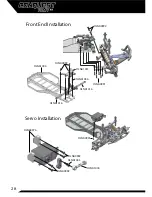
Page 28: ...28 Front End Installation Servo Installation HLNA0992 HLNA0991 HLNA0991 HLNA1018 HLNA0992 HLNA0992 HLNA0976 HLNA1043 HLNA1016 HLNA1016 HLNA1056 HLNA1004 HLNA0992 HLNA1013 ...

Page 29: ...15 HLNA1032 HLNA1033 RDNA5115 HLNA1019 HLNA1019 HLNA0997 HLNA1001 HLNA0998 HLNA1071 HLNA1000 HLNA1037 RDNA0052 HLNA1076 HLNA1053 HLNA1076 HLNA1034 HLNA1036 HLNA0975 HLNA1021 HLNA0994 HLNA1076 HLNA0973 HLNA0991 HLNA0985 HLNA0999 HLNA1035 HLNA1024 ...

Page 30: ...0 Rear End Installation HLNA1027 HLNA0971 HLNA1063 HLNA1017 HLNA1009 HLNA1006 HLNA0986 HLNA0986 HLNA1017 HLNA1006 HLNA1006 HLNA0970 HLNA0987 HLNA0985 HLNA1027 HLNA1062 HLNA1062 HLNA1006 HLNA1041 HLNA1006 ...

Page 31: ...End Installation Shock Absorber HLNA0974 RDNA5115 HLNA1040 HLNA1055 HLNA1061 HLNA1061 HLNA1070 HLNA1043 RDNA5115 HLNA0980 HLNA1039 HLNA1012 Note Friction shock shown oil filled shocks supplied with the vehicle ...

Page 32: ...1032 RDNA5115 HLNA1019 HLNA0998 HLNA0998 HLNA1000 HLNA1001 HLNA1071 HLNA1071 HLNA1001 HLNA1001 HLNA1001 HLNA0997 HLNA1071 HLNA1062 HLNA0971 HLNA1009 HLNA1061 HLNA1017 HLNA1006 HLNA0970 HLNA1027 HLNA1041 HLNA1040 HLNA1017 HLNA1039 RDNA5115 HLNA0987 HLNA0985 HLNA1070 HLNA0979 HLNA1055 HLNA1006 HLNA0974 HLNA0980 HLNA1012 HLNA1043 HLNA1043 HLNA0993 HLNA1043 HLNA1062 HLNA1063 HLNA1033 HLNA1023 HLNA0973...

Page 33: ...A0991 HLNA0991 HLNA1043 HLNA1015 HLNA1007 HLNA1014 HLNA1043 HLNA1016 HLNA1056 HLNA1013 HLNA0992 RDNA5115 HLNA1031 HLNA0992 HLNA1043 HLNA1042 HLNA0992 HLNA1031 HLNA1045 HLNA1016 HLNA1042 HLNA1045 HLNA1008 HLNA0971 HLNA1026 HLNA0986 HLNA1005 HLNA1043 HLNA1041 HLNA0986 HLNA1028 HLNA0992 HLNA1031 RDNA5119 HLNA0983 HLNA1022 HLNA0984 HLNA0981 HLNA0990 HLNA0981 HLNA0982 HLNA0981 HLNA0981 HLNA0990 HLNA098...

Page 34: ... Head Hex Machine Screw 3 8 HLNA0988 Flat Head Hex Machine Screw 2 10 HLNA0990 Sus Arm E Clips 0 6mm HLNA0991 Flat Head Hex Mechnical Screw 3 10 HLNA0992 Cap Head Hex Mechnical Screw 3 10 HLNA0993 Cap Head Hex Mechnical Screw 3 12 HLNA0994 Cap Head Hex Mechnical Screw 3 5 HLNA0996 Front Bumper MT HLNA0997 Motor Guard MT HLNA0998 Wheelie Wheel MT HLNA0999 Motor Guard With Wheelie Wheel ST MT HLNA10...

Page 35: ...023 Gear 34T 48P HLNA1024 Gear 81T 48P HLNA1026 Front Shock Absorber HLNA1027 Rear Arm Bulkhead HLNA1028 Front Arm Bulkhead HLNA1031 Steering Sway Arm Assembly HLNA1032 Gear 20T 48P HLNA1033 Slipper Shaft HLNA1034 Slipper Pad HLNA1035 Slipper Hub HLNA1036 Slipper Tensioner Spring HLNA1037 Motor Mount HLNA1039 Rear Wheel Axle HLNA1040 Dogbone HLNA1041 Front Rear Suspension Pin HLNA1042 Servo Saver ...

Page 36: ...1G Replacement Body MT Green HLNA1082 Clear Body MT HLNA1086 Conquest Battery 2000 mAh HLNA1088 Front Steering Turnbuckle 55mm HLNA1089 Front Arm Turnbuckle HLNA1090 Front Steering Turnbuckle 74mm HLNA1091 Machine Serrated Axle Nuts HLNA1092 Aluminum Axle Drive Hexes HLNA1093 Front Aluminum Pivot HLNA1094 Rear Aluminum Pivot Block HLNA1095 Front Aluminum Chassis Brace HLNA1096 Front Aluminum Pivot...

Page 37: ... being used If you believe a defect in materials workmanship or assembly was not apparent when the product was new and only became evident after the product was used then please contact your local HobbyTown to apply for warranty service You must provide your original sales receipt verifying the proof of purchase and date thereof Provided warranty conditions have been met the components that are fo...

Page 38: ...or 60 days from the date of purchase and will repair replace or refund the purchase should the product prove to be defective This warranty does not apply to any unit or system or component which has been dropped damaged in a crash improperly installed assembled handled or abused Model Engines Aust Pty Ltd reserves the right to void the warranty if the product has been altered or modified has had a...

Page 39: ...relating to the delivery of the goods to Model Engines Aust Pty Ltd will be borne by Model Engines Aust Pty Ltd The benefits of this warranty are in addition to other rights and remedies of the customer under any law to which this warranty relates Our goods come with guarantees that cannot be excluded under the Australian consumer Law You are entitled to a replacement or refund for a major failure...

Page 40: ...l Electrical equipment marked with the crossed out wheelie bin symbol must not be disposed of in household waste but must be taken to a specialist disposal or recycling system In EU member countries electrical equipment must not be discarded via the normal domestic refuse channels WEEE Waste Electrical and Electronic Equipment Directive 2002 96 EG You should take unwanted electrical equipment to y...

Page 41: ...www Helion RC com ...

Reviews: