


InfRasTRUCTURe seTUP / seTTInGs
10
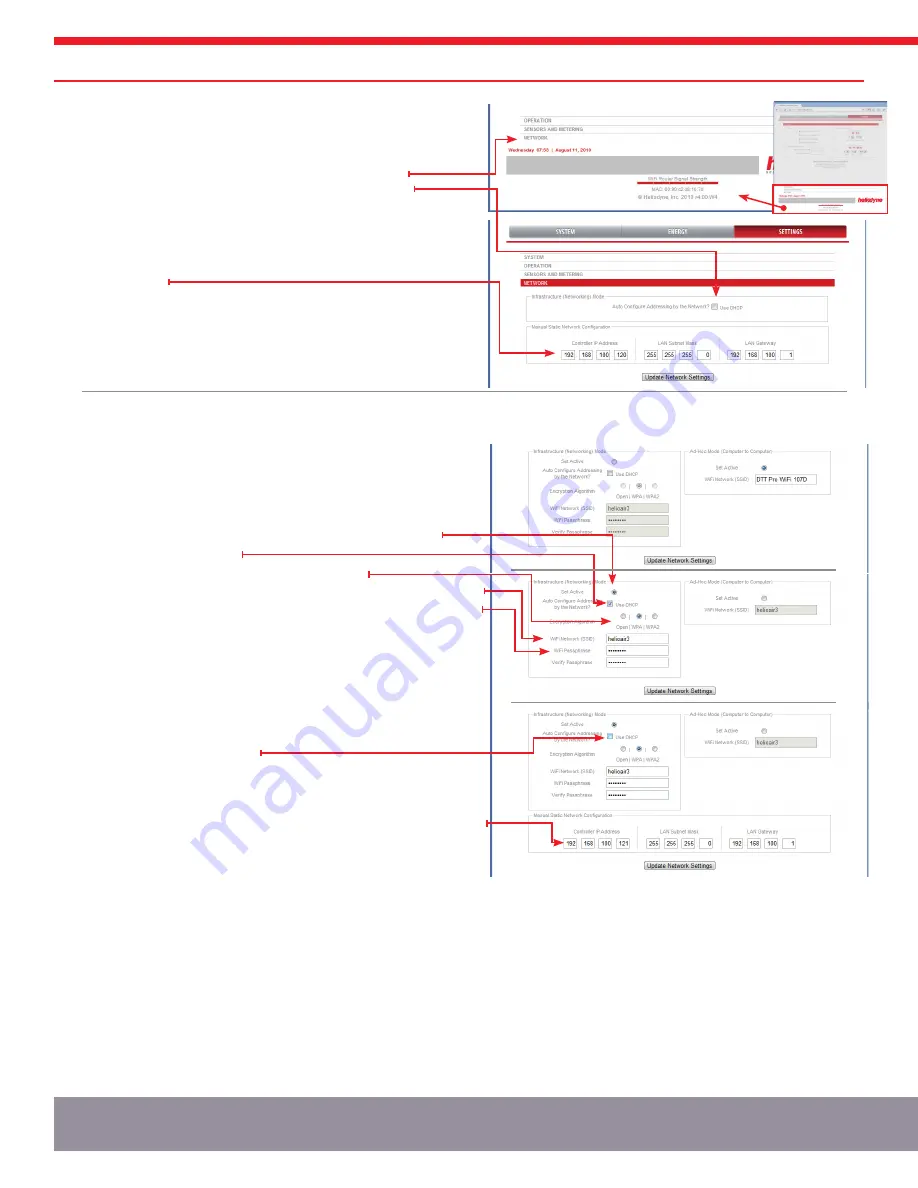
3.2.0.0. Setup With Static IP Address
1.
Bring up the controller’s web interface as in section 3.1.0.1.
2.
Click on SETTINgS in the Nav Bar; you will be prompted for a user
name and password, enter the defaults unless you have changed it.
3.
Click on the NETWORK Bar near the bottom of the page.
4.
Under the NETWORK Bar, uncheck the ‘Use DHCP’ box.
5.
The IP Address, Subnet Mask and gateway setting numbers will
display. Enter in the appropriate settings for your static IP Address
and network settings. Note that any static IP Address selected
should be available and outside the assigning range of the DHCP
server / router.
6.
Hit ‘Update Network Settings’ and close your browser window. Open
a new browser window and navigate to the Static IP just entered.
7.
If the settings were flawed, the controller will revert back to the
original default network settings within 60 seconds.
3.2.1. DLtA 000 002 [Wi-Fi]
3.2.1.0. Setup With DHcP
1.
Bring up the controller’s web interface as in section 3.1.1.
2.
Click on SETTINgS in the Nav Bar; you will be prompted for a user
name and password, enter the defaults unless you have changed it.
3.
Click on the NETWORK Bar near the bottom of the page (see number
2 in the above section for location.)
4.
In the Infrastructure Box, click on the Set Active radio button.
5.
Select the ‘Use DHCP’ box.
6.
Set which form of encryption your router is using.
7.
Enter the name of the WiFi network you wish to connect to - this is CASE Sensitive.
8.
Enter and re-enter in the passphrase for your WiFi network, also CASE Sensitive.
9.
Hit ‘Update Network Settings’ and close your browser window. Use
the Delta-T Pro Discovery Tool to find the Controller and click on
‘Open Web Interface’ to view it in your web browser. This program is
available for download at www.heliodyne.com/controls.
3.2.1.0. Setup With Static IP Address
1.
Follow steps 1-4 above in section 3.2.1.0.
2.
Uncheck the ‘Use DHCP’ box if it is selected (the IP Address and
network numbers will display).
3.
Follow steps 6-8 above in section 3.2.1.0.
4.
Enter in the appropriate settings for your static IP Address and
network settings. Note that any static IP Address selected should be
available and outside the assigning range of the DHCP server / router.
5.
Hit ‘Update Network Settings’ and close your browser window. Open
a new browser window and navigate to the Static IP just entered.
If the network settings were entered incorrectly or incompatible with
the network, the controller will reset itself within one minute’s time to
transmit again in Ad-Hoc mode with the default SSID and IP Address of
169.254.148.50
.
3.2.1. Wi-Fi Ad-Hoc Mode
•
To change back to Wi-Fi Ad-Hoc mode, Set Active in the SETTINgS > Network tab.
•
The network parameters are reset to the defaults and cannot be changed in this mode,
except for the SSID.
•
Once back in Ad-Hoc transmitting mode, the Ad-Hoc SSID can be renamed.
•
Save the settings to take effect.
FIg. 3.2.0
FIg. 3.2.1


