background image

-2-

595-5684-08

Code and Tune Settings

Code Settings

Note: Most installations will not require you to change any jumpers on 
your chime and push button.
WARNING:  Disconnect  chime  unit  from  power  source  before  opening 
code  access  door.  Close  door  and  replace  screw  before  reconnecting 
to power.
The push button and chime communicate by using a code that can be changed 
by removing and/or adding jumpers on both the push button and chime. The 
code is factory set; however, there are 128 selectable codes that allow you to 
expand your system and prevent outside interference. Other wireless products 
may cause interference and the system may not function properly. Follow the 
instructions below for setting a new code.
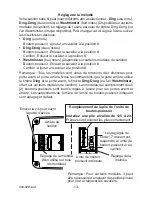
1.  Unplug wireless chime.
2.  Open the cases and locate the jumpers on both the push button and chime 

(See illustration on page 3).

3.  The push button and chime both have eight different jumper locations. The 

jumper positions 1 through 7 are used for setting the code.

4.  To change the code, add and/or remove jumpers as needed. It is recom-

mended to only change one jumper at a time and then check to see if system 
is functioning properly. Note: Jumpers in positions 1 through 7 must be exactly 
the same for both the push button and chime for this system to function.

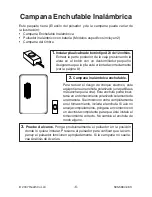
4.

 Mount push button.

Use  either  screws  or  double  sided  tape  to  mount  push 
button.
To mount with screws, remove back of case by pushing in 
tab on bottom with a small screwdriver.
Attach back of case to door jamb or wall. Snap front of 
push button on.
When attaching push button using double sided tape, make 
sure the surface of the door jamb or wall is clean.

Summary of Contents for 595-5684-08

Page 1: ...only one way If the plug does not fit fully in the outlet reverse the plug If it still does not fit contact a qualified electrician to install the proper outlet Do not change the plug in any way 2 Plu...

Page 2: ...Unplug wireless chime 2 Open the cases and locate the jumpers on both the push button and chime See illustration on page 3 3 The push button and chime both have eight different jumper locations The j...

Page 3: ...ve jumper from location 8 Chime Add a jumper to location 8 Note All models have both front and back door tune capabilities We recommend the back door use the Ding tune and the front door use the Ding...

Page 4: ...is subject to the following two conditions 1 this device may not cause harmful interference and 2 this device must accept any interference received including interference that may cause undesired oper...

Page 5: ...y does not include reimbursement for inconvenience installation setup time loss of use or unauthorized service This warranty covers only HeathCo LLC assembled products and is not extended to other equ...

Page 6: ...mpletamente en el tomacorriente invierta el enchufe Si a n no encaja completamente p ngase en contacto con un electrista competente para qua ste instale el tomacorriente correcto No cambie el enchufe...

Page 7: ...jas y localice los puentes tanto en el pulsador como en la campana vea la ilustraci n en la p gina 8 3 Tanto el pulsador como la campana tienen ocho posiciones diferentes de los puentes Las posiciones...

Page 8: ...calibraci n de f brica es el tono Til n tal n o el tono Westminster cuando est disponible Este tono puede ser cambiado siguiendo las instrucciones que siguen Til n tono de una nota Pulsador aumente un...

Page 9: ...tienda Si tiene alg n problema siga esta gu a Usted puede tambi n visitar nuestro sitio Web www hzsupport com Si el problema contin a llame al 1 800 858 8501 s lo para hablar en ingl s de 7 30 AM a 4...

Page 10: ...nconveniencia instalaci n tiempo de instalaci n perdida de uso servicio no autorizado o costos de transporte de retorno Esta garant a cubre solamente los productos ensamblados por HeathCo LLC y no se...

Page 11: ...ut tre ins r e fond dans la prise inversez la Si elle ne convient toujours pas demandez un lectricien comp tent d installer une prise appropri e Ne changez pas la fiche pour quelle que raison que ce s...

Page 12: ...niquent l un avec l autre en utilisant un code que l on peut changer par ajout et ou enl vement de cava liers au niveau de l unit de bouton poussoir et du carillon Le code est r gl en usine 128 codes...

Page 13: ...du timbre Ding Dong ou l air Westminster lorsque disponible Pour changer cet air r gl l usine suivez les directives ci dessous Ding une note Bouton poussoir Ajouter un cavalier la position 8 Ding Dong...

Page 14: ...n anglais seulement pour obtenir de l aide avant de retourner l article au magasin En cas de probl me suivez ce guide Vous pouvez aussi visiter notre site Web www hzsupport com Si le probl me persiste...

Page 15: ...nt l installation ler glage laperted utilisation leservicenon autoris ou les frais d exp dition pour le renvoi de la marchandise La garantie ne couvre que les produits assembl s HeathCo LLC et ne s te...

Page 16: ...a fechado se lo requiere para cualquier solicitud de garant a Veuillez conserver le re u portant la date d achat vous en aurez besoin pour toutes vos demandes li es la garantie Chime Purchase Informat...

Reviews: