background image

To see operational and troubleshooting information and videos,


go to www.hzsupport.com

208814-01

IMPORTANT CONSIDERATIONS

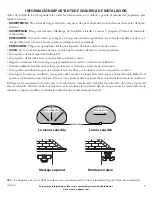
AVOID AIMING THE SENSOR AT:

•  Below are examples of objects that might produce heat and may cause the motion sensor to trigger:

•  Pools of Water 

•  Air Conditioners 

•  Dryer Vents

• Animals 

• Heating Vents 

• Automobile Traffic

•  Areas where pets or traffic may trigger the motion sensor.

•  Nearby large, light-colored objects reflecting light may trigger the shut-off feature. Do not point other lights at the 

motion sensor.

SEASONAL CHANGES:

The motion sensor works by sensing temperature changes across its field of view. The closer the surrounding temperature 

is to a person’s body heat, the less sensitive the sensor will appear. The greater the temperature difference, the more sensi-

tive the sensor will appear. This is a normal part of the light sensor’s operation.

MANUAL MODE

Manual mode overrides the motion sensor and timer control so the light will 

operate full bright. This feature only works at night and only for one night 

at a time. The motion sensor will reset to motion sensing mode at 6 hours 

or sunrise, whichever comes first. Manual mode can be toggled on and off 

using a wall switch.

•  To turn manual mode on, switch the light off at the wall switch for 2 to 4 

seconds and then back on.

•  To turn manual mode off, switch the light off at the wall switch for 2 to 4 

seconds and then back on.

Figure 5

Figure 7

Figure 6

Turn the switch 

OFF for 2 to 4 

seconds

Turn the 

switch 

back ON

5 Min 

Te

st

S

5 Min 

Te

st

S

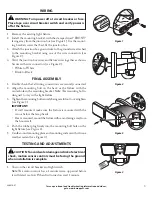
2.  Turn the control dial to the TEST position (see Figure 5). 

Note:


When the control dial is set to the TEST position, the light fixture 

will operate during the day or night. The light will stay on for 8 

seconds after all motion has stopped.

3.  Walk through the coverage area noting where you are when the 

lights turn on. Also, the red LED behind the motion sensor lens 

will flash several times when motion is detected (see Figure 6).

4.  Stop, wait for the light to turn off, and then begin walking again. 

Continue this process until the detection zone has been established.

5.  If needed, gently grasp the motion sensor and move it from side 

to side or up and down to adjust the detection zone.

6.  If needed, gently grasp the lamp heads and move them from side 

to side or up and down to adjust the light coverage area.

7.  Turn the control dial to set the amount of time you want the 

lights to stay on after all motion has stopped (adjustble between 

5 seconds and 5 minutes) (see Figure 7). 

Note:

 When set between 

5 seconds and 5 minutes, the light fixture will only work after 

dark (sunset).

Summary of Contents for 5846

Page 1: ...ore assembling this light fixture This package includes the following items Security Light Owner s Manual Mounting Hardware 2016 HeathCo LLC 208814 01A Motion Activated LED Light Model 5846 HARDWARE INCLUDED Note Four mounting bracket screws are included The installation will only require two Discard the unused mounting bracket screws after installation Plastic plug 6 Mounting Bracket 8 Mounting B...

Page 2: ... 120 volts AC This light fixture must be properly grounded Some electrical codes require installation by a qualified electrician If you want to use Manual Mode the light fixture must be wired through a switch This fixture is designed for outdoor installation and should be mounted to a wall or eaves To achieve best results this fixture should be mounted 8 feet 2 4 meters above the ground Note If fi...

Page 3: ...onnected 2 Align the mounting bolt on the back or the fixture with the center hole in the mounting bracket Note The mounting bolt is designed to stay in the light fixture 3 Tightenthemountingboltsecurelybeingcarefulnottoovertighten see Figure 3 IMPORTANT If wall mounted make sure the fixture is mounted with the sensor below the lamp heads If eave mounted mount the fixture with sensor facing away f...

Page 4: ...sing a wall switch To turn manual mode on switch the light off at the wall switch for 2 to 4 seconds and then back on To turn manual mode off switch the light off at the wall switch for 2 to 4 seconds and then back on Figure 5 Figure 7 Figure 6 Turn the switch OFF for 2 to 4 seconds Turn the switch back ON 5 Min Test 5 S 5 Min Test 5 S 2 Turn the control dial to the TEST position see Figure 5 Note...

Page 5: ...th a hose or power washer To clean the camera lens use a dry microfiber cloth only SPECIFICATIONS Range Up to 40 ft 12 m varies with surrounding temperature Sensing Angle Up to 180 Power Requirements 120 VAC 60 Hz Operating Modes TEST MOTION ACTIVATED and MANUAL MODE Timer 5 seconds to 5 minutes adjustable Test Timer 8 Seconds Manual Mode Timer Maximum 6 Hours This device complies with Part 15 of ...

Page 6: ...hanges on page 4 for more information 3 Do not use a dimmer or timer to control the light fixture Replace the dimmer or timer with a standard on off wall switch The lights stay on continuously 1 The motion sensor may be picking up a heat source like an air vent dryer vent or brightly painted heat reflective surface 2 The motion sensor is in manual mode 3 The light fixture is wired through a dimmer...

Page 7: ...tems are not covered by this warranty Unauthorized service or modification of the product or of any furnished component will void this warranty in its entirety This warranty does not include reimbursement for inconvenience installation setup time loss of use unauthorized service or return shipping charges This warranty covers only HeathCo LLC assembled products and is not extended to other equipme...

Page 8: ...l empaque y verificar que todos los elementos estén incluidos antes de ensamblar este aparato de luz Este paquete incluye los siguientes elementos Luz de seguridad Manual del propietario Ferretería de montaje FERRETERÍA INCLUIDA Nota Se incluyen cuatro tornillos para el soporte de montaje La instalación sólo requiere dos Deseche los tornillos del soporte de montaje no utilizados luego de la instal...

Page 9: ...120 voltios CA Este aparato de luz debe estar correctamente conectado a tierra Algunas normativas eléctricas exigen que la instalación la realice un electricista calificado Si desea utilizar la fase Manual la lámpara debe estar conectada a través de un interruptor Este aparato está diseñado para una instalación al aire libre y se lo debe montar en una pared o en aleros Para lograr los mejores resu...

Page 10: ...ra Tuérazalos juntos y asegúrelos con un conector de cables vea la Figura 2 Blanco con blanco Negro con negro MONTAJE FINAL 1 Asegúrese de que todas las conexiones de los cables estén bien conectadas 2 Alinee el tornillo de montaje de la parte posterior del aparato con el agujero central del soporte de montaje Nota El tornillo de montaje está diseñado para permanecer en la lámpara 3 Apriete bien e...

Page 11: ...star la zona de detección 6 Si es necesario sujete suavemente los cabezales de la lámpara y 5 Min Test 5 S 5 Min Test 5 S PRUEBAS Y AJUSTES muévalas de lado a lado o de arriba hacia abajo para ajustar el área de cobertura de la luz 7 Gire el disco de control para fijar la cantidad de tiempo que la luz debe quedarse prendida después de que todo movimiento se ha parado ajustable entre 5 segundos y 5...

Page 12: ...impia y un paño suave y húmedo No use pinturas solventes ni otros químicos en este aparato de luz Podrían ser la causa de una prematura deterioración del acabado Esto no es un defecto del acabado y no será cubierto por la garantía No rocíe la lámpara con una manguera o lavadora a presión Para limpiar la lente de la cámara use solamente un paño seco de microfibra ESPECIFICACIONES Alcance Hasta 12 m...

Page 13: ...o pequeños animales o tráfico automotor 2 La temperatura exterior está más caliente o más fría que el calor corporal de una persona verano o invierno 3 El aparato de luz está cableado a través de un reductor de luz o de un temporizador 1 Vuelva a colocar el detector de movimiento 2 Vea Cambios de Temporada en la página 11 para más información 3 No use un reductor de luz o un temporizador para cont...

Page 14: ... fase manual El detector de movimiento está detectando luz de los cabezales de la lámpara Vuelva a colocar los cabezales de la lámpara para mantener el área por debajo del detector de movimiento relativamente oscura SERVICIO TÉCNICO Favor de llamar al 1 800 858 8501 sólo para hablar en inglés para pedir ayuda antes de devolver el producto a la tienda Si tiene algún problema siga esta guía Usted pu...

Page 15: ... LLC y no se extiende a otros equipos o componentes que el consumidor usa junto con nuestros productos ESTA GARANTÍA ESTÁ EXPRESAMENTE EN LUGAR DE OTRAS GARANTÍAS EXPRESADAS O SOBREENTENDIDAS INCLUYENDO CUALQUIER GARANTÍA REPRESENTACIÓN O CON DICIÓN DE COMERCIABILIDAD O QUE LOS PRODUCTOS SE ADAPTEN PARA CUALQUIER PROPÓSITOOUSOENPARTICULAR YESPECIFICAMENTEENLUGARDETODOSLOSDAÑOS ESPECIALES INDIRECTO...

Page 16: ...e contenu de l emballage et assurez vous d avoir en main tous les éléments avant de débuter l assemblage L emballage contient les éléments suivants Éclairage de sécurité Guide du propriétaire Ferrures de montage QUINCAILLERIE FOURNIE Remarque Les quatre vis du support de montage sont fournies L installation n en exige que deux Jeter les vis du support de montage non utilisée une fois l installatio...

Page 17: ... Ce luminaire doit être correctement mis à la terre Dans certaines localités le code de l électricité exige que l installation soit confiée à un électricien qualifié Pour utiliser le mode Manuel le luminaire doit être branché à un interrupteur Ce luminaire est conçu pour une installation extérieure il devrait être fixé à un mur ou à l avant toit Pour des résultats optimums ce luminaire doit être i...

Page 18: ... ceux de la commande d éclairage Les fixer ensemble à l aide de serre fils voir la Figure 2 Blanc avec blanc Noir avec noir ASSEMBLAGE FINAL 1 Assurez vous que tous les fils sont solidement branchés 2 Alignez le boulon de montage à l arrière du luminaire avec le trou central du support de montage Remarque Le boulon de montage est conçu pour demeurer dans le luminaire 3 Serrez solidement le boulon ...

Page 19: ...s est arrêté 3 Déplacez vousdanslazonedecouverture enremarquantl endroitoù voustrouvezlorsquelalumières allume LevoyantàDELrougesitué derrière la lentille du détecteur de mouvement clignote à plusieurs reprises lorsqu un mouvement est détecté voir la Figure 6 4 Arrêtez vous attendez que la lumière s éteigne 8 secondes puis recommencez à marcher Continuez ainsi jusqu à ce que vous ayez établi la zo...

Page 20: ...ision Plus la température ambiante se rapproche de celle du corps humain moins le capteur semblera sensible Plus la différence de température sera importante plus le capteur semblera sensible Cela fait partie du fonctionnement normal du capteur du luminaire MODE MANUEL Le mode manuel contourne le détecteur de mouvement et la commande de la minuterie de sorte que l éclairage s allume à pleine inten...

Page 21: ...ssion Utilisez uniquement un chiffon en microfibres sec pour nettoyer la lentille de la caméra FICHE TECHNIQUE Portée Jusqu à 12 m 40 pi Varie selon la température ambiante Angle de détection Jusqu à 180 Courant requis 120 V c a 60 Hz Modes de fonctionnement ESSAI DÉCL PAR MOUV et CONTOURNEMENT MANUEL Minuterie 5 secondes à 5 minutes réglable Minuterie d essai 8 secondes Minuterie du mode manuel M...

Page 22: ... pour plus de détails 3 N utilisez pas de gradateur ni de minuterie pour commander l éclairage Remplacez le gradateur ou la minuterie par un interrupteur mural standard L éclairage demeure continuellement allumé 1 Le détecteur de mouvement capte une source de chaleur évent sortie de sécheuse ou surface brillante réfléchissant la chaleur 2 Le détecteur de mouvement est en mode manuel 3 Le luminaire...

Page 23: ...ET SPÉCIFIQUEMENT DE TOUS DOMMAGES SPÉCIAUX DIRECTS INDIRECTS OU SECONDAIRES LE REMPLACEMENT OU LA RÉPARATION CONSTITUENT LE SEUL RECOURS DU CLIENT ET HEATHCO LLC NE POURRA ÊTRE TENUE RESPONSABLE DE TOUS DOMMAGES SPÉ CIAUX DIRECTS INDIRECTS OU SECONDAIRES Y COMPRIS SANS S Y LIMITER LES PERTES COMMERCIALES ET PERTES DE PROFIT QU ELLES SOIENT PRÉVISIBLES OU NON Certaines provinces n autorisent pas l...

Page 24: ...PT IT IS REQUIRED FOR ALL WARRANTY REQUESTS POR FAVOR GUARDE SU RECIBO DE VENTA FECHADO SE LO REQUIERE PARA CUALQUIER SOLICITUD DE GARANTÍA VEUILLEZ CONSERVER LE REÇU PORTANT LA DATE D ACHAT VOUS EN AUREZ BESOIN POUR TOUTES VOS DEMANDES LIÉES À LA GARANTIE Purchase Information Información de la compra Renseignements d achat Model __________________ Date of Purchase ______________ Nº de modelo N de...

Reviews: