background image

HearthStone

 Quality Home Heating Products   


MODEL Sterling “G” Direct-Vent 


19

Gas supply


N

OTICE


qualified technician

 must connect the heater to the gas supply and leak test the stove before it is approved for use. 

Consult all local code. 

W

ARNING


The stove must be installed and connected in accordance with local codes, or in the absence of local codes, with the 

current edition of the National Fuel Code ANSI Z223.1 

!

 CAN/CGA B149 Installation Code. 


High Altitude Adjustments 

For high altitude installations consult the local gas distributor or the authority having jurisdiction for proper rating 
methods.  If the stove must be adjusted, the information sticker on page 6 (provided with the high altitude kit) must be 

filled out completely and mounted to the stove per the instructions provided with the kit.  This stove must be installed 
in accordances with CAN/CGA 2.17 installation codes. 

 
All the Sterlings are shipped from the manufacturer fully assembled and ready for natural gas  operation with minor 

adjustment.  However, if the Sterling needs to be converted from natural gas to LP, conversion of the stove must be 
performed by qualified service personnel using the manufacturer-supplied optional conversion kit.  Follow the 

conversion instructions supplied with conversion kit. 


Gas Connection 

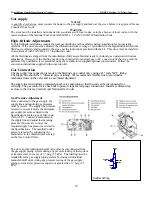
The gas supply line connection is made to the Sterling’s gas control valve using a 

d

" male N.P.T. fitting.  

The supply line should be ½ "diameter pipe or tubing.  We recommend a flexible line to avoid undue 

mechanical load on the valve and to ease thread alignment. 
 
The supply line must include a manual shut-off valve and union so that the unit can be disconnected for 

servicing. The gas control valve has built in pressure taps for test gauge connections.  Install a sediment trap 
as close to the inlet as practical (per National Gas Code). 


Gas Pressure Adjustment 

Once connected to the gas supply, the 
supply line and manifold gas pressures 
must be tested.  The supply line pressure 
is tested to ensure it meets the minimum 
gas supply pressure as listed in the 
Specifications for the type of fuel in use 
(NG or LP).  Connect a manometer to 
the supply line and adjust the incoming 
pressure if necessary to meet the 
required supply line pressure as listed in 
the Specifications.  The manifold outlet 
pressure is tested by connecting the 
manometer to the manifold pressure tap 
on the Gas Control Valve 


The stove and its individual shutoff valve must be disconnected from 
the gas supply piping system during any pressure testing of that system 
at test pressures in excess of ½" psig (3.5 kPa).  The Sterling must be 
isolated from the gas supply piping system by closing its individual 
manual shutoff valve during any pressure testing of the gas supply 
piping system at test pressures equal to or greater than ½" psig (3.5 
kPa). 

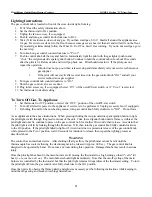
3" MIN.

Cap

Nipple

To Equipment

Inlet

Tee Fitting

Gas Supply

Inlet

Sediment Trap 

Summary of Contents for STERLING "G" 8531

Page 1: ...supplier AVERTISSEMENT Assurez vous de bien suivre les instructions donné dans cette notice pour réduire au minimum le risque d incendie ou pour éviter tout dommage matéeriel toute blessure ou la mort v Ne pas entresposer ni utiliser d essence ni autrevaperurs ou liquides inflammables dans le voisinage de cet apprareil ou de tout autre appareil v QUE FAIRE SI VOUS SENTEZ UNE ODEUR DE GAZ Ne pas te...

Page 2: ... Connections 18 High Altitude Adjustments 19 Gas Connection 19 Gas Pressure Adjustment 19 Operation 20 Before the Stove is Lit 20 Lighting Instructions 21 To Turn Off Gas To Appliance 21 Initial Adjustments 22 Variable Output Control 22 Air Shutter Adjustments 22 Pilot Adjustment 23 Daily Operation 23 Routine Maintenance And Care 24 Servicing And Trouble Shooting 25 How To Obtain Parts And Service...

Page 3: ...decor of any home Handcrafted in Vermont your HearthStone stove is a fine piece of furniture which will complement any room even when it is not burning However when your Sterling is burning it provides the warmth of radiant heat from the granite marble and soapstone tiles Your Sterling is easy to use too There is no chopping hauling or stacking wood simply adjust the temperature on your wall mount...

Page 4: ...y ______________________________ ___________________ _____________________________________________________ Phone _________________________ Date of Installation _____________ Gas Supplier _________________________________________________ Phone _______________________________________ Read this entire Owner s Manual before installing or operating the Sterling gas fired heater Retain this manual for f...

Page 5: ...ving jurisdiction for proper rating methods If the installer must convert the unit to adjust for varying altitudes the information sticker must be filled out by the installer and adhered to the appliance at the time of conversion This appliance has been converted for use at an altitude of Orifice size Manifold Pressure Input Btu h Fuel Type Date of Conversion Converted By Cet appareil est equipé p...

Page 6: ...vised when in the same area as the Sterling heater Do not leave children unattended in the vicinity of this unit FIRE HAZARD Do not store or use gasoline or other flammable vapors and liquids in the vicinity of this appliance Clean the area around under and behind the unit on a regular basis to prevent the accumulation of dust and lint ELECTRICAL HAZARD This appliance is equipped with a three pron...

Page 7: ...uld be done by a licensed or qualified service person UNPACKING AND INSPECTION PACKING LIST 1 Sterling Gas Fireplace Heater 3 Decorative Ceramic Fiber Log set 1 Bag of Charcoal Embers 1 Ember Screen 1 Owner s Manual 1 Warranty Card 1 Thermostat with 40 Thermostat Wire INSPECT FOR DAMAGE Do not install or put into service a damaged or incomplete heater Prior to removing the shipping carton inspect ...

Page 8: ... Your Stove 1 Place stove in desired location Maintain clearance from combustibles 2 Determine the vent configurations 3 Layout fan location and plan gas line run Refer to Optional Blower Fan page 31 4 Find the area of wall penetration The hole must be positioned so that the vent has a minimum per foot rise toward the termination 5 Be sure there is no wiring or plumbing in the chosen location The ...

Page 9: ...ight side of the unit as well as full access for periodic cleaning and servicing Also consider the location of the Optional Blower Fan Minimum clearances to combustibles must be maintained as shown Note that the rear clearance to combustibles will be determined by either the unit s or vent pipe s minimum clearance depending on whether the installation calls for a top exit vertical vent within the ...

Page 10: ...between the two burner tubes The middle log will now fit over the peg locators provided on the two larger logs Open the bag of embers and place in a random pattern on the screen Do not place embers on or in front of the pilot Note Exact positioning of the log set is required in order to obtain a pleasing flame pattern and efficient combustion Incorrect log placement may cause carbon build up exces...

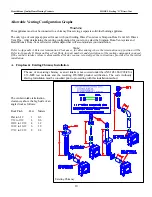
Page 11: ... termination cap position will be Refer to Appendix D Simpson Dura Vent Parts for part numbers and descriptions of the venting components you need If the vent air intake system is disassembled for any reason reinstall per the instructions provided for the initial installation A Fireplace Existing Chimney Installation The vent air intake termination clearances above the high side of an angled roof ...

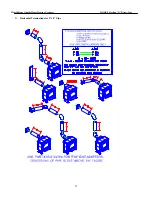
Page 12: ...HearthStone Quality Home Heating Products MODEL Sterling G Direct Vent 11 B Horizontal Terminations for 5 x 8 Pipe ...

Page 13: ...HearthStone Quality Home Heating Products MODEL Sterling G Direct Vent 12 C Horizontal Terminations for 4 x 6e Pipe Horizontal Terminations for 4 x 6e Pipe ...

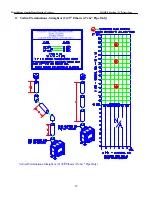
Page 14: ...HearthStone Quality Home Heating Products MODEL Sterling G Direct Vent 13 D Vertical Terminations Straight or 2 45O Elbows 4 x 6e Pipe Only Vertical Terminations Straight or 2 45E Elbows 4 x6e Pipe Only ...

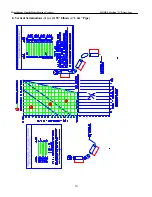
Page 15: ...HearthStone Quality Home Heating Products MODEL Sterling G Direct Vent 14 E Vertical Terminations 1 or 2 90O Elbows 4 x 6e Pipe ...

Page 16: ...o vertical with horizontal termination Fireplace Liner Kits MAXIMUM RISE 27 MINIMUM RISE 2 Can not be used as follows Straight back w horizontal termination 2 95 61223HA 5 x 8 Rear Exit Starter Collar Adaptor Used in the following configurations Straight back with horizontal termination Straight back to vertical to horizontal termination Corner Installations MAXIMUM VERTICAL RISE 3 Cannot be used ...

Page 17: ...plate is available for the appliance to adjust the flow rate of exhaust gases draft In controlling the draft it also changes the burn and the aesthetics of the flame Depending on the vent configuration you may be required to adjust the restrictor plate position The restrictor plate consists of a rotating shutter below the starter section of pipe and an adjustment plate with index holes used to hol...

Page 18: ... collar attaches to the heat exchanger Remove the 4 existing screws placed for shipping purposes Attach the inner collar and gasket and restrictor plate where applicable with the 8 screws provided with the collar OUTER COLLAR Locate the 8 screw holes where the outer collar attaches to the heat exchanger Attach the outer collar and gasket with the 8 screws provided with the collar You are now ready...

Page 19: ...ve metal facade under ash lip for electrical and gas connections THERMOSTAT WIRING The thermostat should be connected to the Sterling using 18 gauge insulated thermostat wire supplied The thermostat wire from the Sterling to the thermostat can be surface mounted or routed under the floor through walls etc Connect one of the two conductor thermostat wires to the terminal on the gas valve marked TH ...

Page 20: ...Sterling s gas control valve using a d male N P T fitting The supply line should be diameter pipe or tubing We recommend a flexible line to avoid undue mechanical load on the valve and to ease thread alignment The supply line must include a manual shut off valve and union so that the unit can be disconnected for servicing The gas control valve has built in pressure taps for test gauge connections ...

Page 21: ...f operation BREAK IN WARNING The natural stones used in the assembly of the Sterling were polished using a water based polishing system prior to assembly of the unit Any residual moisture in the stones must be dried out slowly to avoid damaging the stones This is accomplished by adhering to the following break in procedure When lit the first time the Sterling should be burned on low setting for 2 ...

Page 22: ...c power to the appliance if service is to be performed Unplug accessory fan if equipped 3 If shutting the unit for the non heating season turn gas control knob fully clockwise to OFF Do not force As a supplement to the above instructions When pressing clicking the red piezoelectric spark ignition button to light the pilot light watch through the glass front door of the unit Click the red ignitor b...

Page 23: ... to aid in determining the correct flame pattern 1 If the flame at the base of the logs is completely blue the air shuttles may be open too far 2 If the flame is dirty or licks the top of the stove the air shutters may be closed too far To adjust the air shutter opening simple loose the screw on the shutter clamp and pull the adjustment rod to close the air opening or push the adjustment rod to op...

Page 24: ...olled via the wall mounted thermostat during the heating season Set the thermostat to the desired room temperature and the unit will cycle on and off as required By adjusting the variable output control located on the gas control valve the rate of heat output can be varied to meet the heating requirement of the season Choosing a low flame setting will result in larger burn cycles at a reduced outp...

Page 25: ...ly vacuum the posts holes along the top of the burner tubes With the decorative ceramic fiber logs out of the firebox fasten the door shut and momentarily light the stove according to the lighting instructions described elsewhere in this manual Check to ensure that a flame is burning from each burner port The pilot light flame should be large enough to engulf the sensor thermocouple as described e...

Page 26: ...vered by the warranty Read the warranty card supplied with the unit for complete details Complete and return the warranty card to HearthStone Replacement parts for the Sterling are available from your dealer For a list of replacement parts see Appendix D Broken Glass On Front Door WARNING Do not operate this stove with the glass removed cracked or broken Do not use substitute materials Replacement...

Page 27: ... this may damage the orifice PILOT AND BURNER COME ON BUT GO OUT AFTER SOME WARM UP ºInconsistent or insufficient flame on thermopile UCheck line pressure APPENDIX C to ensure that the correct inlet pressure is present for the type of gas being used If propane pressure is inconsistent check for water condensation at the regulator UCheck proper venting FREQUENT PILOT OUTAGE PROBLEM ºPilot may be to...

Page 28: ...hin the room It will come with complete installation instructions The blower fan which is powered by standard 110 115 volt 60 cycle 2 4 amp household current is easily placed beneath the lower rear casting of the unit The blower fan has a thermo switch When the stove heats up the blower fan turns on The blower fan will continue to operate for a period of time after the unit shuts off as it takes s...

Page 29: ...HearthStone Quality Home Heating Products MODEL Sterling G Direct Vent 28 EXTERIOR TERMINATION CLEARANCES ...

Page 30: ...ng Products MODEL Sterling G Direct Vent 29 ELECTRICAL SCHEMATICS Optional Blower W W Wiring Color KEY Bk Bk G YG R HearthStone c 50 70 90 10 20 30 O OFF 50 60 70 80 90 c 10 20 30 O Bk V Y Br B Bk Y V Bk W Wiring Diagram Sterling DV ...

Page 31: ...HearthStone Quality Home Heating Products MODEL Sterling G Direct Vent 30 GAS CONTROL VALVE ...

Page 32: ...10 NG Fuel Conversion Kit SIMPSON DURA VENT PARTS DESCRIPTION ITEM ITEM ITEM ITEM 4 x e 4 x 6e 5 x 8 5 x 8 Galvanized Black Black Galvanized 6 Straight Pipe 908B 1208B 9 Straight Pipe 907B 1207B 12 Straight Pipe 906 906B 1206B 24 Straight Pipe 904 904B 1204B 36 Straight Pipe 903 903B 1203B 48 Straight Pipe 902 902B 11 14e Adjustable Straight Pipe 911B 1211B Vertical Termination Cap 991 Horizontal ...

Page 33: ...75 mm 14 355 mm BLOWER ASSEMBLY Part number 95 57010 MAY BE USED ELECTRICAL RATING 115 VOLTS 2 4 AMPS 60 HZ UL CSA LISTED DANGER RISK OF ELECTRICAL SHOCK DISCONNECT POWER BEFORE SERVICING UNIT DO NOT ROUTE POWER CORD UNDER HEATER FLOOR PROTECTION MIN R VALUE 1 1 REQUIRED FROM MANUFACTURED BY HearthStone MORRISVILLE VERMONT 05661 Date of Manufacture 1999 2000 2001 Jan Feb Mar Apr May Jun Jul Aug Se...

Page 34: ...son préfabiquée modile déjè installée à demeure si les règlements locaux le permettent Cet appareil doit être utilisé uniquement avec le type gaz indiqué la plaque signalétique Ne pas convertir cet appareil à autres gaz à moins utiliser une trousse de conversion certifiée Warranty 3 year limited warranty excluding door glass gasket and enamel finish Refer to Appendix F Safety Label for Canadian ra...

Page 35: ...r and if the Stove is a vent free model ODS system against breakage or malfunction This warranty expires on the third 3rd anniversary of the Purchase Date LIMITED ONE YEAR WARRANTY HearthStone warrants the following parts of the Stove against the following occurrences that result from defects in material and workmanship I Enamel Finish against peeling or fading excluding chipping mechanical abrasi...

Page 36: ...t in the Stove When the Original Purchaser contacts HearthStone or a Dealer HearthStone or the Dealer as the case may be will instruct the Original Purchaser to either return the defective part or the entire Stove if needed with shipping prepaid to HearthStone or a Dealer or allow a Dealer to make a service call at the place where the Stove is located In the event the Original Purchaser refuses to...

Reviews: