background image

21

1.5.Make sure that the camera will not be interfered unnecessarily when it is 
working, and avoid direct sunlight or near the branches. The detection range of
the sensor is about 120 degrees, and the lens range is about 90 degrees.
2. Normal operation mode
In this mode, the camera is triggered to shot by the sensor , the camera enters 
monitoring mode when the switch is “ON”. After 5 seconds, the LED lights will 
turn off and the camera starts to work independently and enter the standby 
mode. Once an animal enters the detection area detected by the side sensor, 
the camera will be activated and detect the it’s motion track. If the animal 
continues to move to the main sensor detection area, the camera will take 
photos or record video automatically. And if the animal leaves the area detected 
by the main sensor, the camera will turn off and return to standby mode.

Summary of Contents for NDL703P

Page 1: ...User Manual VER NDL703P V1 0 ...

Page 2: ...mal body which can be alerted for a long time In order to operate the camera please read this manual carefully before using The contents contained in this manual refer to the latest information when the manual is written Due to different technical development and production batches it may be slightly different from your actual use Please refer to the actual product functions 2 Notice for use Instruc...

Page 3: ...instruction next to the memory card slot chip up push the SD card into the slot until the card is fully inserted pop up To remove the SD card gently press the back of the memory card inward and the card will After repeated use or improper use the memory card will degrade its performance and may damage the recorded data You need to buy a new memory card Note The memory card will get hot after being...

Page 4: ...3 Button Interface Indicator Function Introduction 3 ...

Page 5: ... USB port 19 SD card slot 20 OFF SETUP ON 21 AV port Key and interface MODE KEY OK key Functions 1 Click the preview interface to enter the main menu OR return to the previous menu 2 Click on playback interface to enter the settings menu or return to the previous menu 1 On preview interface of video or photo Click it to record or take photo 2 On menu setting click to confirm 3 On playback click to ...

Page 6: ...Left Key 5 1 On menu setting click for down choice 2 On time or password setting click to choose down digit 3 On video preview interface click switching to photo preview interface 4 View Playback short press Down key to switch files 1 Press this key to select left when the submenu sets multiple digits Right Key 1 Press this key to select right when the submenu sets multiple digits 2 Click RIGHT Key...

Page 7: ...1 Switch to OFF mode to shut down 2 Switch to SETUP mode to setup 3 Switch to ON mode to monitor OFF SETUP ON Battery bin switch button 6 Press down battery bin pop up replace battery ...

Page 8: ...he camera will perform operations as setting Photo Video or Photo Video Push switch to OFF the camera will be turned off then LCD screen will show nothing 2 Working Mode The Camera have three modes Photo Video and Photo Video Photo mode Photo resolution option 30MP 24MP 20MP 16MP 12MP 8MP 5MP 3MP 1MP Higher resolution means larger photo size then the SD card can store fewer photos otherwise more 7 ...

Page 9: ...ord Remarks The screen will automatically be turned off during recording for power saving users can click any key to recover display 3 Picture Number One two and three and continuous photo taking functions can be selected 4 Shutter speed Shutter speed option 1 15 1 20 1 30 the night vision is different in brightness 5 Video length Set the video length 5 180 seconds optional more longer setting time ...

Page 10: ...etting option 10seconds 60mintues The camera does not record any images or videos during the selected time interval which prevents the memory card from saving too many files and occupying memory capacity 8 PIR Sensitivity The sensitivity of the main sensor setting when the indoor environment is very small Low sensitivity shall be selected When the outdoor environment is normal medium sensitivity sh...

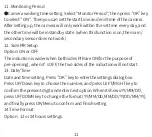
Page 11: ...rk Remark Auto option is recommended the camera will adjust the brightness of IR led light automatically according to it s power state under this model 10 Time Lapse Time lapse setting For example to observe the flowering process of plants you can use this function setting the interval between each shooting then the camera will record the whole process of flowering When choose Time Lapse press OK ke...

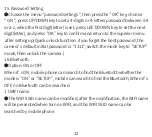
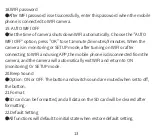
Page 12: ...PIR Setup Option ON or OFF The induction is wider when both sides PIR are ON for the purpose of pre opening when it s OFF the two sides of the induction will not start 13 Date Time Date and time setting Press OK key to enter the settings dialog box Press UP Down key to choose the number and press LEFT RIGHT key to confirm the present digit and enter next option When it shows YY MM DD press UP DOWN ...

Page 13: ...unlock function if you forget the boot password the camera s default initial password is 1111 switch the mode key to SETUP mode then unlock the camera 16 Bluetooth Option ON or OFF When it s ON mobile phone can search to find the Bluetooth whether the mode is ON or SETUP mobile can search to find the Bluetooth When it s OFF no Bluetooth can be searched 17 WIFI name The WIFI SSID name can be modified ...

Page 14: ...toring or SETUP mode after turning on WIFI or after connecting to WIFI and using APP the mobile phone is disconnected from the camera and the camera will automatically exit WIFI and return to ON monitoring Or SETUP mode 20 Beep Sound Option ON or OFF The button and switch sound are muted when set to off the button 21 Format SD card can be formatted and all data on the SD card will be cleared after ...

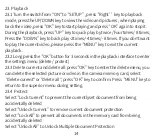
Page 15: ... the OK button for 3 seconds in the playback interface to enter the settings menu delete protect 23 3 Delete current and delete all press OK key to enter the delete menu you can delete the selected picture or video in the camera memory card select delete current or delete all press OK key to confirm Press MENU key to return to the superior menu during setting 23 4 Protect Select Lock Current to pre...

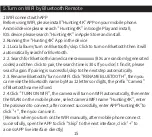
Page 16: ...pair the search time is 30s If you don t find it please search again If pairing is successful skip to the next step automatically 2 3 Rename Bluetooth Turn on WIFI Click RENAME BLUETOOTH then you can revise the Bluetooth name by Max 12 letters or digits the prefix Camera of Bluetooth name is fixed 2 4 Click TURN ON WIFI the camera will turn on WIFI automatically then enter the WLAN on the mobile phon...

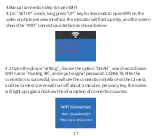
Page 17: ...obile phone is operated to the following figure go back and find the mobile phone Settings icon in the Settings choose the WLAN and find the camera WIFI name Hunting 4K and input the password when the connection is successful go back to the APP Hunting 4K again to click the to go ahead ...

Page 18: ...he WIFI connection interface as shown below 4 2 Open the phone setting choose the option WLAN search and choose WIFI name Hunting 4K and input original password 12345678 After the connection is successful you will see the connection interface on the camera and the camera screen will turn off about 2 minutes press any key the screen will light up again and show the information of connection success ...

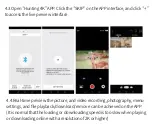
Page 19: ... preview interface 4 4 Real time preview the picture and video recording photography menu settings and file playback download remove can be achieved on the APP It is normal that the loading or downloading speed is too slow when playing or downloading online with a resolution of 2K or higher ...

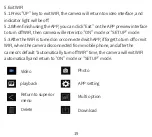
Page 20: ...I then camera will enter into ON mode or SETUP mode 5 3 After the WIFI is turned on or connected with APP if forget to turn off or exit WIFI when the camera disconnected from mobile phone and after the camera s default automatically turn off WIFI time the camera will exit WIFI automatically and return to ON mode or SETUP mode Video playback Return to superior menu Delete Photo APP setting Multi opti...

Page 21: ...e direction of the camera s lens and then slowly move the camera to the other side to monitor the object s motion track 1 3 If the indicator light of the side sensor is on it means that the side sensor has detected the moving object If the indicator light of the corresponding main sensor is on it means that the main sensor has detected the moving object In this way the best position for installing...

Page 22: ...nters monitoring mode when the switch is ON After 5 seconds the LED lights will turn off and the camera starts to work independently and enter the standby mode Once an animal enters the detection area detected by the side sensor the camera will be activated and detect the it s motion track If the animal continues to move to the main sensor detection area the camera will take photos or record video ...

Page 23: ...e or video is only black and white When recording video for a long time low voltage may have a big effect on the stability of the camera so DO NOT record video at night when the power is low Note When the camera is used at night and the battery voltage is low the current increases due to the infrared light and low battery may have a big effect on the stability of the camera then the camera cannot ta...

Page 24: ... playback mode and the LCD screen will turn black the captured picture will be displayed on the TV screen 8 Connect the computer to download photos videos After the camera is connected with PC a removable disk will be added in the my computer window Access the DCIM folder in the removable disk you can copy files to your computer hard disk from MOVIE PHOTO folder Note do not disconnect the data cabl...

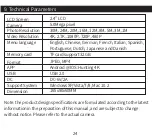
Page 25: ...80P 720P 480P English Chinese German French Italian Spanish Portuguese Dutch Japanese and Danish TF card support 32GB JPEG MP4 Android IOS Hunting 4K USB 2 0 DC 6V 2A Windows XP Vista 7 8 Mac 10 2 165x90x60MM Note the product design specifications are formulated according to the latest information in the preparation of this manual and are subject to change without notice Please refer to the actual ...

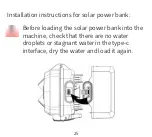
Page 26: ...ation instructions for solar power bank Before loading the solar power bank into the machine check that there are no water droplets or stagnant water in the type c interface dry the water and load it again 25 ...

Page 27: ... if not installed and used in accordance with the instructions may cause harmful interference to radio communications However there is no guarantee that interference will not occur in a particular installation If this equipment does cause harmful interference to radio or television reception which can be determined by turning the equipment off and on the user is encouraged to try to correct the in...

Reviews: