background image

English

15

OPERATION

Get started

1.  Remove all packaging material.
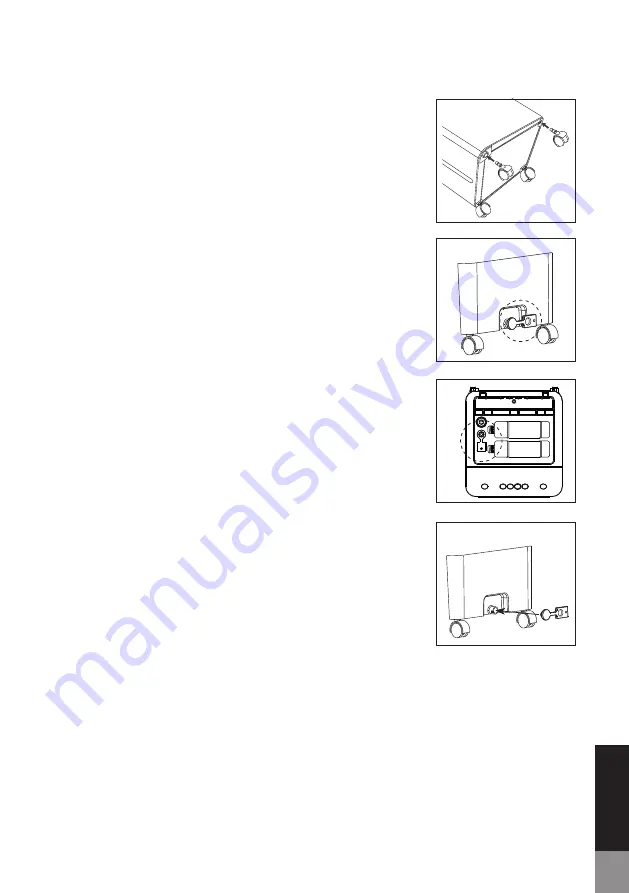
2.  Place the appliance on a flat surface and install the 

four casters on the bottom of the appliance (A).

3.  Place the appliance in an upright position on a flat 

and stable surface.

4.  Check that the bottom drain plug (B) is correctly 

installed, otherwise water will leak out on the floor.

5.  Open the top cover, remove the upper drain plug 

(C) and add water. The water will run down to the 
bottom water tank. Ensure that the water level is 
between the ”MIN” and ”MAX” mark on the water 
indication window. Close the upper drain plug and 
top cover. 

Note: 

When the appliance is operating in cooling 

mode, the water will be pumped from the bottom 
water tank, and the cool water will drip into the 
water filter to deliver cool winds. If the upper drain 
plug is not closed, the water will drip into the bottom 
water tank again.

6.  To release water: Remove the bottom drain plug (D).

A

B

D

C

Important about the water level


Pay attention to the water level in the water indication 
window when adding water. The water level must 
never exceed the “MAX’’ level, or be below the 
”MIN”.

Summary of Contents for Svea 1.0

Page 1: ...Svea I 0 AIR COOLER USER MANUAL Svenska English...

Page 2: ......

Page 3: ...eskrifter 4 5 Produkt versikt 6 Anv ndning 7 8 Underh ll 9 Specifikationer 10 vrig information 11 English Safety precautions 12 13 Product overview 14 Operation 15 16 Maintenance 17 Specifications 18...

Page 4: ...n det leda till elchock personskador eller skador p egendom Om str msladden r skadad m ste den ers ttas av tillverkaren dess serviceagent eller liknande kvalificerad servicepersonal f r att undvika fa...

Page 5: ...r du flyttar den Om du vill flytta den ska du anv nda handtagen och flytta den f rsiktigt f r att undvika att spilla vatten fr n vattentanken Om utrustningen lutas med vatten inuti och vattnet l cker...

Page 6: ...PRODUKT VERSIKT 1 vre vattentank 2 Luftutsl pp 3 Vattenniv m tare 4 Hjul 5 Kylklampar 6 Nedre vattentank 7 Kontrollpanel 8 Handtag 9 Vattenfilter 10 Luftfilter 11 Nedre dr neringsplugg 1 2 5 9 10 11...

Page 7: ...rinner ner till den nedre tanken S kerst ll att vattenniv n r mellan MIN och MAX markeringarna p vattenniv m taren St ng den vre dr neringspluggen och locket Obs N r enheten anv nds i kylningsl get k...

Page 8: ...en Avbryt denna funktion genom att trycka p COOL igen Obs S kerst ll att det finns vatten i vattentanken innan du trycker p denna knapp Tryck inte p knappen om vattentanken r tom Tryck p SWING f r att...

Page 9: ...a det Reng ra den nedre vattentanken 1 Lossa den nedre dr neringspluggen f r att t mma vattentanken Obs S kerst ll att du har en uppsamlare f r vattnet som rinner ut eller t m vattentanken utomhus 2 T...

Page 10: ...10 SPECIFIKATIONER Modellnummer 530069 Svea 1 0 Str mf rs rjning AC 220 240 V 50 60 Hz Effekt 65 W Kapacitet 5 liter Ljudniv 56 8 dB Luftfl de 3 5 m min Sladdl ngd 140 cm M tt 260 x 238 x 565 mm Vikt...

Page 11: ...ervinningssystem f r avfall Kontakta lokala myndigheter eller din terf rs ljare f r mer information Den h r symbolen p produktens f rpackning inneb r att materialet r tervinningsbart S kerhet Detta m...

Page 12: ...ing dropped or damaged in any way Doing so may cause electric shock personal injuries and property damage may occur If the supply cord is damaged it must be replaced by the manufacturer its service ag...

Page 13: ...hen use otherwise it may cause stop Do not tilt or knock over the appliance when you try to move it If you want to move it use the handles and move it carefully to avoid spilling water inside the wate...

Page 14: ...RODUCT OVERVIEW 1 Top water tank 2 Air outlet 3 Water indication window 4 Casters 5 Ice packs 6 Bottom water tank 7 Control panel 8 Handle 9 Water filter 10 Air filter 11 Bottom drain plug 1 2 5 9 10...

Page 15: ...ter tank Ensure that the water level is between the MIN and MAX mark on the water indication window Close the upper drain plug and top cover Note When the appliance is operating in cooling mode the wa...

Page 16: ...on by pressing the COOL button again Note Ensure that there is water in the water tank before pressing this button Do not press the button if the water tank is empty 4 Press SWING to start oscillation...

Page 17: ...r tank 1 Remove the bottom drain plug to release the water Note Ensure you have a container under the drain to collect the water or empty the water tank outdoors 2 Remove the filters The water tank ca...

Page 18: ...18 SPECIFICATIONS Model number 530069 Svea 1 0 Power supply AC 220 240 V 50 60 Hz Effect 65 W Capacity 5 L Sound level 56 8 dB Air flow 3 5 m min Cord length 140 cm Dimensions 260 x 238 x 565 mm Weigh...

Page 19: ...systems contact your local dealer or authority for more information This symbol on the products packaging means that the material is recyclable Safety This mark is printed on the product and in the ma...

Page 20: ...Made in P R C by Bergsala SDA AB P O Box 10204 434 23 Kungsbacka Sweden...

Reviews: