background image

19

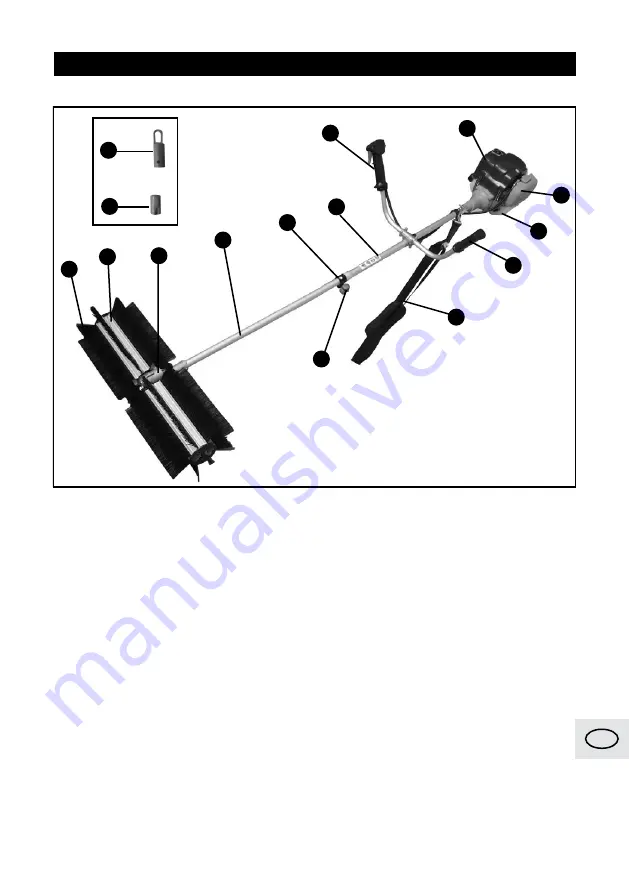
KNOW YOUR PRODUCT                                                                         

Parts List
1. Sweeper Attachment Shaft
2. Brush
3. Brush H older
4. Gear Head
5. Knob
6. Coupler
7. Shoulder Strap
8. Power Head Shaft
9. Operating Handle 
10. Throttle
11. Engine Housing
12. Air filter Assembly
13. Fuel Tank
14. End Cap
15. Hanger Cap

EN

1

2

3

4

6

8

10

11

9

12

7

5

13

14

15

Summary of Contents for 59695006

Page 1: ...e dry place for future reference QUESTIONS 1 866 206 0888 Our Customer Service staff is ready to provide assistance In the case of a damaged or missing part most replacement parts ship from our facility in two business days For immediate help with assembly or for additional product information call our toll free number 1 866 206 0888 Notre personnel du Service à la clientèle est disponible pour vo...

Page 2: ...miliarisez vous avec votre produit p 3 Description et caractéristiques techniques p 4 Règles de sécurité p 5 Fonctionnement p 7 Entretien p 11 Dépannage de base p 13 Rangement p 13 Garantie p 17 Schéma et liste des pièces p 14 ...

Page 3: ...5 Molette 6 Raccord 7 Bandoulière 8 Manche de la tête motorisée 9 Poignée de mise en oeuvre 10 Manette de commande 11 Logement du moteur 12 Filtre à air 13 Réservoir à essence 14 Capuchon 15 Capuchon de suspension 1 2 3 4 6 8 10 11 9 12 7 5 13 14 15 F FAMILIARISEZ VOUS AVEC VOTRE PRODUIT ...

Page 4: ...éments que vous ne voulez pas au lieu de les jeter aux ordures Tous les outils et éléments d emballage doivent être triés apportés au centre local de recyclage et mis au rebut dans le respect de l environnement Caractéristiques techniques Balai rotatif Longueur 36 po 914 mm Largeur 23 5 po 596 mm Hauteur 9 po 220 mm Arbre d entraînement 0 25 po 6 35 mm Direction de rotation Vers l utilisateur Rapp...

Page 5: ...me la tête de coupe afin de prévenir les dommages et rangez l appareil hors de portée des enfants 4 Habillez vous correctement Ne portez pas de vêtements ou de bijoux lâches de shorts ou de sandales ne restez pas pieds nus Ne portez rien qui risquerait d être pris dans les éléments en mouvement de l appareil Si vous avez les cheveux longs attachez les 5 Utilisez des protections oculaires et auditi...

Page 6: ... toujours cet appareil dans un endroit bien ventilé Les gaz d échappement du moteur risquent de contenir du monoxyde de carbone et de causer un décès si l appareil est utilisé dans un endroit confiné et non ventilé 4 Lorsque vous remplissez le réservoir d essence éteignez d abord le moteur et laissez le refroidir 20 minutes 5 Ne fumez pas n approchez pas de sources d étincelles ou d autres sources...

Page 7: ...filtre à air 4 Replacez le filtre en suivant la procédure inverse RESSERRAGE DES BOULONS ET ÉCROUS Vérifiez qu il n y a aucun écrou ou boulon relâché Resserrez les au besoin UTILISATION VÉRIFICATION PRÉALABLE NIVEAU DE L HUILE À MOTEUR Assurez vous de bien vérifier le moteur sur une surface de niveau avec le moteur arrêté 1 Vérifiez le niveau d huile sur une surface de niveau Figure 1 2 Assurez vo...

Page 8: ...aire tourner au ralenti 2 Appuyez sur le bouton marche arrêt du guidon de façon à placer le bouton en position O Cela provoque l arrêt immédiat du moteur 3 Gardez le moteur éloigné des matériaux inflammables tant qu il est chaud 4 Si vous n utilisez pas l appareil pendant un certain temps videz l essence du réservoir et remettez le capuchon en place MONTAGE MONTAGE DE L AXE D ENTRAÎNEMENT SUR LE C...

Page 9: ...llés en position Faites légèrement tourner d un côté et de l autre jusqu à ce que le bouton s enclenche en position t 4FSSF CJFO MB NPMFUUF MISE EN GARDE Assurez vous que la molette est bien serrée à fond avant d utiliser l appareil Vérifiez son serrage régulièrement en cours d utilisation afin de prévenir tout risque de blessures ou de dommage au produit DÉMONTER LE MANCHE DU BALAI ROTATIF ET LAT...

Page 10: ... béton grillage fils bois métal etc N utilisez pas la lame si un dommage a été détecté Avant de démarrer l appareil équipez vous et équipez les autres personnes travaillant dans un rayon de 50 pi 15 m avec l équipement et les vêtements de sécurité requis Conservez une bonne position et un bon équilibre à tout moment Ne vous placez pas sur des surfaces glissantes inégales ou instables Ne travaillez...

Page 11: ...enlevez le capuchon supérieur Ne tirez pas sur la poignée du démarreur et ne démarrez pas le moteur lorsque le capuchon supérieur est enlevé 2 Enlevez le bouchon de protection de la bougie 3 Enlevez la bougie 4 Nettoyez le dépôt ou remplacez la vieille bougie par une bougie neuve si la vieille bougie ne peut plus être utilisée 5 Mesurez l intervalle il doit être de 0 7 mm 0 1 mm LUBRIFICATION Outi...

Page 12: ...PVS VUJMJTFS MF DBQVDIPO EF TVTQFOTJPO enfoncez le bouton et placez le capuchon de suspension au dessus du manche de l appareil Faites légèrement tourner le capuchon d un côté et de l autre jusqu à ce que le bouton s enclenche en position NIVEAU DE QUALIFICATION Niveau 1 Facile à faire la plupart des outils requis sont fournis avec l appareil Niveau 2 Moyennement difficile Il se peut que certains ...

Page 13: ... 2 La soupape d essence est en position fermée Placez la en position ouverte 3 L étrangleur est en position ouverte Placez le en postion fermée 4 Le réservoir à essence est vide Mettez de l essence 5 La bougie est sale Démontez la bougie et nettoyez la 6 Problème technique Faites réparer par un mécanicien qualifié 7 Essence sale ou instable Essayez de redémarrer avec de l essence que vous avez ach...

Page 14: ...6 11050035 rondelle élastique 1 17 11050037 écrou M6 1 18 11090003 capuchon à tambour 2 19 21090004 tambour support de brosse 2 20 50060022 écrou de sécurité hexagonal 2 21 21090003 feuille aluminium carrée 2 22 50040049 vis à tête ronde 2 23 50240048 roulement 2 24 50010144 anneau de protection interne 2 25 50250021 joint à huile 2 26 50100005 goupille élastique 2 27 11090007 axe turbo 1 28 11090...

Page 15: ...1010008 axe flexible 1 46 31010007 manchon caoutchouc 4 47 31010002 manchon tubulaire 1 48 11010005 plaque flexible 1 49 11020010 rivet 1 50 31010008 capuchon antipoussière 1 51 21010002 tube aluminium 1 52 11030033 vis hexagonale 2 53 50010023 rondelle élastique 2 54 50010034 rondelle plate 2 55 50010143 anneau de protection interne 1 56 50240050 roulement 2 57 11090009 clé 1 58 50240047 roulemen...

Page 16: ...TE DES PIÈCES F 5 4 8 9 4 6 7 3 12 11 10 1 13 2 14 16 15 17 35 20 19 18 22 21 23 24 25 26 22 21 20 19 18 23 24 25 26 27 28 29 30 31 32 33 34 35 36 37 38 39 40 41 42 43 44 45 46 47 48 49 50 51 52 53 54 55 56 57 58 59 60 ...

Page 17: ...au vendredi de 8h à 18h heure de l Est RONA se réserve le droit de réparer ou remplacer l outil défectueux à sa discrétion L usure normale y compris l usure des accessoires n est pas couverte par cette garantie Ce produit est garanti 36 mois s il est utilisé de façon normale Toute garantie est invalide si le produit a été utilisé en surcharge ou de façon non recommandée ou a fait l objet de néglig...

Page 18: ...Product p 19 Description and Specifications p 20 Safety Instructions p 21 Operating Instructions p 23 Maintenance Instructions p 27 Basic Troubleshooting p 29 Schematic Drawing and Parts List p 30 Warranty p 33 Storage Instructions p 29 ...

Page 19: ...hment Shaft 2 Brush 3 Brush H older 4 Gear Head 5 Knob 6 Coupler 7 Shoulder Strap 8 Power Head Shaft 9 Operating Handle 10 Throttle 11 Engine Housing 12 Air filter Assembly 13 Fuel Tank 14 End Cap 15 Hanger Cap EN 1 2 3 4 6 8 10 11 9 12 7 5 13 14 15 ...

Page 20: ... and disposed of in an environmentally safe way Specifications Sweeper Attachment Length 36 in 914 mm Width 23 5 in 596 mm Height 9 in 220 mm Drive shaft 6 35 mm 0 25 in Rotating Direction Towards the operator Gear Reduction Ratio 40 1 Brushes Standard 0 028 in 0 8 mm Lubrication Lithium Base Grease Max Sweeping Width 22 8 in 580 mm Specifications Type Single Cylinder Air cooling 4cycle Power 1 36...

Page 21: ...per footing and balance at all times Do not reach over or across running machines 7 Maintain tools with care Keep tools clean for better and safer performance Follow instructions for lubricating before starting 8 Stay alert Watch what you are doing use common sense Do not operate any tool when you are tired 9 Check for damaged parts Before using this rotating floor sweeper always inspect your mach...

Page 22: ... rotating floor sweeper produces loud noise when running Prolonged exposure to noise levels above 85 dBA is hazardous Always wear hearing protection when operating the rotating floor sweeper Package contents When unpacking check to make sure that the following parts are included If any parts are missing or broken please contact Customer Service at 1 866 206 0888 Rotating floor sweeper 1pc Brush 1p...

Page 23: ...floor sweeper Picture 4 EN Keep attention to the Fuel level be sure that the Fuel Level should be always between Upper level And Lower level when working Never use an oil gasoline mixture or dirty gasoline AIR FILTER Check for dirt in the air filter If the air filter is dirty clean it with the following steps picture 5 6 1 Remove the air filter cover 2 Remove the air filter the foam 3 Wash the air...

Page 24: ...ior to starting the gas engine 1 Attach the rotating floor sweeper to your gas engine and ensure it is securely in place 2 Press the priming pump 8 10 times until it is full of fuel You should also see the fuel through the clear plastic fuel pipe 3 Set the choke lever to the on position and switch the on off switch to the I position on position A5 A6 4 Pull the starter cord slightly until resistan...

Page 25: ...nd reduces operator fatigue EN OPERATING INSTRUCTIONS JOININGTHE ENGINE SECTIONTOTHE ROTATING FLOOR SWEEPER ATTACHMENT A1 A2 A3 WARNING Never attach or adjust the rotating floor sweeper or any other attachment while engine is running Failure to stop the engine may cause serious personal injury The rotating floor sweeper attachment connects to the engine by means of a coupler device t PPTFO UIF LOP...

Page 26: ...tain footing and balance at all times Do not stand on slippery uneven or unstable surfaces Do not work in odd positions or on ladders Do not over reach Hold handles with both hands with thumbs and fingers encircling the handles Do not perform Maintenance or Assembly procedures with engine running During operation the exhaust area and lower gearcase hosing may become very hot too hot to touch Avoid ...

Page 27: ... remove the top cover Do not pull the starter grip and start the engine when the top cover removed 2 Remove the spark plug cap 3 Remove the spark plug 4 Clean the deposit or change to a new one if the old one can not be used any more 5 Measure the clearance the gap should be within 0 7mm 0 1mm LUBRICATION Tools Required 13 mm Open end wrench Clean Rag Parts Required Lithium Base Grease Gear Housin...

Page 28: ...e unit serviced by an authorized servicing dealer ATTACHINGTHE STORAGE HANGER C3 C4 t 5P VTF UIF IBOHFS DBQ QVTI JO UIF CVUUPO BOE place the hanger cap over the attachment shaft Slightly rotate the cap from side to side until the button locks into place SKILL LEVEL Level 1 Easy to do Most required tools come with unit Level 2 Moderate difficulty Some specialized tools may be required Level 3 Exper...

Page 29: ...le Remedy Engine can not start 1 ON OFF switch in OFF position Turn to on position 2 Gas Valve in closed position Push to open position 3 Choke set to open position Set to closed position 4 Gas Tank empty Fill the Fuel 5 Spark plug dirty Remove spark plug and clean 6 Technical problem Service by qualified mechanic 7 Dirty or unstable gas Try to re start it with using newly purchased gas 8 Low oil ...

Page 30: ...14 32140053 clamp for shoulder strap 1 15 11050036 hex bolt 1 16 11050035 spring washer 1 17 11050037 M6 nut 1 18 11090003 drum cap 2 19 21090004 brush holder drum 2 20 50060022 hex safety nut 2 21 21090003 squared aluminum sheet 2 22 50040049 pan head screw 2 23 50240048 bearing 2 24 50010144 inner protective ring 2 25 50250021 oil sealer 2 26 50100005 spring pin 2 27 11090007 turbo shaft 1 28 11...

Page 31: ...10008 flexible shaft 1 46 31010007 rubber sleeve 4 47 31010002 tubal sleeve 1 48 11010005 flexible plate 1 49 11020010 rivet 1 50 31010008 dust proof cap 1 51 21010002 aluminum tube 1 52 11030033 hex screw 2 53 50010023 spring washer 2 54 50010034 flat washer 2 55 50010143 inner protective ring 1 56 50240050 bearing 2 57 11090009 key 1 58 50240047 needle bearing 1 59 11090011 rolling ball 1 60 110...

Page 32: ...ING AND PARTS LIST 5 4 8 9 4 6 7 3 12 11 10 1 13 2 14 16 15 17 35 20 19 18 22 21 23 24 25 26 22 21 20 19 18 23 24 25 26 27 28 29 30 31 32 33 34 35 36 37 38 39 40 41 42 43 44 45 46 47 48 49 50 51 52 53 54 55 56 57 58 59 60 ...

Page 33: ...e line at 1 866 206 0888 from 8 AM to 6 PM Monday to Friday Eastern time RONA reserves the right to repair or replace the defective tool at its discretion Normal wear and tear including accessory wear is not covered under guarantee The product is guaranteed for 36 months if used for normal trade purposes Any guarantee is invalid if the product has been overloaded or subject to neglect improper use...

Page 34: ...34 ...

Reviews: