background image

38

ENGLISH

AIR FILTER

Air filter must be cleaned to remove dust and dirt. A dirty air filter can cause carburetor malfunc-
tions, starting problems, engine power reduction, wear and tear on engine parts and abnormal 
fuel consumption.
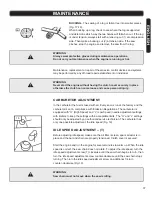
-     Unscrew the screw holding the air filter cover in place and remove the cover (Fig. 20).
-     Pull the choke lever out to close it. This prevents dirt from entering the carburetor throat
      when the air filter is removed.
-     Brush the accumulated dirt and dust from the air cleaner area before removing the air
       cleaner.
      Remove the air cleaner and wash the filter in a non-flammable detergent such as hot soapy
      water and dry thoroughly (Fig.21).
-     Check the air filter for damage and deformation. Replace the filter if damaged.
-     Install the air filter and refit the cover using the screw.

SPARK PLUG

The condition of the spark plug is influenced by an incorrect carburetor setting, too much oil in 
the fuel mixture, a dirty air cleaner and hard running conditions such as cold weather. These 
factors can cause deposits to build up on the electrodes which may result in malfunctions and 
starting problems. If the engine is low on power, difficult to start or runs poorly at idle speed, 
always check the spark plug first.

To check and re-gap spark plug, remove the air filter cover, remove spark plug lead and 
remove spark plug using the T-wrench (Fig.22). Clean the electrodes with a fine wire brush. 
Re-gap spark plug using feeler gauge. 

Gap is 0.6mm 

Replace spark plug if electrode is 

worn. 

Use replacement plug NGK # BPMR7A or Champion # RCJ6Y.

 Install spark plug, 

torque to 11-14 ft.lbs., attach spark plug lead and refit air filter cover.

GUIDE BAR AND OIL HOLES

Clean guide bar before use. Follow instructions for removing and installing guide bar and saw 
chain. Remove guide bar and clean groove of the guide bar with a small screwdriver. Clean oil 
holes with a wire (Fig.23). Check the sprocket and the clutch and clean the bar mount area 
before installing the bar. Guide bar with sprocket nose should be lubricated with grease using a 
lubricating syringe. Invert the symmetrically shaped guide bar every 8 working hours or each 
time the chain is removed to ensure uniform wear. Check the bar rails frequently for wear and 
remove burrs and square up the rails using a flat file. Clean the Oiler port on the saw every time 
the saw chain and guide bar are removed.

WARNING

When installing the air filter, make sure it is secure before refitting the cover.

22

20

21

23

MAINTENANCE

Summary of Contents for 59595017

Page 1: ...ence QUESTIONS 1 888 874 8661 Our Customer Service staff is ready to provide assistance In the case of a damaged or missing part most replacement parts ship from our facility in two business days For immediate help with assembly or for additional product information call our toll free number 1 888 874 8661 C Notre personnel du Service à la clientèle est disponible pour vous aider Dans le cas d une...

Page 2: ...uillez lire ce manuel attentivement avant d utiliser la scie à chaîne Il contient des règles de sécurité de même que des instructions importantes pour le fonctionnement et l entretien Lisez ces instructions avec attention même si l utilisation d une scie à chaîne vous est déjà bien familière SÉCURITÉ DES PERSONNES Ne faites pas fonctionner la scie à chaîne si vous êtes malade si vous avez consommé...

Page 3: ...tions desserrées Ne modifiez jamais la scie à chaîne et n utilisez que des pièces de rechange approuvées lors des réparations Vérifiez la tension de la chaîne avant chaque utilisation et lors du ravitaillement en essence La chaîne se rallongera pendant l utilisation de la scie et tout particulièrement pendant la période initiale de mise au point Une chaîne déten due est dangereuse Ne laissez jamai...

Page 4: ...ne lorsque l outil est utilisé Essuyez tous les débordements de carburant avant de démarrer la scie à chaîne Avant de démarrer la scie à chaîne éloignez vous d au moins 10 pieds 3 m du réservoir de carburant Arrêtez le moteur avant de retirer le bouchon du réservoir de carburant Videz le réservoir de carburant avant de ranger la scie à chaîne Rangez la scie et le carburant à un endroit où les vape...

Page 5: ... manière à former une boucle et redresser les maillons Les gouges devraient faire face à la direction de la chaîne Si elles font face à l arrière retourner la boucle fig 3 5 Placer les maillons d entraînement de chaîne dans la gorge du rail fig 4 6 Positionner la chaîne de manière à ce qu il y ait une boucle sur l arrière du rail fig 4 7 Maintenir la chaîne en position sur le rail et placer la bou...

Page 6: ... fig 8 13 Maintenir la pointe du rail de guidage vers le haut et visser fermement le bouton de blocage de capot d embrayage 14 ATTENTION La chaîne est correctement tendue lorsqu il n y a plus de mou sur le dessous du rail de guidage La chaîne est tendue mais elle peut tout de même être tournée à la main sans se coincer CARBURANT ET RAVITAILLEMENT 4 5 6 7 8 FONCTIONNEMENT AVERTISSEMENT Coupez toujo...

Page 7: ...fumée à proximité du carburant Le carburant peut être sous pression en raison de la température Desserrer le bouchon de réservoir de carburant lentement afin de permettre l équilibrage de la pression Ne jamais faire le plein de carburant lorsque le moteur tourne ou lorsqu il est chaud Ne pas remplir les réservoirs de carburant à l intérieur Toujours remplir les réservoirs de carburant à l extérieu...

Page 8: ...minimiser lors de l utilisation l usure entre la chaîne et le rail de guidage de la scie fig 9 Remarque Lors de la première utilisation il est normal que le moteur émette de la fumée AVERTISSEMENT Vérifiez s il y a des fuites de carburant En cas de fuite de carburant réparez ces fuites avant d utiliser la scie pour éviter les risques d incendie ou de brûlures AVERTISSEMENT N utilisez jamais de l h...

Page 9: ...RAGE D UN MOTEUR CHAUD FONCTIONNEMENT DU MOTEUR AVERTISSEMENT Si la chaîne de la scie est en rotation avec un moteur au ralenti réglez le ralenti Consultez la section Réglage du ralenti à la page 14 Cette étape peut ne pas être nécessaire car le ralenti des scie est testé pendant la fabrication 11 12 10 11 11 1 Avant le démarrage désengager le frein de chaîne en poussant le levier de frein de chaî...

Page 10: ... est bonne 6 Utiliser la scie à de grandes vitesses seulement quand vous êtes en train de couper 7 Vérifier que la chaîne de scie s arrête lorsque la gâchette de l accélérateur est relâchée 1 Dévisser les écrous de rail de guidage 2 En portant un gant maintenir la pointe du rail de guidage vers le haut et tourner la vis de réglage de tension de chaîne dans le sens horaire jusqu à ce que la chaîne ...

Page 11: ...que ne vous est pas bien connue Gardez votre corps positionné d un côté ou de l autre de la trajectoire de coupe de la scie Coupez en utilisant tout le temps une chaîne correctement tendue et graissée Le frein de chaîne permet d arrêter la rotation de la chaîne lors d un rebond Le frein de chaîne n empêche pas le rebond Un frein de chaîne efficace arrête la chaîne en un dixième de seconde ou moins...

Page 12: ...e est très importante car l arbre essayera de tomber dans l entaille fig 15 La coupe d abattage est faite du côté opposé à l entaille et à environ 2 po 5 cm au dessus du centre de l entaille Ne pas couper à travers l encoche avec la coupe d abattage Le bois entre l entaille et la coupe d abattage servira de cale comme une charnière lorsque l arbre tombera le guidant dans la direction de la chute s...

Page 13: ...ille vont tomber Si la bille est sous tension toujours commencer par faire une coupe de détente 1 du côté de la compression Faire ensuite une coupe de tronçonnage 2 du côté de la tension Si la chaîne se coince couper le moteur et retirer la scie de la bille AVERTISSEMENT La plupart des accidents de rebond se produisent pendant les opérations d ébranchage AVERTISSEMENT Portez toujours des gants de ...

Page 14: ...n place et retirer le couvercle fig 20 Tirer le levier d étrangleur pour le fermer Cela évite l entrée de saletés dans la gorge du carburateur lorsque le filtre à air est retiré Brosser la poussière et les saletés accumulées de la zone du filtre à air avant de retirer le filtre à air BOUGIE D ALLUMAGE L état de la bougie d allumage est influencé par un réglage incorrect du carburateur trop d huile...

Page 15: ...e Inverser le rail de guidage de forme symétrique toutes les 8 heures d utilisation ou chaque fois que la chaîne est retirée afin d assurer une usure uniforme Vérifier fréquemment si les rails de guidage sont usés et retirer les copeaux et limer les rails pour s assurer qu ils sont bien perpendiculaires Nettoyer l orifice du graisseur sur la scie chaque fois que la chaîne et le rail de guidage de ...

Page 16: ...ANGEMENT Vider et nettoyer le réservoir de carburant Faire tourner le moteur jusqu à ce que le carburateur soit sec ce qui permettra d éviter que les membranes du carburateur ne se collent ensemble Nettoyer l outil avec minutie Porter une attention toute spéciale aux ailettes du cylindre et au filtre à air Ranger l outil dans un endroit sec et hors de la portée des enfants et des personnes non aut...

Page 17: ...produits sont conçus pour répondre à des normes de qualité supéri eure très strictes et sont garantis pour usage domestique contre tout défaut de fabrication pendant 36 mois suivant la date de l achat Cette garantie n a aucune incidence sur vos droits prévus par la loi En cas de mauvais fonctionnement de votre produit bris pièces manquantes etc composez notre numéro sans frais pour parler à un tec...

Page 18: ... plate 6 Caoutchouc d amortisseur Vis d obturation en forme de T Ensemble du démarreur Vis m5x30 Poignée du démarreur Carter du démarreur Ressort vis Boîtier du ressort de démarreur Poulie Rondelle plate 5x18x1 0 Cordon de démarrage Allumage Commutateur Vis autotaraudeuse 4x19 Vis autotaraudeuse 4x14 Câble de commande des gaz accélérateur Gâchette d accélérateur Ressort de la gâchette Sécurité de ...

Page 19: ...6 97 98 99 100 101 102 103 104 105 106 107 108 109 110 111 112 113 114 115 116 117 118 119 120 121 122 123 124 125 126 127 NO DESCRIPTION Boulon Écrou m5 Support de silencieux Rondelle Pare étincelles du silencieux Vis m5x45 Vis autotaraudeuse acier inox 4 2x9 5 Plaque de guidage Pare étincelles Ensemble de silencieux Joint statique de silencieux Plaque de refroidissement Boulon à tête carrée Join...

Page 20: ...20 FRANÇAIS ENGLISH SCHÉMA SCHEMATIC DRAWING ...

Page 21: ...21 FRANÇAIS ENGLISH SCHÉMA SCHEMATIC DRAWING ...

Page 22: ...22 FRANÇAIS ENGLISH SCHÉMA SCHEMATIC DRAWING ...

Page 23: ...23 FRANÇAIS ENGLISH SCHÉMA SCHEMATIC DRAWING ...

Page 24: ...grard Plastic warning Spring brake Latch brake Pivot latch Weight Tapping screw 4x9 Nut top cover Top cover Plain washer 6 Damper rubber T screw plgu Starter assy Screw m5x30 Grip starter Starter housing Screw spring Case starter spring Pulley Plain washer 5x18x1 0 Starting rope Ignition Switch Tapping screw 4x19 Tapping screw 4x14 Throttle cable Throttle trigger Spring trigger Safety trigger Chok...

Page 25: ... Oil pump assy Fuel tank cap Seal ring fuel tank cap Cushion blocking Fuel tank Fuel retern tube Tank grommet Vent valve assy Carburetor tube Fuel filter Tensioning knob Ratchet wheel Lock konb Aix lock knob Bush Screw Gear cover Washer Steel wire Gear Support Gear Clutch cover Screw Bolt Nut m5 Muffler bracket Washer Muffler cover Screw m5 45 Tapping screw st4 2 9 5 Guide plate Spark arrestor Muf...

Page 26: ...estions relative to its application do not use the tool until you have contacted customer service SAFETY PRECAUTIONS Please read this manual carefully prior to operating the chainsaw It contains important safety maintenance and operating instructions Read these instructions thoroughly even if you are already familiar with chainsaw use OPERATOR SAFETY Do not operate the chainsaw when you are tired ...

Page 27: ... repair work Check chain tension before each use and in between fueling breaks The chain will lengthen with use especially during the initial breaking in period A slack chain is dangerous Never let the chain strike anything If the chain makes contact stop the chainsaw and inspect for damage Replace any damaged parts before use Make sure the automatic oiler is working Keep the oil tank filled with ...

Page 28: ...g carburetor Use only replacement parts authorized for the chainsaw while making repairs or maintaining the saw TRANSPORT AND STORAGE SAFETY Always carry the saw with the engine stopped muffler away from the body and chain facing backwards Allow the engine to cool empty the fuel tank cover the chain with the scabbard and secure the saw before storing or transporting in a vehicle Empty the fuel tan...

Page 29: ...tch cover from the chainsaw body 4 Lay out the saw chain in a loop and straighten the links The cutters should face in the direction of chain rotation If they face backwards turn the loop over Fig 3 5 Place the chain drive links into the bar groove Fig 4 6 Position the chain so there is a loop at the back of the bar Fig 4 7 Hold the chain in position on the bar and place the loop around the sprock...

Page 30: ...xist Fig 8 13 Hold the tip of the guide bar up and tighten the clutch cover lock knob securely NOTE The chain is correctly tensioned when there is no sag on the underside of the guide bar the chain is snug but it can be turned by hand without binding NOTE The chainsaw is equipped with a two stroke engine and must always be run using a gasoline and two stroke oil mixture It is important to accurate...

Page 31: ...his includes the pre mixed gasoline lubricant intended for use in mopeds motorcycles etc MIXING THE FUEL 1 Gasoline to two stroke oil ratio is 40 1 3 2 oz of oil to 1 gallon gasoline 2 Fill an approved container with half of required amount of gasoline 3 Add the proper amount of two stroke oil to the gasoline 4 Close container and shake to mix oil with gasoline 5 Add remaining gasoline to the cont...

Page 32: ...h the choke lever all the way in 9 Pull starter handle until engine starts 10 Depress and release throttle trigger to allow engine to idle normally 11 Allow engine to warm for 30 seconds before using Use high quality chain lubricating oil to minimize wear between the saw chain and guide bar while in use Fig 9 We recommend using SAE No 30 in the summer and SAE No 10 in the winter or when cutting re...

Page 33: ...ts to move in the guide bar at approximately 4200 RPM 5 Check for proper acceleration and saw chain lubrication 6 Do not run the chainsaw at high speed unless you are cutting 7 Make sure the saw chain stops when the throttle trigger is released STARTING A WARM ENGINE RUNNING THE ENGINE 1 Release the throttle trigger and let the engine return to idle 2 Move the ignition switch to STOP position 3 En...

Page 34: ...dden rapid upward movement of the saw cutting mechanism in an upward arc towards the operator Kickback occurs when the upper quadrant of the bar nose comes into contact with a solid object or is pinched The rotational force of the chainsaw can be reversed in the opposite direction of the chain movement This may fling the bar up and back in an arc towards the operator Serious injury or even death c...

Page 35: ... 13 The release of the chain brake can also be felt when the chain brake is moved to the OFF position 1 Start the engine on a solid surface and run at idle until warm 2 Hold the saw firmly by the handles and accelerate the engine to a fast idle The chain should rotate at this speed 3 Push the chain brake forward until it is engaged while holding the saw firmly on the ground The chain should stop i...

Page 36: ...he wood between the notch cut and the felling cut will act as a hinge when the tree falls guiding it in the desired falling direction Fig 15 When the tree starts to fall turn off ignition switch place the chainsaw on the ground and retreat to a safe position at least 10 feet 3 m from the trunk To fell bigger trees with diameters exceeding twice the bar length requires specialized skills and should...

Page 37: ...ARBURETOR ADJUSTMENT MAINTENANCE In the carburetor the fuel is mixed with air Every saw is run at the factory and the carburetor is set in compliance with Emission Regulations The carburetor is equipped with H High Speed and L Low Speed needle adjustment settings with limiters to keep the settings within acceptable limits The H and L settings should only be adjusted by an authorized service techni...

Page 38: ...n power difficult to start or runs poorly at idle speed always check the spark plug first To check and re gap spark plug remove the air filter cover remove spark plug lead and remove spark plug using the T wrench Fig 22 Clean the electrodes with a fine wire brush Re gap spark plug using feeler gauge Gap is 0 6mm Replace spark plug if electrode is worn Use replacement plug NGK BPMR7A or Champion RC...

Page 39: ...must be checked for carbon buildup and condition To check spark arrestor screen first remove the three nuts and the screw of the muffler bracket Fig 25 Next remove the muffler cover Next remove the guide plate held by three screws The spark arrestor screen is now visible Visually check the screen and if holes are present replace the screen If carbon buildup is present use a small brush and remove ...

Page 40: ... is set to STOP Set engine switch to START Engine is out of fuel Add fuel with 40 1 ratio Engine is filled with contaminated or old fuel Change the fuel in the fuel tank Spark plug is dirty Clean spark plug re gap Spark plug is broken Replace spark plug Air filter clogged Clean or replace as necessary Improper fuel or fuel ratio Spark plug defective worn Air filter clogged Chain tension is incorre...

Page 41: ...to demanding high quality standards and are guaranteed for domestic use against manufacturing faults for a period of 36 months from the date of purchase This guarantee does not affect your statutory rights In case of any malfunction of your tool failure missing part etc please contact one of our service technicians at our toll free service line at 1 888 874 8661 from 8 AM to 6 PM Monday to Friday ...

Reviews: