background image


OSD MENU USAGE


Product: JH 21C06

AVAILABLE FUNCTIONS:

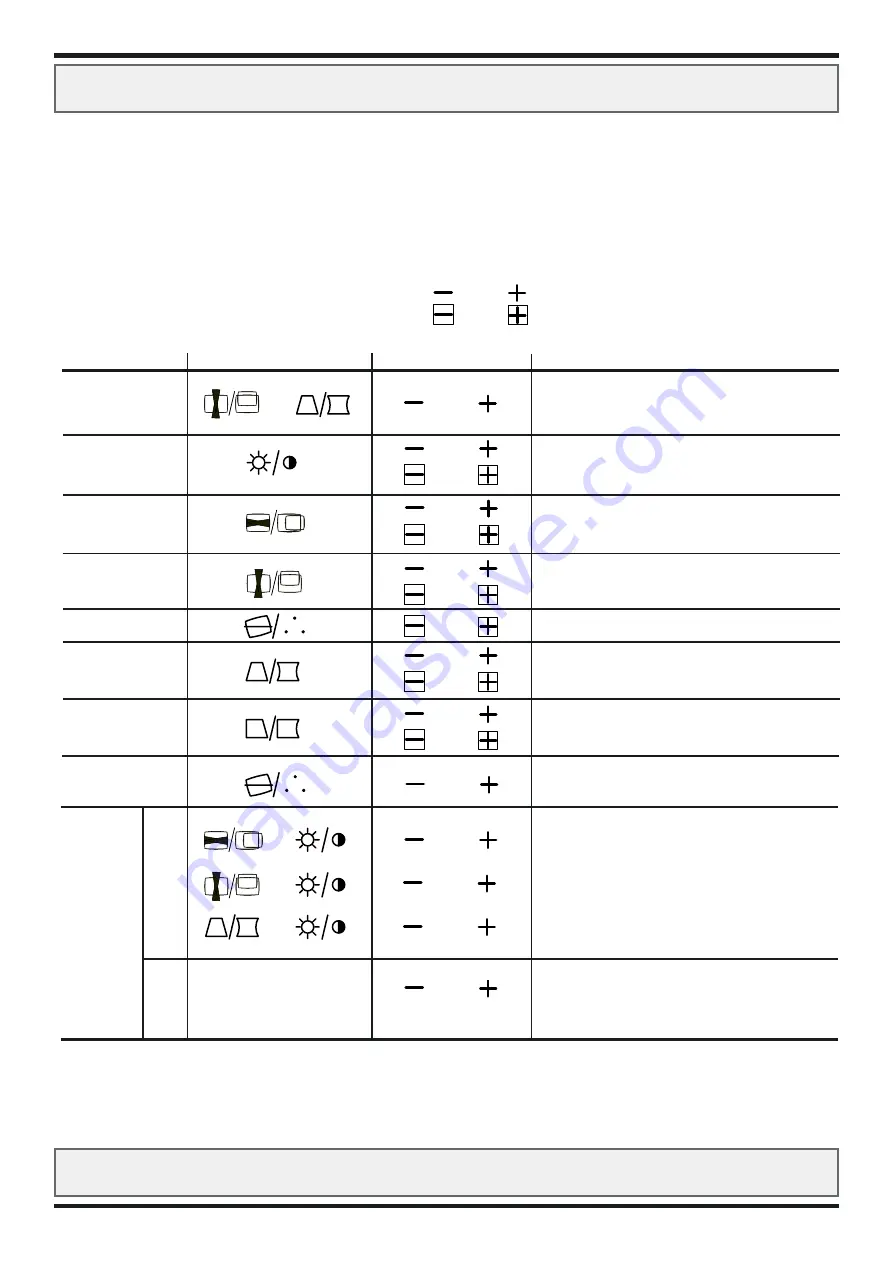
Each of the “function buttons” have two sets of parameters that can be modified. One upper parameter

and one lower parameter. To modify any of the parameters use either of the “adjust buttons” sets.

The EasyMenu display will also indicate what parameter is beeing modfied. Some of the parameters

requires the user to press two “functions buttons” simultaneous. This will be shown in the table below.

Upper Parameter are adjusted with these buttons:

Lower Parameter are adjusted with these buttons:


Product: JH 21C06

5

   PARAMETER          FUNCTION BUTTON        ADJUST BUTTON

Language Select                                   and 


or

Contrast   


or


Brightness 


or

H.Position 


or

H.Size   


or

V.Position 


or

V.Size 


or


Rotation   


or 


Pincushion 


or

Trapezoid 


or

Right Pincushion   


or

Right Trapezoid 


or 

Color Select  


or


Color Balance 


           Red                            and 


or


         Green                          and 


or


           Blue                           and 


or


          Color      This function is only valid when 


and


          reset     the user already has entered the

                                        color balance parameter menu.


              (As described above) 

                           RESULT

Choose between these languages:

ENGLISH, DEUTSCH, ESPANOL, ITALIANO and

FRANCAIS. Will affect all of the menus and messages.

Makes Contrast darker/brighter excluding background.

Makes Brightness darker/brighter including background.

Moves the position of the picture left or right

Shrinks or expands the picture horizontally.

Moves the position of the picture down or up.

Shrinks or expands the picture vertically.

Rotates the picture counter clockwise or anti-clockwise.

Curves the left and right sides inwards or outwards.

Shrinks or expands the top and bottom side.

Curves the right side inwards or outwards.

Shrinks or expands the right top side+right bottom side.

Choose the color warmth (Kelvin Degree) of the picture.

Available modes are: No 1:9300K, No 2:6500K, 

No 3:5000K and No 4:USER (if available)

Decrease or increase the intensity of the red color.

Decrease or increase the intensity of the green color.

Decrease of increase the intensity of the blue color.

Pressing these two buttons simultaneously will cancel

the currently adjusted color mode, and recalls the 

previously selected color mode, before entering the

color balance parameter menu.

NOTE:

- When EasyMenu is not shown, the user can start the adjustment of Contrast and Brightness only, without pressing any of the “Select Function Buttons”

- It is recommended to follow the following procedures for the adjustment of distortions;

  (1) “Rotation”  -  (2) “Pincushion” and “Trapezoid” (Adjust the right side)  -  (3) “Right Pincushion” and “Right Trapezoid” (Adjust the right side)

- The mode “No 4:USER” is not factory preset, it can be programmed by the user - if desired.

  After adjustment of “Color Balance” (Red, Green or Blue) and “STORE” (refer to page 5), the user’s color balance preset can be restored by selecting “No 4:USER”

continues....

Summary of Contents for JH 21C06

Page 1: ...8 Nedre Vats Norway Phone 47 5276 3700 Fax 47 5276 5444 www hatteland com DEGAUSS BRIGHT CONT ON Jakob Hatteland Display AS Created 06 Apr 2001 Modified 01 Jul 2002 Created by Stein Eikesdal Title IND100014 1 Subject JH21C06 UserManual Description Internet release for customers Rev 8 ...

Page 2: ...reen Connector 7 PIN ASSIGNMENTS 8 VGA 15P D SUB Input1 Input2 Touchscreen 9P D SUB 8 SIGNAL CHECKING 9 Signal Check Automatic Signal Check 9 Video Muting 10 PRESETS POWER SAVING 11 Preset Signal Timing Table Power Saving Plug Play 11 TROUBLESHOOTING 12 Common Errors 12 NOTES 13 SPECIFICATIONS 14 2 Features This color monitor is an industrialized version of a high quality Hitachi based monitor The...

Page 3: ... 60945 6 5 c e g Goose neck light This is because the brightness and contrast knobs are not self lightning dimmable WARNING Use of brightness and contrast knobs may inhibit visibility of information at night CONTRAST Adjust the image brightness in relation to the background using the knob marked CONT BRIGHTNESS Adjust the overall image and background screen brightness using the knob marked BRIGHT ...

Page 4: ...showing it s function Every function can be adjusted using the Adjust Buttons to either increase or decrease the values The EasyMenu will be visible for 6 seconds before it automatically disappears Pressing the same button will also close the EasyMenu When any of the Adjust Buttons are pressed a purple color will indicate that the selected function is active and are now beeing modified A slider wi...

Page 5: ...ks or expands the picture horizontally Moves the position of the picture down or up Shrinks or expands the picture vertically Rotates the picture counter clockwise or anti clockwise Curves the left and right sides inwards or outwards Shrinks or expands the top and bottom side Curves the right side inwards or outwards Shrinks or expands the right top side right bottom side Choose the color warmth K...

Page 6: ...play brightness etc before trying the adjustment of moire In some cases this function may cause deterioration of display quality such as focus jitter etc The condition of the moire changing circuit will be indicated by pressing any of the Select Function Buttons or Adjust Buttons and will be displayed in the lower left corner of the EasyMenu as its own icon See below AVAILABLE FUNCTIONS continued ...

Page 7: ...the cable to the VGA output of your computer and fasten it there also POWER TERMINAL Make sure the monitor is turned off before connecting Insert the powercable into the 220 VDC power terminal You may secure the cable further by mounting it to the base mounted cable tie clamp TOUCHSCREEN optional Connect the RS 232 cable to the D SUB 9P Connector female on the rear side of the monitor Connect the ...

Page 8: ... 7 green ground green ground 8 blue ground blue ground 9 no connection no connection 10 ground ground 11 no connection no connection 12 bi directional data SDA no connection 13 horizontal sync or H V horizontal sync or H V 14 vertical sync VCLK vertical sync 15 data clock SCL no connection TOUCHSCREEN D SUB 9P CONNECTOR FEMALE optional Pin Number Description 1 DCD 2 RXD 3 TXD 4 DTR 5 GND 6 DSR 7 R...

Page 9: ... condition it will indicate the condition automatically as follows Indication 1 The EasyMenu indicates the resolution and vertical frequency Precision frequency 2khz approx Condition 1 The monitor detects proper signal Solution 1 No action is needed Above Sample of EasyMenu Indication 2 The monitor indicates the message POWER SAVE for 5 seconds Condition 2 The monitor detects no sync signal Soluti...

Page 10: ...when the monitor detects a sync signal which is out of set up specification or is unstable Solution 4 Verify the specification of input signal Above Sample of INVALID SCAN FREQ condition VIDEO MUTING When the monitor has detected the change of the input signal condition the monitor mutes the picture automatically This function hides scrambled images which may appear during the changing period of t...

Page 11: ...ENERGY STAR power saving requirements The power saving system works only when used with VESA DPMS compliant PC s and or graphic controllers VESA DPMS Power Saving States MODE VIDEO H Sync V Sync Power Power LED ON Active Yes Yes 130 W typical Lighting Green Stand by Blanked No Yes less than 15W Flashing quickly Suspend Blanked Yes No less than 15W Flashing quickly OFF Blanked No No less than 5W Fl...

Page 12: ...ard is compatible and that it is properly seated installed on the computer DISPLAY AREA IS NOT CENTERED SIZED CORRECTLY Make sure that a supported video mode has been selected on the display or on the video card system If it is impossible to position the image correctly ie the image adjustment controls will not move the image far enough then test it again using another graphics card for the PC sys...

Page 13: ... category b protected from the weather For navigational use a external dimmable illumination is required IEC 60945 6 5 c e g Goose neck light This is because the knobs for brightness and contrast are not self lightning dimmable Use of brightness and contrast knobs may inhibit visibility of information at night ...

Page 14: ...55 deg C Humidity 30 to 93 non condensing Storage Temperature 20 deg C to 60 deg C Humidity 10 to 90 non condensing User Adjustments by OSM Easy Menu on screen display contrast brightness color temperature white balance selection 9300k 6500k 5000k user rotation H position H size V position V size side pin cushion right pincushion trapezoid right trapezoid H moiré on off H moiré adjustment Presets ...

Reviews: