background image

Symptom

Probable Cause

Corrective Action

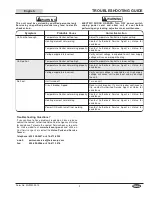
Unit not hot enough.

Temperature Control set too low.

adjust Temperature Control to a higher setting.

Heating element not working.

Contact  authorized  Service  agent  or  Hatco  for

assistance.

Temperature Control not working properly. Contact  authorized  Service  agent  or  Hatco  for

assistance.

Voltage supplied is incorrect.

Verify correct voltage is supplied to unit. Low supply

voltage will cause improper heating.

Unit too hot.

Temperature Control set too high.

adjust Temperature Control to a lower setting.

Temperature Control not working properly. Contact  authorized  Service  agent  or  Hatco  for

assistance.

Voltage supplied is incorrect.

Verify correct voltage is supplied to unit. High supply

voltage  will  cause  unit  to  overheat  and  my  damage

the unit.

No heat.

Unit turned off.

Turn on unit.

Circuit breaker tripped.

Reset  circuit  breaker.  If  circuit  breaker  continues  to

trip,  contact  authorized  Service  agent  or  Hatco  for

assistance.

Temperature Control not working properly. Contact  authorized  Service  agent  or  Hatco  for

assistance.

Heating element not working.

Contact  authorized  Service  agent  or  Hatco  for

assistance.

Power I/O Switch (on/off) not working.

Contact  authorized  Service  agent  or  Hatco  for

assistance.

TROUBLESHOOTING GUIDE

Form No. mVWm-0515

9

English

This unit must be serviced by qualified personnel only.

Service  by  unqualified  personnel  may  lead  to  electric

shock or burn.

WARNING

ELECTRIC  SHOCK  HAzARD:  Turn  OFF  power  switch,

unplug  power  cord,  and  allow  unit  to  cool  before

performing any cleaning, adjustments, or maintenance.

WARNING

Troubleshooting Questions?

If you continue to have problems resolving an issue, please

contact the nearest authorized Hatco Service agency or Hatco

for assistance. To locate the nearest Service agency, log onto

the  Hatco  website  at 

www.hatcocorp.com

and  click  on 

Find Service Agent

, or contact the 

Hatco Parts and Service

Team

at:

Telephone: 800-558-0607 or 414-671-6350
e-mail:

[email protected]

Fax:

800-690-2966 or 414-671-3976
Summary of Contents for MVW Series

Page 1: ...l seguimiento de las instrucciones contenidas en este manual puede resultar en un serio lesión o muerte Este manual contiene importante información sobre seguridad concerniente al mantenimiento uso y operación de este producto Si usted no puede entender el contenido de este manual por favor pregunte a su supervisor Almacenar este manual en una localización segura para la referencia futura Ne pas u...

Page 2: ...ars in this manual is identified by the following signal word panels WARNING indicates a hazardous situation which if not avoided could result in death or serious injury CAUTION indicates a hazardous situation which if not avoided could result in minor or moderate injury NOTICE is used to address practices not related to personal injury NOTICE CAUTION WARNING Record the model number serial number ...

Page 3: ... could occur Make sure all operators have been instructed on the safe and proper use of unit This unit is not intended for use by children or persons with reduced physical sensory or mental capabilities Ensure proper supervision of children and keep them away from unit This unit has no user serviceable parts If service is required on this unit contact an Authorized Hatco Service Agent or contact t...

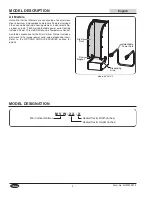
Page 4: ...829 mm detachable power cord Controls include a Power I 0 on off Switch and a Temperature Control available accessories for the mini Vertical Warmer include a wall mount kit a jumper power cord and a dispensing insert Refer to the OPTIONS aND aCCESSORIES section for details model mVW 12 4 Detachable Power Cord Dispensing Area Flip Up Door Door Magnet M V W X X X Mini Vertical Warmer Heated Cavity ...

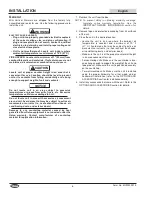
Page 5: ...Configuration Units are supplied from the factory with a detachable electrical power cord and plug Plugs are supplied according to the application ELECTRIC SHOCK HAzARD Plug unit into a properly grounded electrical receptacle of the correct voltage size and plug configuration If plug and receptacle do not match contact a qualified electrician to determine and install the proper voltage and size el...

Page 6: ...r currents i e near exhaust fans hoods air conditioning ducts and exterior doors Damage to any countertop material caused by heat generated from Hatco equipment is not covered under the Hatco warranty Contact manufacturer of countertop material for application information CAUTION WARNING NOTICE 1 Remove the unit from the box NOTE To prevent delay in obtaining warranty coverage complete online warr...

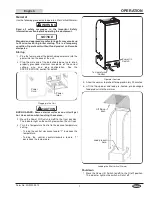
Page 7: ...or details Plugging in the Unit BURN HAzARD Some exterior surfaces on unit will get hot Use caution when touching these areas 3 move the Power I O Switch on off to the I on position The indicator light on the switch glows when the unit is on 4 Turn the Temperature Control to the desired temperature setting Turning the control clockwise toward 7 increases the temperature Turning the control counter...

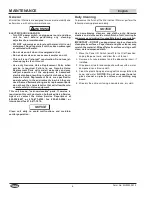
Page 8: ...his unit has no user serviceable parts If service is required on this unit contact an Authorized Hatco Service Agent or contact the Hatco Service Department at 800 558 0607 or 414 671 6350 fax 800 690 2966 or International fax 414 671 3976 Clean unit daily to avoid malfunctions and maintain sanitary operation WARNING NOTICE Daily Cleaning To preserve the finish of the mini Vertical Warmer perform ...

Page 9: ...contact authorized Service agent or Hatco for assistance Temperature Control not working properly Contact authorized Service agent or Hatco for assistance Heating element not working Contact authorized Service agent or Hatco for assistance Power I O Switch on off not working Contact authorized Service agent or Hatco for assistance TROUBLESHOOTING GUIDE Form No mVWm 0515 9 English This unit must be...

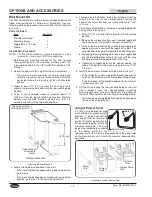
Page 10: ...e screw out from the wall a distance of 1 16 1 5 mm 7 For hollow wall installation install the included toggle bolts with washers into the wall a Drill a 1 2 13 mm pilot hole in the wall at each marked location b Remove the wing section from each included toggle bolt and place one of the included washers on each bolt c Thread the wing section back onto each toggle bolt approximately one quarter of...

Page 11: ...ss components and fuses Product failure in booster tank fin tube heat exchanger or other water heating equipment caused by liming sediment buildup chemical attack or freezing or Product misuse tampering or misapplication improper installation or application of improper voltage 2 LIMITATION OF REMEDIES AND DAMAGES Hatco s liability and Buyer s exclusive remedy hereunder will be limited solely at Ha...

Page 12: ...nt contenues dans ce manuel avant d installer et d utiliser l appareil Les consignes de sécurité qui apparaissent dans ce manuel sont identifiées par les mots indicateurs suivants AVERTISSEMENT indique une situation dangereuse qui si elle n est pas évitée peut provoquer la mort ou des blessures graves ATTENTION indique une situation dangereuse qui si elle n est pas évitée peut provoquer des blessu...

Page 13: ...ENDIE Placez l unité à au moins 25 mm 1 de murs ou de matières inflammables Si ces distances de sécurité ne sont pas respectées une décoloration ou une combustion peut se produire AVERTISSEMENT Assurez vous que tous les opérateurs ont été formés à l utilisation sûre et correcte de l appareil Cet appareil ne doit pas être utilisé par des enfants ou des personnes avec des capacités physiques sensori...

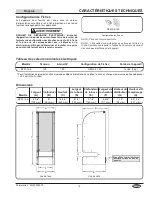
Page 14: ...1 829 mm 6 Les commandes incluent un interrupteur d alimentation I O marche arrêt et un thermostat En outre un kit de fixation au mur un câble d alimentation et une pièce de distribution figurent parmi les accessoires disponibles pour les mini présentoirs verticaux chauffants Pour plus de détails reportez vous à la section OPTIONS ET aCCESSOIRES modèle mVW 12 4 Cordon d alimentation amovible Zone ...

Page 15: ...n de Fiches Les appareils sont fournis par l usine avec un cordon d alimentation amovible et une fiche électrique Les fiches fournies correspondent à leur application DANGER DE DéCHARGE éLECTRIQUE Brancher l appareil sur une prise de courant avec terre de tension de format et de configuration des broches corrects Si la fiche et la prise ne se correspondent pas s adresser à un électricien qualifié ...

Page 16: ...es d aspiration de conduites de climatisation et de portes extérieures Les dommages à toute partie du comptoir pouvant être causés par la chaleur générée par l équipement de Hatco ne sont pas couverts par la garantie de Hatco Contactez le fabricant du comptoir pour obtenir des renseignements CAUTION AVERTISSEMENT AVIS 1 Retirez l appareil du carton de livraison et retirez tous les éléments d embal...

Page 17: ...ls Branchement dans l appareil DANGER DE BRûLURE Certaines surfaces extérieures de l appareil deviennent chaudes Toucher ces zones de l appareil avec précaution 3 Placez l interrupteur d alimentation I O marche arrêt sur I marche Le témoin lumineux de l interrupteur s allume lorsque l unité est en marche 4 Tournez le thermostat pour choisir le réglage de température souhaité Tournez le thermostat ...

Page 18: ...his unit Cet appareil ne contient aucune pièce réparable par l utilisateur Si cet appareil doit être réparé contacter un réparateur Hatco agréé ou le Service après vente Hatco au 1 800 558 0607 ou 1 414 671 6350 télécopieur 1 800 690 2966 télécopieur internationale 1 414 671 3976 Nettoyez l unité quotidiennement pour éviter les dysfonctionnements et assurer un fonctionnement sain AVERTISSEMENT AVI...

Page 19: ...ontactez votre agent de maintenance agréé ou Hatco pour toute demande d assistance Les éléments chauffants ne fonctionnent pas Contactez votre agent de maintenance agréé ou Hatco pour toute demande d assistance L interrupteur d alimentation I O marche arrêt ne fonctionne pas Contactez votre agent de maintenance agréé ou Hatco pour toute demande d assistance Formulaire n mVWm 0515 19 Français GUIDE...

Page 20: ...nts en bois dans le mur Si l emplacement de fixation correspond à la position des montants en bois rendez vous à l étape 6 Si l emplacement de fixation ne correspond à la position des montants en bois rendez vous à l étape 7 pour suivre la procédure d installation sur des parois creuses 6 Pour la fixation sur des montants en bois insérez les vis de fixation dans le mur à chaque emplacement marqué ...

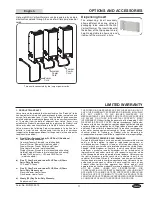
Page 21: ...u à huit mini présentoirs verticaux chauffants peuvent être alimentés par une seule prise électrique grâce à l utilisation de câbles d alimentation Trois appareils reliés par deux câbles d alimentation Câble d alimentation Cordon d alimentation Sortie d alimentation Entrée d alimentation Câble d alimentation Cordon d alimentation Câble d alimentation Fiche femelle Fiche mâle Pièce de distribution ...

Page 22: ...PROPRIÉTÉ INTELLECTUELLE Sans restreindre la portée générale des énoncés précédents CES GaRaNTIES NE COUVRENT PaS ampoules d éclairage à incandescence enduites lumières fluorescentes ampoules de lampes chauffantes ampoules d éclairage à halogène enduites ampoules de lampes chauffantes au xénon tubes d éclairage DEL composants en verre et fusibles défaut de produit dans la cuve d un appareil de cha...

Page 23: ...Form No mVWm 0515 23 English NOTES ...

Page 24: ... 890 0700 Kaemmerlen Parts Service St Louis 314 535 2222 NEBRASKA anderson Electric Omaha 402 341 1414 NEVADA Burney s Commercial Las Vegas 702 736 0006 Hi Tech Commercial Service N Las Vegas 702 649 4616 NEW JERSEy Jay Hill Repair Fairfield 973 575 9145 Service Plus Flanders 973 691 6300 NEW yORK acme american Repairs Inc Brooklyn 718 456 6544 alpro Service Co Brooklyn 718 386 2515 appliance Inst...

Reviews: