A
B
C
D
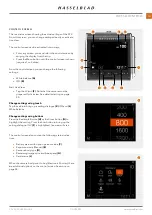
THE FIRST CAPTURE
Press and hold the power button for one second to turn the
CFV on. When the status LED has turned green the camera is
ready to make the first capture.
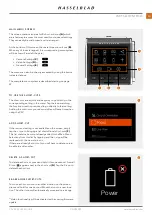
Set correct exposure parameters on the lens and release the
camera. Within a couple of seconds you will see the result on
the LCD
(A).
If no image is shown please make sure the correct camera
model is set by following the procedure on page 69.
To set a different ISO value, use the following steps:
●
If the display is not activated press any of the rear
buttons.
●
Place your finger at the top of the screen and slide
down to reveal the control screen
(B). You can do this
from any screen.
●
Tap the ISO value in the top right area
(C). Scroll
through the list of ISO values by sliding up/down and
tap the required value
(D) to confirm the new ISO value
Note!
From the control screen you can also change white balance by
tapping the white balance icon in the top left corner.
See also page 40.
CFV II 50C USER GUIDE
www.hasselblad.com
19
QUICK START
Summary of Contents for CFV II 50C
Page 1: ...CFV II 50C User Guide 2019 12 20 v1 ...
Page 6: ...1 INTRODUCTION ...
Page 15: ...2 QUICK START ...
Page 21: ...3 SAFETY ...
Page 25: ...4 PARTS CONTROLS ...
Page 39: ...5 USING THE CFV ...
Page 68: ...6 SETTINGS ...
Page 98: ...7 PHOCUS ...
Page 106: ...8 ACCESSORIES ...
Page 109: ...9 APPENDIX ...

