background image


30 


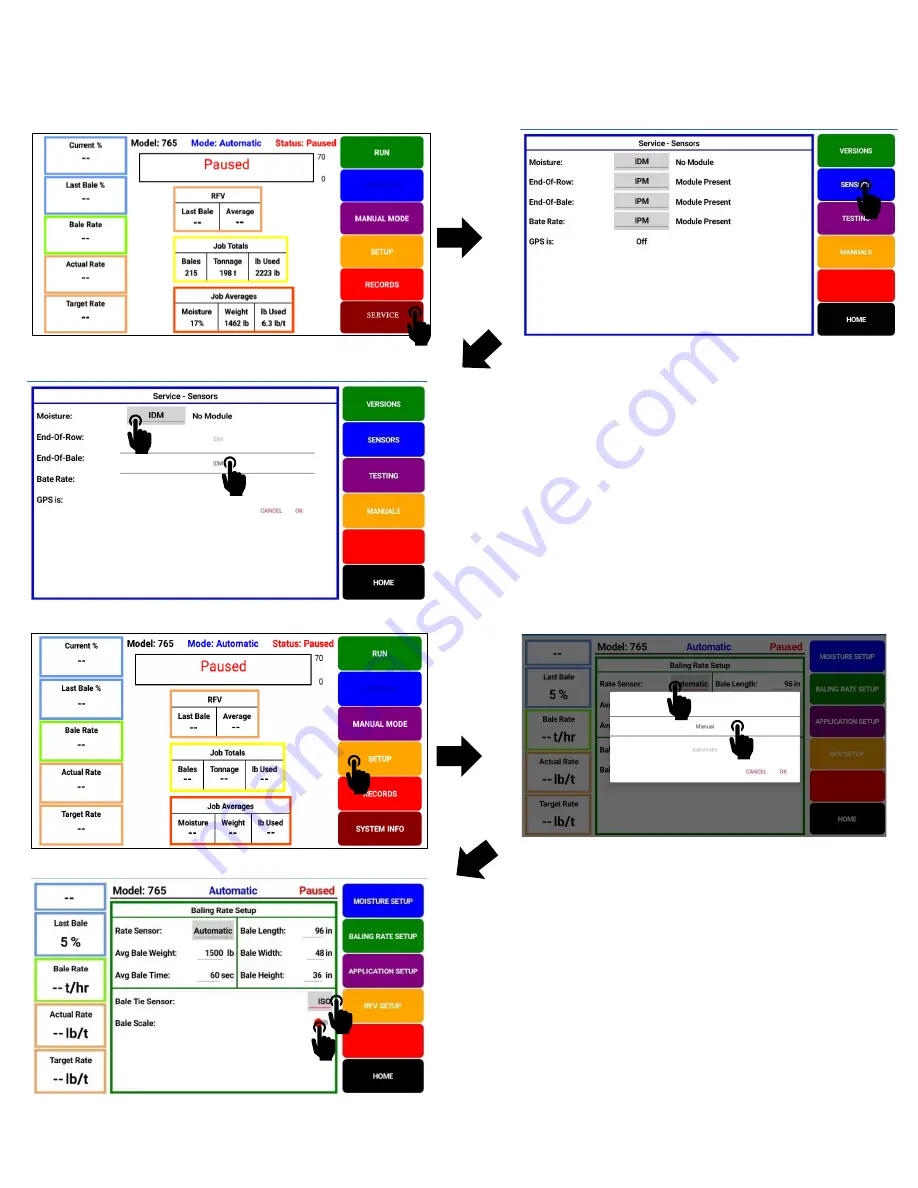
Moisture System with Dye Marker Object Pool Setup (screens shown in Precision Baling App 
using tablet display) 


Service - Sensors screen 


Select SENSORS 

Required - Update Moisture sensor selection to IDM (ISO Dye Module) 

Set the module in which moisture readings are displayed in 
SERVICE menu 

Set the baler sensors utilized from ISOBUS 

Select Rate Sensor and choose Manual 

Select Bale Tie Sensor and choose ISO.   
If baler is equipped with roller chute scale turn ON to record 
bale weights in job record 

Summary of Contents for 239DM

Page 1: ...1 239DM 20 5 21 OWNER S MANUAL Model 239DM Dye Sprayer Marking System Accessory upgrade to CNH DIA Moisture kits 439618 48189657 90420182 Forage Harvester...

Page 2: ...utomatic or Manual Mode 19 20 23 24 31 32 32 Pin Outs 33 36 Parts Breakdown 37 Warranty 38 Introduction Congratulations on purchasing a Harvest Tec Dye Sprayer Marking System When attached to a DIA st...

Page 3: ...in plug on 006 765IC harness near ICM Securely fasten to key power outlet in cab of tractor 4 Secure wires with zip ties Setting up baler 1 Route 006 765BN harness from draw bar of baler back toward B...

Page 4: ...4 System Wiring Diagram 6 3 stem iring iagram aler ote 6 moisture module is removed rom and connected to 1 ptional tablet displa with use o recision aling...

Page 5: ...ollowing order A Elbow B nozzle holder C check valve D reducing bushing E tip as pictured below Note All parts should be thread taped 2 Once the nozzle holders are fastened to the balers route the 3 8...

Page 6: ...holder assemblies in the suggested locations pictured shown below se the 1 hardware provided to do so a Make sure that the tip assemblies A are mounted in line with the star wheels B so that the syste...

Page 7: ...stem is out of dye 2 There is air in the lines preventing a steady mist coming from the tips 3 Damaged pinched hose 4 Tip is plugged 5 Set point is set too high 1 Check the tank for solution If the ta...

Page 8: ...s touch screen options to make selections Selections are made by finding the desired selection and pressing the touch screen icon All buttons are labeled and color coded When the moisture system is co...

Page 9: ...object pools have been loaded and Icon 1 disappears from the upper left corner of the display press the NEXT IMPLEMENT button 2 and verify that the moisture system object pool appear on the Virtual T...

Page 10: ...ntroller software displays version 4 2 0 0 or higher proceed to configuring the baler for the moisture system by pressing the MACHINE SETUP button 6 Once the MACHINE SETUP icon has been selected the M...

Page 11: ...u have reached the second ealer ode screen select the area under oisture 1 ote that the box below oisture will likel be the de ault T I T LL Select the proper configuration setting from the pop up men...

Page 12: ...the bottom of the Menu Bar 13 to scroll down thru the Menu Bar until you reach the SCREEN SETUP pages Select the icon for SCREEN SETUP 1 14 so the Screen Setup 1 screen appears Select how you would li...

Page 13: ...etup pages have been configured scroll back up to the top of the Menu Bar by pressing the top button in the Menu Bar with the up arrow 16 Select the FIELD SETTING icon 17 and adjust the Moisture Alarm...

Page 14: ...reen Cycle back and forth between the Baler Work Screen and the Moisture System Work Screen by pressing the NEXT IMPLEMENT button 19 during operation Harvest Tec Icons signified by arrows 19 22 are as...

Page 15: ...1 and later Big Baler Series Follow the steps below to setup the integration of the Moisture System into the baler display 1 Select the baler Setup tab in the top right corner of the baler run screen...

Page 16: ...press and hold the first blank square box under the down arrow on the right side of the screen for 10 Seconds 4 ter 1 seconds the irst screen below will appear prompting ou or a code ress the and ente...

Page 17: ...in the top right corner of the baler run screen Then press Machine Configuration from the baler setup page wrench icon at top 6 Select the Moisture Sensor line on the Machine Configuration screen On t...

Page 18: ...later Big Baler Series continued The current bale moisture content will now display above the baler next to the water droplet and the previous bale moisture will display next to the bale in above the...

Page 19: ...ICM Through the free Precision Baling App the operator can set real time baling parameters to monitor every bale This provides a multi use option while utilizing the improved app to select objects en...

Page 20: ...n for a few seconds until the slider appears onscreen then drag the slider to the right Android Turn Tablet ON Hold down the Sleep Wake button until logo appears Tablet will take a moment to load You...

Page 21: ...d open You will need a Wi Fi connection available to download app iPad Android ownload the recision aling pp in the app stores b searching or Harvest Tec in the search bar The advertisements displayed...

Page 22: ...al USB cable included with tablet Shutting Down the Precision Baling App iPad 1 To shut down the Precision Baling App double click the home button This will show the open apps that are running on your...

Page 23: ...ablet Note By pressing the home button to return to the home screen the Precision Baling App does not shut down 2 lide the app ou want to shut down toward the right o the tablet screen or click on the...

Page 24: ...has been selected C Status Confirms if system is running or paused Note Upon startup the system is PAUSED D Histogram Moisture graph of the last 90 seconds or shows if system is paused Real Time Info...

Page 25: ...M Run Pause Toggles between run mode to apply and pause mode to stop reading moisture N Override Only displays when in run mode while the applicator is applying preservative Once in override the appli...

Page 26: ...ens shown in Precision Baling App using tablet display Use the screen shots below to navigate through the operation screens Note not all functions utilized with operation of moisture dye marker Automa...

Page 27: ...justing Moisture Levels Adjusting Baling Rate Adjusting Application Rate Select and change input boxes sliders as needed Select and change input boxes sliders as needed Select and change input boxes s...

Page 28: ...28 Job Records View Job List View Current Job List View Selected Job List...

Page 29: ...29 Create a New Job v Software Versions Select Job Details to view job records Press Create Job Software Versions Select and fill out blank input boxes as needed...

Page 30: ...RS Required Update Moisture sensor selection to IDM ISO Dye Module Set the module in which moisture readings are displayed in SERVICE menu Set the baler sensors utilized from ISOBUS Select Rate Sensor...

Page 31: ...when moisture is above threshold Dye Marker can be manually primed from either this screen or button located on dye marker Note prime dye marker upon each refill System is now setup From HOME screen...

Page 32: ...stream of liquid coming from each of the tips NOTE The system needs to be primed every time the system has run out of dye B You can adjust the moisture content level at which you would like the system...

Page 33: ...1 Pin 10 Gray GPS Expansion 2 Pin 11 Brown GPS Expansion 3 Pin 12 Black Ground from ECU Pin 1 Red 12V from ECU Pin 2 Yellow ISO CAN Hi Pin 3 Green ISO CAN Lo Pin 4 Black Ground from ECU Pin 1 Not Used...

Page 34: ...765VN Deutsch Plug Number DT04 4P and DT06 4S Pin 1 Not Used Pin 2 Yellow ISO CAN Hi Pin 3 Green ISO CAN Lo Pin 4 Red 12V Power to ECU Pin 5 Black Ground to ECU Pin 6 Not Used Pin 7 Not Used Pin 8 Not...

Page 35: ...n 1 Red 12V from ECU Pin 2 Not Used Pin 3 Not Used Pin 4 Black ISO CAN Lo Pin 1 Black White Ground to End of Bale Sensors Pin 2 Red White 12V to Pump Pin 3 Blue Prime Wire Pin 1 Black White Ground to...

Page 36: ...rness 006 7307CMS Deutsch Plug Number DT06 3S Moisture Plug on Harness 006 7307CMS Deutsch Plug Number DT06 2S Pin 1 12V from ECU Pin 2 ISO CAN Hi Pin 3 Ground from ECU Pin 4 ISO CAN Lo Pin 1 12V to P...

Page 37: ...003 T3838 1 20 Shut Off Cap 004 1207F 1 10 3 8 Hose 002 9003AS 6 NP Red Dye 009 0800 1 11 DSM Pump 007 4120LF 1 NP Tank Cap Gasket 005 9022CG 1 31 Integration Harness 006 765VN 1 34 Baler Harness 006...

Page 38: ...ed through the selling dealer and distributor transportation charges prepaid This warranty shall not be interpreted to render Harvest Tec Inc liable for injury or damages of any kind direct consequent...

Reviews: