MM-015371-001, Rev. C
43
8.2.2
Control Head Adapter Bracket (Not Supplied)
In some cases, a control adapter bracket (not supplied) may be required to attach the supplied U-shaped
control head mounting bracket (or the optional mounting pedestal) to the motorcycle. Control head
adapter brackets for all makes and models are not available from the factory. Therefore, obtaining or
field-fabricating an adapter bracket will be required in some cases. All utilized bracketry:
Must be mounted in a location that is safe for the motorcycle operator (e.g., so it does not interfere
with steering and other motorcycle controls);
Must not interfere with the motorcycle operator’s visibility, including the view of all motorcycle
instruments;
Must provide a secure mount for the control head;
Must utilized rounded corners/edges to the maximum extent possible; and,
Must not be mounted in a way that compromises the strength of the motorcycle’s frame or other key
components.
Never comprise the strength of a motorcycle’s frame, handlebars, or other key
components by drilling or grinding holes in these components. Use clamps or
another method approved by the motorcycle manufacturer to attach radio
components.
CAUTION
Before drilling holes and/or installing mounting screws, verify these operations will not
damage or interfere with any existing vehicle components such as the fuel tank, a fuel
line, engine, transmission, wiring, etc. Always check to see how far the mounting
screws will extend below the mounting surface prior to installation. Always deburr
drilled holes before installing screws.
8.2.3
Mounting the CH-721 Control Head
8.2.3.1
Using the Standard U-Shaped Mounting Bracket
The following CH-721 control head mounting procedure is recommended:
1.
Obtain CH-721 Mounting Bracket FM24841-0001 included in Mounting Bracket Kit KT-008608
(item 8 in Table 4-2).
2.
Obtain or field-fabricate a suitable adapter bracket. Mount this bracket to the motorcyle according to
the manufacture’s instructions and/or industry-standard practices. Observe and follow the require-
ments listed in Section 8.2.2.
3.
Using the CH-721 Mounting Bracket as a template, mark and drill mounting holes into the adapter
bracket as required. The round and elliptical holes in the mounting bracket’s mounting surface are
symmetrical, so forwards/backwards positioning is not important during this step. However,
positioning is important in the next step.
4.
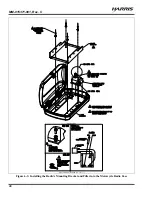
Postion the mounting bracket on the surface of the adapter bracket so the two round holes in its two
side “ears” are nearest to the normal location of the operator (towards the rear of the motorcycle) and
the two slotted holes are farthest from the normal location of the operator.
5.
Attach the mounting bracket to the adapter bracket using suitable mounting hardware (not supplied).
The use of #12-24 stainless-steel self-locking hardware (i.e., machine screws with washers and self-
locking nuts) is recommended, in at least six (6) locations.

