background image

13

ENGLISH

Operating Instructions

Troubleshooting

oPeRaTInG InsTRUCTIons

Listening to your CD player, tape 

deck, tuner or other source

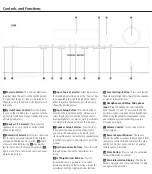
1.  Press the Power switch 

1

 to turn on the 

amplifier. The power indicator lights white and 
the protection circuitry checks for short circuit 
or other problems for a few seconds before 
sound output.

2.  Press ”speaker 1” to hear loudspeakers 

 connected to the rear speakers 1 terminals. 
Press ”speaker 2” to hear loudspeakers 
 connected to the rear speakers 2 terminals. 
Press both to hear both speaker pairs at once. 
To listen to headphones only, press to turn off 
any active speaker pair.

3.  select desired source for listening by pressing 

the front panel source up or down 

4

 repeat-

edly until the name of the source is shown in 
the Main Information Display or by pressing 
the desired system on button on the remote 
control. Please take the time to first associate 
physical Input jacks to source names, then 
press the Power button to place the amplifier 
in standby to have it save your preferences.

4.  begin playing the desired source.

5.  adjust the Volume control to the desired level.

With the Input setup, you may adjust bass and 
Treble as well as balance if you have not already 
done this during the setup process. 

With the eQ Preset you can select one, two or 
three stages of equalization, if you did already 
perform the ezset / eQ setup automated adjusting 
process as described above.

Making a recording

You may record any source to tape or to CD-R or 
to both simultaneously. You may also connect a 
second tape deck to the CDR inputs and outputs 
to record from tape to tape (in either direction).

To select the desired source for recording (this 
can be a different source than the one being 
 listened to), press the Record out button, fol-
lowed by the source selector up or down button 
on the front panel repeatedly until the indica-
tor for the name of the source to be recorded 
is shown in the Main Information Display. all 
Input signals, digital or analog, are available for 
recording in both digital and analog form. This 
means that if you wish to copy a vinyl record to a 
digital recorder, you simply start vinyl play, select 
Phono as Record source and begin recording on 
your digital recorder. The built-in analog/digital 
converters transform the analog Phono signal to 
digital form. The reverse is also possible: if you 

have connected a cd player to the HK 990 with 
a digital cable, its signal is available from the 
analog recording outputs as well as the digital 
outputs.

NOTE:

 The record output signal is taken directly 

from the program source and is unaffected by the 
Volume, bass, Treble or balance controls.

Important Notes:

”Record source” can be selected on the front 

• 

panel only, not from the remote control.

3-head cassette decks with monitoring func-

• 

tion can be connected to ”Tape” or ”CDR” 
connectors too, but their monitoring function 
cannot be used.

always turn the HK 990 to standby with the 

• 

Power button before unplugging the Power 
Cord (or before switching off an external 
multi-plug). This saves your current setup in 
the memory, in addition to safely switching off 
the power amplifier section of the HK 990.

This unit is designed for trouble-free operation; most problems users encounter are due to operating errors. so if you have a problem, first check this list for a 
possible solution. If the problem persists, consult your authorized  HarmanKardon service center.

If the problem is... 

Make sure that...

No lights illuminate when power cord is plugged into AC outlet.


• The unit is plugged into a live outlet.

No sound is heard.


• Speaker switches corresponding to the desired speakers are pressed.


• Correct source button has been pressed.


• Volume is turned up.


• Speaker wires are connected properly.


• Hook-up wires to source component are connected properly.

Sound is not heard from the speaker system on one side.


• The speaker wires and connection wires are connected correctly.


• Set the balance setting to 0

When listening to stereo sound, the left and right sounds are reversed.


• The speaker wires are connected correctly.


• The wires between components are connected correctly.

Intermittent or continuous buzzing or hissing.


• The unit is away from fluorescent lights, TV, motors and other electrical appliances.

The remote control and front panel controls don't appear to work.


• Disconnect the AC line cord from the wall socket, wait 5 minutes and then re-connect it.

Humming noise when listening to LP


• Ground wire from record player has been connected to ground terminal on amplifier.


• Cable from record player is away from power cords and speaker cables.

Howl or ringing when listening to LP.


• Record player is not to close to speakers.


• Record player is on stable surface.

Low sound level when listening to LP.


• Cable from record player is connected to the Phono jacks.


• The MM Input has not inadvertently been used with an MC phono cartrigde

LP sound is distorted and too loud.


• The MC Input has not inadvertently been used with an MM or MC High Output cartridge.

Summary of Contents for Kardon HK 990

Page 1: ...HK 990 Integrated Amplifier Owner s Manual ...

Page 2: ...on or pinched particularly at plugs convenience receptacles and the point where they exit from the apparatus 11 Only use attachments accessories specified by the manufacturer 12 Use only with the cart stand tripod bracket or table specified by the manufacturer or sold with the apparatus When a cart is used use caution when moving the cart apparatus combination to avoid injury from tip over 13 Unpl...

Page 3: ...er noise levels and higher Signal to Noise performance RLS IV digital to analog conversion technology with dual conversion using two stereo AD1955 high grade DACs in Dual Mono configuration The HRS link allows Harman Kardon CD players to lock themselves to the external clock of the amplifier for a jitter free connection similar to having the CD playback inside the amplifier Dual differential input...

Page 4: ... etc as well as Gain Bass Treble etc Refer to the Setup section of this manual 6 Speaker Setup Selector Press this But ton to enter the Speaker Setup Menu where you can switch subwoofers on and off select crossover frequency run automatic speaker setup EzSet EQ etc Refer to the Setup section of this manual 7 Up Down Arrow Buttons Press to scroll through various options for adjustment in a menu 8 L...

Page 5: ...ume from the processor NOTE Only use the Processor Input with a device that has its own volume control J CD analog Input jacks You can select either this Input or the Balanced Input as analog Input in the CD Input Setup Mode K Phono Input for record player with Moving Magnet high output and high impedance or High Output Moving Coil cartridge L Phono Input for record player with Moving Coil low out...

Page 6: ...it will not hurt to experiment A second wire may be used to connect your amplifier s REMOTE OUT jack to the Remote Input of another stereo component Continue this process to include additional components if compatible Connecting Speakers 1 For best performance use high quality speaker cables However ordinary copper wire can be used if the gauge meets the following require ments Wire Min Length Dia...

Page 7: ... products with a built in battery that lasts for the lifetime of the product removal may not be possible for the user In this case recycling or recovery centers handle the dismantling of the product and the removal of the battery If for any reason it becomes necessary to replace such a battery this procedure must be performed by authorized service centers HK 990 Remote Control functions Please ref...

Page 8: ...ain to re activate sound output and Search Buttons Press one of these buttons to search fast forward or back ward on a CD or Tape You can hear intermittent sounds from the CD while searching Normal playback resumes when you release the button and Skip Buttons Press one of these buttons to move to the next track or to the previous track on a CD or Tape Repeatedly pressing one of the buttons skips m...

Page 9: ...n Devices Switch between Devices Info RDS Info RDS Info RDS Time Time Time Display Display Display Display Display Display Display Band Band FM Mode FM Mode Auto Auto 0 9 Track Select Preset Select Track Select Mem Mem Clear Clear Clear Clear Check Check Check Prog Prog Prog Speaker Setup Speaker Setup Speaker Setup Speaker Setup Speaker Setup Speaker Setup Speaker Setup Input Setup Input Setup In...

Page 10: ...nput Type Each Input can be configured to the following connections on the rear panel CD Unbalanced Analog Balanced Analog Coaxial 1 Coaxial 2 Optical 1 Optical 2 HRS Link Digital TUNER Unbalanced Analog Coaxial 1 Coaxial 2 Optical 1 Optical 2 Digital PHONO Moving Magnet Analog Moving Coil Analog TV Unbalanced Analog Coaxial 1 Coaxial 2 Optical 1 Optical 2 Digital AUX Unbalanced Analog Coaxial 1 C...

Page 11: ...is placed The setting goes from 40 to 200 Hz in 10 Hz steps Save and Exit 4 To save the steps 1 to 3 press Enter after each step EzSet EQ Mode If you want to benefit from the HK 990 s advanced automatic frequency correction and setup system select EzSet EQ Mode The process is described in detail below Setup process The Setup process consists of the following steps Subwoofer 1 ON OFF 1 select ON if...

Page 12: ...c EzSet EQ process several frequency sweeps were made Here is a brief explanation of their use Far Field The first sweeps that occur during step 2 are used to calibrate the speaker system adjust rela tive levels and delay determine the crossover frequency if Manual Crossover Frequency was not selected earlier Also the low frequency response of the speakers is equalized by apply ing a correction cu...

Page 13: ...ital cable its signal is available from the analog recording outputs as well as the digital outputs NOTE The record output signal is taken directly from the program source and is unaffected by the Volume Bass Treble or Balance controls Important Notes Record Source can be selected on the front panel only not from the remote control 3 head cassette decks with monitoring func tion can be connected t...

Reviews: