26
Lighting & Operation
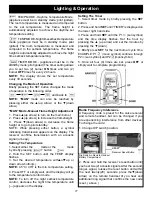
PILOT FLAME ADJUSTMENT
The pilot flow is factory set to maximum. The pilot
flame should envelope 3/8” to 1/2” of the
thermocouple. See the illustration above.
The adjustment screw can be reached through the
MAN-knob. See top illustration above.
1. Turn the Man-knob to the ON position.
2. It is now possible to pierce through a film on the
cover with a screwdriver to reach the adjustment
screw beneath.
3. Turn the adjustment screw clockwise to decrease
or counterclockwise to increase the pilot flame.
REMOTE CONTROL HANDSET
OPERATION AND PROGRAMMING
Setting °C/24 hour or °F/12 hour clock
(Display and timer / Thermostat handsets)
1. Press
OFF
and ▼ (down arrow) until display
changes from farenheit / 12 hour clock to
Celsius / 24 hour clock and vice-versa.
Setting the Time
(Display and Timer / Thermostat handsets)
1. The display will flash after either:
a. Installing the battery or
b. Simultaneously pressing the ▲ (up arrow)
and ▼ (down arrow).
2. Press ▲ (up arrow) to set the hour, and the ▼
(down arrow) to set the minutes.
3. Press
OFF
to return to manual mode or simply
wait and it will automatically return to manual
mode.
Automatic Pilot Mode With Thermostat Remote
If there is no transmission from the handset to the
receiver within a 6 hour period, the appliance will go
to standby (pilot) mode.
Flame Height Adjustment
In “
MAN
” mode: Press ▲ (up arrow) to increase the
flame height. Press ▼ (down arrow) to decrease the
flame height or set the appliance at pilot flame. For
fine adjustments, tap the up/down arrows.
Main Valve Knob
Pilot Gas
adjustment
screw. (turn with
screwdriver)
MAN- knob

