Harman Kardon DVD 23 Owner'S Manual Download Page 20

20

TEST SCREEN

Test Screen

Test Screen

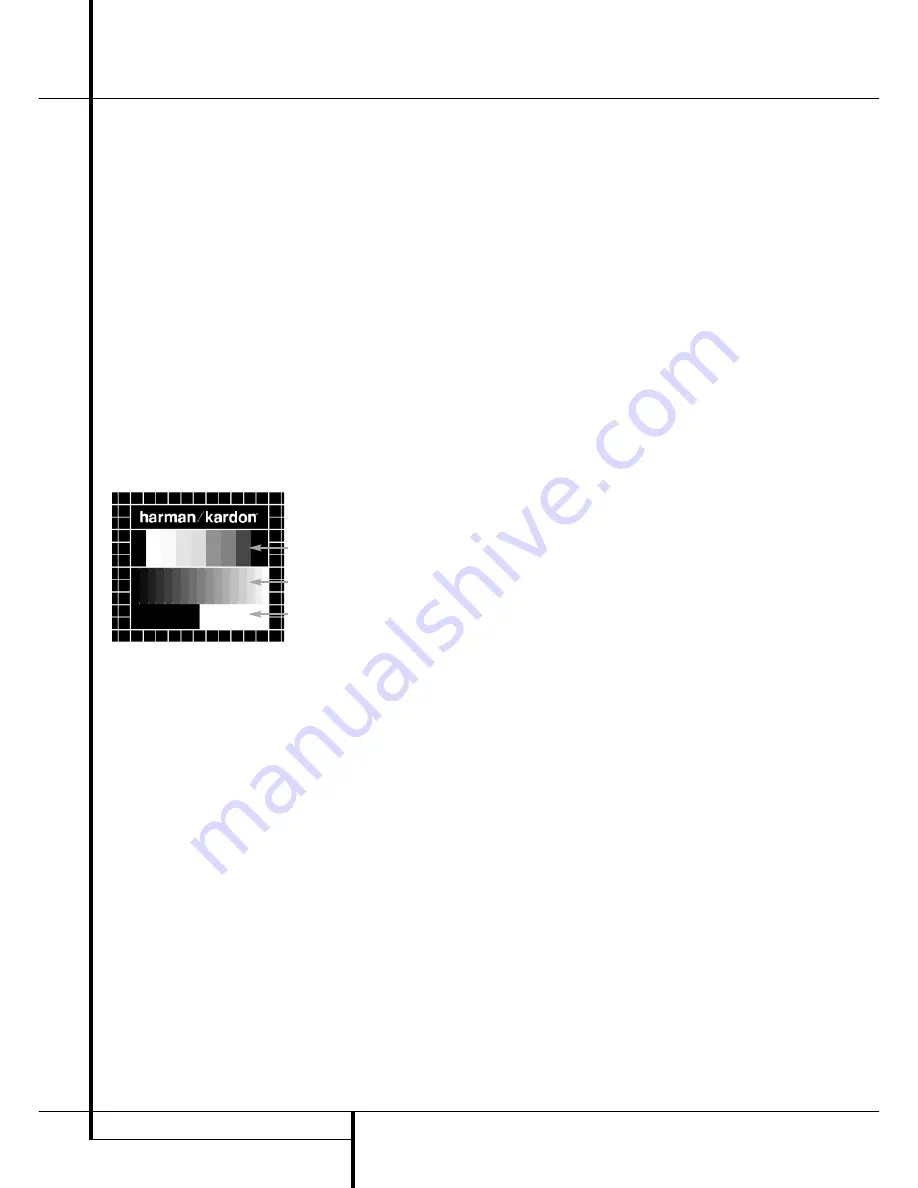
When you activate the Test Screen via the OSD
you can activate a still image to test all settings
and the video performance of your TV. With the
vertical color bars you can test the following:

proper color intensity setting on your TV,

the proper color of each bar, showing if the
proper video standard is turned on: the colors
should be (left to right): black, white, yellow,
cyan (turquoise), green, magenta (purple), red,
blue, black.

proper color transition, seen as sharp 
separation of the bars, S-Video will be better
than Video, RGB best of all.

the performance of the color filter in your TV
(with ”Video” signals), bar edges should show
no vertical crawling dots. Here S-Video and
RGB formats usually give no problems.

With the grey scale and the black/white fields
below the color bars the brightness and contrast
of your screen can be adjusted optimally, see
chapter ”TV Picture Adjustment” below.

TV Picture Adjustment with 
Test Screen

These adjustments may be done now, but you
can also make them after setup has been 
finalized.

Brightness adjustment:

1. Turn down the color control on your TV until

the color bars are visible in black and white.

2. Adjust the contrast to the lowest level where

you still can see all bars within the grey scale
in the test picture separately and clearly.

3. Adjust the Brightness so that the bars in the

grey scale are all visible. The bar furtherst to
the left has to be as black as possible rather
than grey but the next aside must clearly be
differable. All the bars in the grey scale have to
be gradually and evenly changing from black
to whiter, going from left to right.

Contrast adjustment:

1. Adjust the contrast on your TV until you see a

bright white bar in the right low corner of the
screen and a deep dark black bar at the left.
The optimal contrast setting will depend from
your preference and the surrounding light in
the TV room.

2. If the brightness of the white bar will no more

increase while turning up the contrast or when
the borders of the white ”harman/kardon” text
letters on top will bloom (overlight) into the
black areas, what drasticly will decrease the
sharpness of the script, then the Contrast has
been turned up too much. Reduce the contrast
until these effects will disappear and the video
still looks realistic.

3. If you are watching TV with a usual surround-

ing daylight, adjust the Contrast so that a nor-
mal video picture has about the same looking
as the surroundings in your room. By that way
the eye is relazed when watching the TV pic-
ture. This contrast setting may be reduced
when the surrounding light is dimmed, usually
improving the sharpness of a video a lot 
thereby.

4. The grey scale in the middle line needs to have

the same clear difference between each bar as
before the contrast adjustment. If not, go back
to the brightness adjustment and repeat step 3
and then the contrast adjustments, making
only minor adjustments each time for 
optimisation.

Color adjustment.

1. When the Brightness and the Contrast are set

optimally, turn up the color control to the level
of your perference. Adjust to the level where
the colors look strong but still natural, not
overdone. If the color level is too high,
depending from the TV used some of the bars
will seem wider or the color intensity will not
increase while the control is turned up. Then
the color control must be reduced again. At the
end you should test the color intensity also
with a video, e.g. pictures of natural faces,
flowers, fruit and vegetables and other well
known natural articles of our life most usefull
for an optimal setting of the color intensity.

2. If your TV has a Tint option (with most

European TVs this is available or effective only
with NTSC signals, not with PAL), use the large
white bar below the Greyscale to tweak the
warmth of the picture. Every viewer has a 
difference in preference as how the glow of
the picture should be. Some prefer a little 
colder picture, some a warmer glow. The Tint
function on your TV and the white bar can be
used to control this. Adjust the Tint to the level
where you feel the white color has the tone
you prefer.

Color Bars

Grey Scale

100%
Black/White
fields

Summary of Contents for DVD 23

Page 1: ...DVD 23 Digital Versatile Disc Player OWNER S MANUAL...

Page 2: ...Menu 21 Using the Status Bar 21 Player Menu 21 Information Displays 21 Programmed Play 22 DVD Language Codes 23 Specifications Table of Contents 2 NOTE This player is designed and manu factured for co...

Page 3: ...s and icons make it simple to change languages soundtracks subtitles or aspect ratio DVD players are among the fastest growing consumer electronics products ever brought to market but this may neverth...

Page 4: ...ogressively so that all the lines in each frame odd and even are shown at the same time But because most TV s cannot handle a progressive signal all current DVD players generate an interlaced output f...

Page 5: ...th CD as well as DVD The DVD 23 will play any conventional Audio CD or recordable CD R or erasable CD CD RW MP3 WMA v8 or any DivX or VCD or DVD Video with the region code 0 or 2 Disc formats supporte...

Page 6: ...r the disc changed DVD playback will continue from the same point on the disc when the Play Button is pressed again Resume will also work if the unit was turned off To stop a disc and have play start...

Page 7: ...y will show the current chapter When a CD disc is playing they will show the current track number E Time Indicators These positions in the indicator will show the running time of a DVD in play When a...

Page 8: ...A B C D E F G H I J K L M N O P Q POWER ON POWER OFF SUBTITLE TITLE ANGLE AUDIO ENTER OPEN CLOSE OSD ARROWS INFO MENU PAUSE STATUS SKIP STEP PREVIOUS SKIP STEP NEXT PLAY SEARCH SLOW REVERSE STOP SEARC...

Page 9: ...search speed changes as indicated by a number of arrows on the right top of your screen After pressing the PAUSE button each press of this button will change the slow down speed indicated by a number...

Page 10: ...dard analog TV s or projectors with inputs marked Y Pr Pb or Y Cr Cb connect these outputs to the correspon ding inputs If you have a high definition televi sion or projector that is compatible with h...

Page 11: ...outputs Video and S Video to your TV or AV Receiver only one of them Most European TV s are equipped with SCART connectors rather than with a normal video input yellow cinch In that case the SCART co...

Page 12: ...input on your device and the video S video output of this device to your TV For more details see the manual of your Audio Video amplifier receiver Note for Analog Audio The connection from Audio Out...

Page 13: ...video the color intensity cannot be adjusted with most TVs When the RGB video signal is used DVD s recorded with the NTSC format with regional code 0 or 2 can be viewed even on non NTSC compatible TV...

Page 14: ...side the remote control unit and install new batteries If leakage should come into contact with parts of your body wash it off thoroughly with water Batteries contain chemical substances and we recomm...

Page 15: ...high level of noise that it may be harmful to your ears and damage your speakers CD s can be played as they would normally be played Note Some first generation DTS decoders which do not support DVD DT...

Page 16: ...ly 1 When a DVD disc is in pause or freeze frame mode you may move slowly forward or back ward through the program being played at one of four speeds by pressing the Play Buttons on the remote Each pr...

Page 17: ...KLN M and ENTER buttons on the remote control To change a setting simply move the cursor to the setting you wish to change This setting will be highlighted in light blue and a brief explana tion will...

Page 18: ...V receiver or surround processor is NOT capable of handling 96 kHz signals select the 48 kHz option If your A V receiver or surround processor IS capable of handling 96 kHz signals select the 96 kHz...

Page 19: ...s is highlighted pressing ENTER will increase or decrease the value of the setting as will be shown in the bar behind the setting To exit the Video Adjustment Menu move the cursor to DONE and press EN...

Page 20: ...the contrast or when the borders of the white harman kardon text letters on top will bloom overlight into the black areas what drasticly will decrease the sharpness of the script then the Contrast has...

Page 21: ...complete Once complet ed move the cursor up to the Playlist setting Select Programmed order from the options and press PLAY to start the playback If you have a disc that contains both MP3 files and J...

Page 22: ...ndi 7273 Hungarian 7285 Icelandic 7383 Indonesian 7378 Interlingua 7365 Interlingue 7369 Iunpiak 7375 Irish 7165 Italian 7384 Japanese 7465 Javanese 7487 Kannada 7578 Kashmiri 7583 Kazakh 7575 Kinyarw...

Page 23: ...Kardon and Power for the digital revolution are trademarks of Harman Kardon Inc Manufactured under license from Dolby Laboratories Dolby Dolby Digital ProLogic and the double D symbol are trademarks o...

Page 24: ...ossways Park Drive Woodbury New York 11797 www harmankardon com Harman Consumer Group International 2 Route de Tours 72500 Ch teau du Loir France 2005 Harman Kardon Incorporated Partnumber 01 00 YS SM...

Reviews: