


8
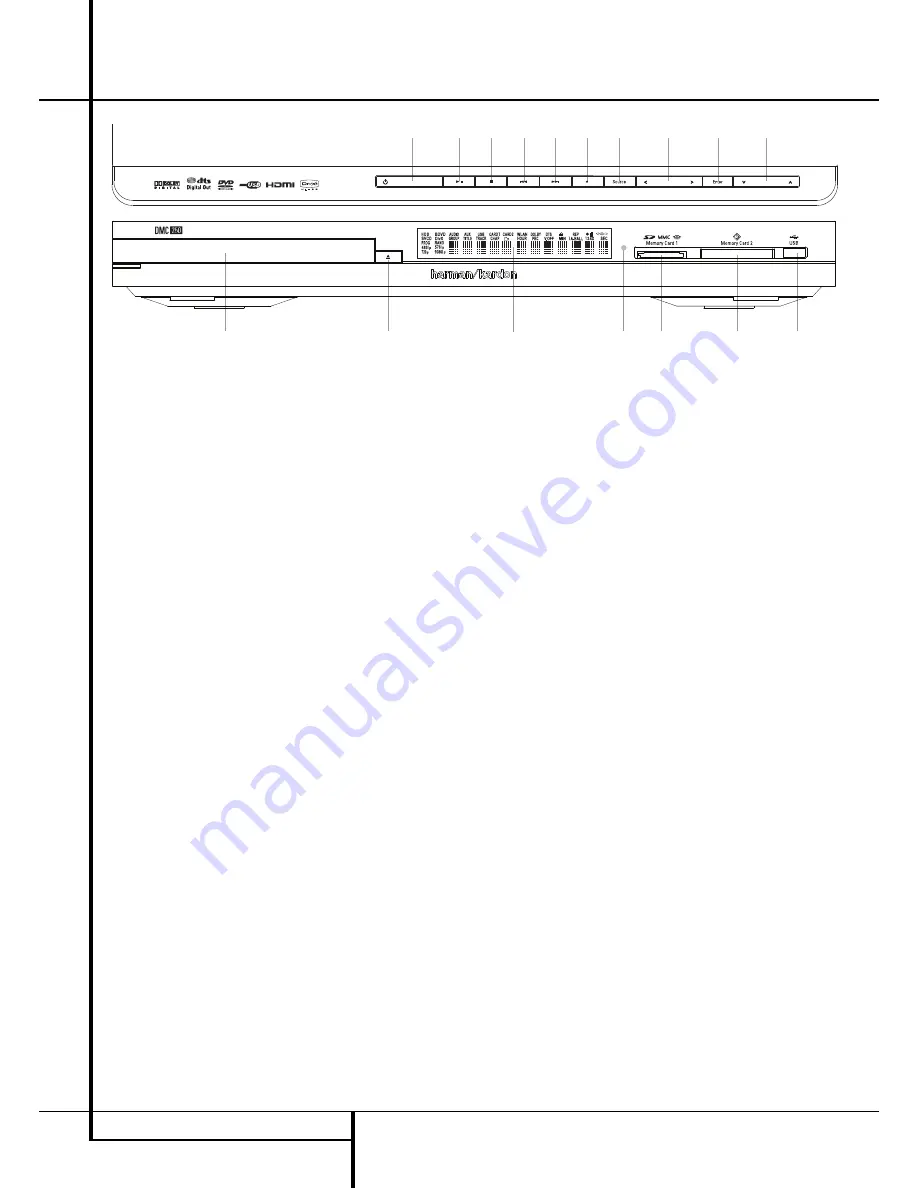
FRONT PANEL CONTROLS
Main Information Display:
This display
delivers messages and status indications to help
you operate the DMC 250 player.
1
Power On/Off (Standby):
Press the button
once to turn the DMC 250 player on, press it
again to put the unit in the Standby mode.
2
Open/Close:
Press this button to open or
close the Disc Tray.
3
Disc Drawer
.
4
Play/Pause:
Press to initiate playback or to
resume playback after Pause has been pressed.
Press this button to momentarily pause play-
back. To resume playback, press the button
again. If a DVD is playing, action will freeze and
a still picture will be displayed when the button
is pressed.
5
Stop:
Press this button once to place the
disc in the Resume mode, which means that
playback will stop, but as long as the tray is not
opened or the disc changed, DVD playback will
continue from the same point on the disc when
the Play Button is pressed again. Resume will
also work if the unit was turned off. To stop a
disc and have play start from the beginning,
press the button twice.
6
Skip/Search (Previous):
Press this button
to move backward through the music tracks on
a CD disc or the chapters on a DVD disc. Keep
the button pressed to search backwards at one
of the available speeds.
7
Skip/Search (Next):
Press to move forward
through the music tracks on a CD or the
chapters on a DVD disc. Keep the button pressed
to search forwards at one of the available
speeds.
8
Record:
When an audio CD is loaded, or the
Analog Audio Inputs are selected as the source,
press this button to view the Record tab of the
on-screen menu. Pressing this button does not
begin the recording.
NOTE:
It is not possible to record from one of
the memory cards or the USB device to any
other media or to the USB device. It is also not
possible to transfer image or video files.
However, an audio signal is always available at
the Analog Audio Outputs. You may make ana-
log recordings from any source by connecting an
analog audio recorder to the rear-panel Analog
Audio Outputs.
9
Source Selector:
Press this button to view
the current media source selection. If a media
source is available, that is, if media is currently
installed, the source icon will appear at normal
brightness. If no media is installed in a particular
source, e.g. if a card slot is empty, its icon will be
dimmed and you will not be able to select it. You
may always select the Disc Player or the
Auxiliary Analog Audio Inputs, even when no
media is present. Use the
M
/
N
Buttons to scroll
through the available sources, and press the
Enter Button to select and switch to the high-
lighted source.
NOTE:
It is not possible to select a new source
while the current source is playing or even while
it is paused. Press the Stop Button before select-
ing a new source.
A B
M
/
N
/
K
/
L
Navigation and Enter
Buttons:
Use these buttons to navigate the on-
screen menus, and press the Enter Button to
select an item.
The
M
/
N
Buttons may be used to switch
between the track or file list on the left side of
the screen and the settings on the right side.
Press and hold a Navigation Button to scroll at a
faster rate.
When a folder is highlighted, press the Enter
Button to expand it.
Highlight the “Up” line and press the Enter
Button to close a folder and view the contents
of the next higher level of the disc, card or
device.
When a file or track is highlighted, press the
Enter Button to begin playback.
C
Card Slot 1:
Insert an SD, MMC or Memory
Stick memory card into this slot by gently
pushing it all the way in until it clicks. The slot
also accommodates miniSD, microSD and
Memory Stick Duo cards when used with the
appropriate adapter, available in most
electronics and computer stores. Remove a card
from this slot by gently pushing it in until it
unlatches, then pulling it all the way out of the
slot.
D
Card Slot 2:
Insert a Compact Flash I
memory card into this slot by gently pushing it
all the way in until it is firmly seated in the slot.
Remove it by pulling it all the way out of the
slot.
E
USB Port:
Insert a USB client device’s
connector into this port, being careful to
correctly align the device’s plastic tongue with
the gap. Do not connect a computer to this port.
F
Remote IR Sensor
.
Main Information Display
1
Power On/Off (Standby)
2
Open/Close
3
Disc Drawer
4
Play/Pause
5
Stop
6
Skip/Search (Previous)
7
Skip/Search (Next)
8
Record
9
Source Selector
A
Navigation Buttons
B
Enter
C
Card Slot 1
D
Card Slot 2
E
USB Port
F
Remote IR Sensor
1
3
8
7
6
5
4
9
A
B
A
2
E
D
C
F
Front Panel Controls
harman/kardon
DMC250/230 Service Manual
Page 4 of 110
Summary of Contents for dmc230
Page 7: ...harman kardon DMC250 230 Service Manual Page 7 of 110...
Page 33: ...harman kardon DMC250 230 Service Manual Page 33 of 110...
Page 41: ...harman kardon DMC250 230 Service Manual Page 41 of 110...
Page 42: ...harman kardon DMC250 230 Service Manual Page 42 of 110...
Page 47: ...harman kardon DMC250 230 Service Manual Page 47 of 110...
Page 48: ...harman kardon DMC250 230 Service Manual Page 48 of 110...
Page 52: ...harman kardon DMC250 230 Service Manual Page 52 of 110...
Page 57: ...harman kardon DMC250 230 Service Manual Page 57 of 110...
Page 58: ...harman kardon DMC250 230 Service Manual Page 58 of 110...
Page 59: ...harman kardon DMC250 230 Service Manual Page 59 of 110...
Page 60: ...harman kardon DMC250 230 Service Manual Page 60 of 110...
Page 62: ...harman kardon DMC250 230 Service Manual Page 62 of 110...
Page 63: ...harman kardon DMC250 230 Service Manual Page 63 of 110...
Page 67: ...harman kardon DMC250 230 Service Manual Page 67 of 110...
Page 72: ...harman kardon DMC250 230 Service Manual Page 72 of 110...
Page 74: ...harman kardon DMC250 230 Service Manual Page 74 of 110...
Page 77: ...harman kardon DMC250 230 Service Manual Page 77 of 110...
Page 85: ...harman kardon DMC250 230 Service Manual Page 85 of 110...
Page 86: ...harman kardon DMC250 230 Service Manual Page 86 of 110...
Page 87: ...harman kardon DMC250 230 Service Manual Page 87 of 110...
Page 88: ...harman kardon DMC250 230 Service Manual Page 88 of 110...
Page 89: ...harman kardon DMC250 230 Service Manual Page 89 of 110...
Page 90: ...harman kardon DMC250 230 Service Manual Page 90 of 110...
Page 91: ...harman kardon DMC250 230 Service Manual Page 91 of 110...
Page 92: ...harman kardon DMC250 230 Service Manual Page 92 of 110...
Page 93: ...harman kardon DMC250 230 Service Manual Page 93 of 110...
Page 94: ...harman kardon DMC250 230 Service Manual Page 94 of 110...
Page 95: ...harman kardon DMC250 230 Service Manual Page 95 of 110...
Page 96: ...harman kardon DMC250 230 Service Manual Page 96 of 110...
Page 97: ...harman kardon DMC250 230 Service Manual Page 97 of 110...
Page 98: ...harman kardon DMC250 230 Service Manual Page 98 of 110...
Page 99: ...harman kardon DMC250 230 Service Manual Page 99 of 110...
Page 100: ...harman kardon DMC250 230 Service Manual Page 100 of 110...
Page 101: ...harman kardon DMC250 230 Service Manual Page 101 of 110...
Page 104: ...harman kardon DMC250 230 Service Manual Page 104 of 110...
Page 105: ...harman kardon DMC250 230 Service Manual Page 105 of 110...
Page 106: ...harman kardon DMC250 230 Service Manual Page 106 of 110...
Page 107: ...harman kardon DMC250 230 Service Manual Page 107 of 110...
Page 108: ...harman kardon DMC250 230 Service Manual Page 108 of 110...
Page 109: ...harman kardon DMC250 230 Service Manual Page 109 of 110...
Page 110: ...harman kardon DMC250 230 Service Manual Page 110 of 110...