


AVR 700/AVR 70/AVR 70C
4
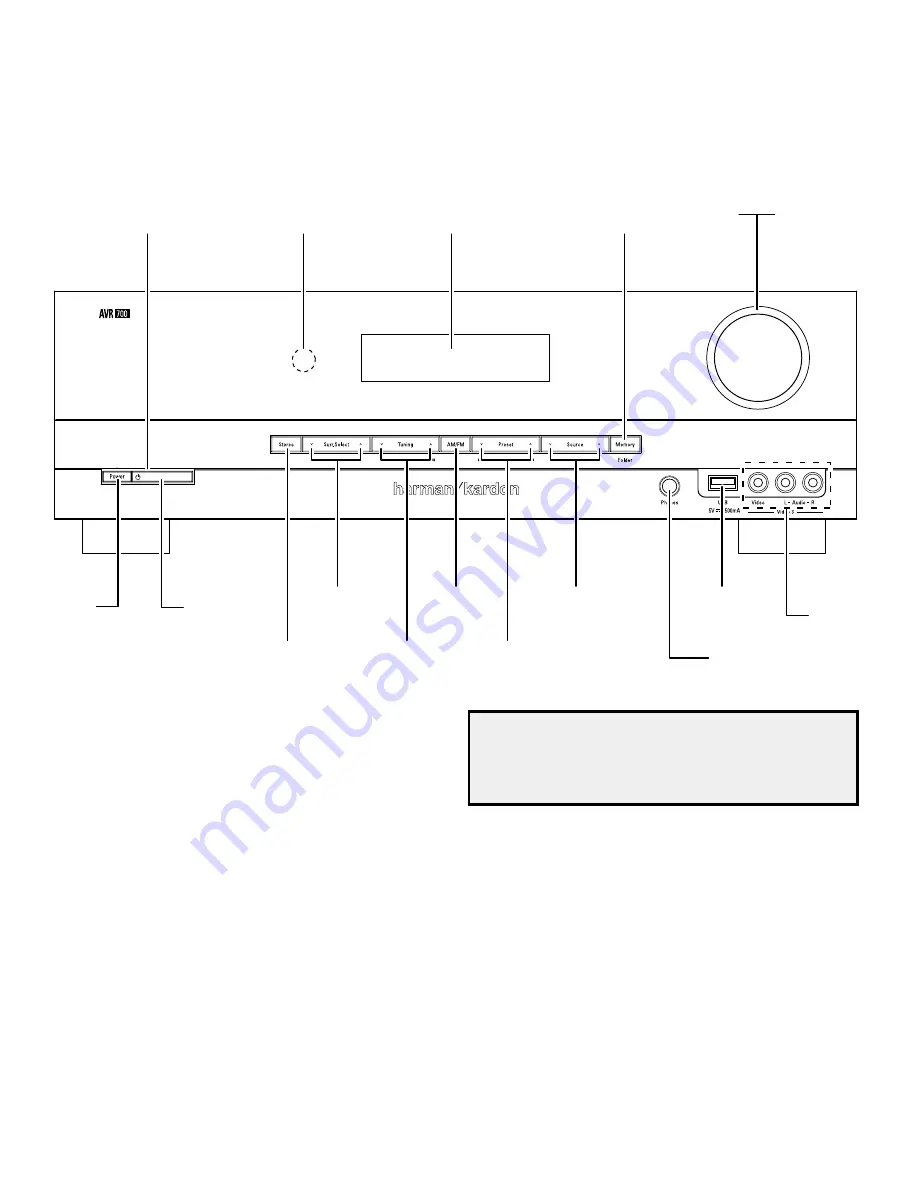
Front-Panel Controls
Front-Panel Controls
Main Power switch:
this mechanical switch turns the AVr’s power supply on or off. It is
usually left on and cannot be turned on or off using the remote control.
Standby indicator:
this led glows amber to indicate that the AVr is in the Standby
mode.
Power On/Standby button:
press this button to turn the AVr on and put it into the
Standby mode. when the AVr is on the power on indicator glows blue and the Standby
indicator turns off.
Stereo Mode button:
places the AVr in the stereo listening mode.
IR Sensor:
this sensor receives infrared (Ir) commands from the remote control. It is
important to ensure that the sensor is not blocked.
Surround Mode Select buttons:
press these buttons to select a surround listening
mode. Surround-mode availability depends on the nature of the source input signal, i.e.,
digital versus analog, and the number of channels encoded within the signal.
Tuning Up/Down buttons:
use these buttons to tune radio stations according to the
setting of the Am/fm button (see below).
AM/FM button:
press this button to listen to the radio. pressing this button when the
radio is in use will select among the fm Stereo, fm mono and Am bands. See
Listening
to FM and AM Radio,
on page 16, for more information.
Message display:
Various messages appear in this display in response to commands
and changes in the incoming signal. In normal operation, the current source device name,
surround mode and active input appear. when the on-screen display menu system (oSd)
is in use, the current menu settings appear.
IMPORTANT NOTE:
If the protect message ever appears on the message display,
turn off the AVr and unplug it from the Ac outlet. check all speaker wires for a
possible short circuit (the “+” and “–” conductors touching each other or both
touching the same piece of metal). If a short circuit is not found, bring the unit to
an authorized harman kardon service center for inspection and repair before using
it again.
Preset Selector buttons:
when the radio is in use, press these buttons to cycle through
your preset radio stations.(See
Listening to FM and AM Radio,
on page 16, for more
information.) note: when you're listening to files on a uSb device, the tuning up/down
buttons and the preset Selector buttons serve as the uSb device’s transport control
buttons.(See
Playing Files on a USB Device,
on page 16, for more information.)
Source Select buttons:
press these buttons to select the active source device.
Memory/Folder button:
when the radio is in use, press this button to set the current
station as a preset. See
Listening to FM and AM Radio,
on page 16, for more information.
when a uSb device is the active source deivce, press this button to display the contents
of the current folder or to display all of the folders in the current directory level. See
Playing files on a USB Device,
on page 16, for more information.
Headphone connector:
connect a 1/4" stereo headphone plug to this jack for private
listening
USB Port:
Insert a flash drive or hdd disk drive with a uSb Standard-A cable to this port.
Volume control:
turn this knob to raise or lower the volume.
Video 3 Audio and Video Input connectors:
connect an auxiliary audio/video source
component that will be used only temporarily, such as a camcorder, portable music
player or game console, here.
Standby
Indicator
message
display
Volume
control
power on Indicator
(inside Volume control ring)
memory/folder
button
Surround mode
Select buttons
Ir
Sensor
main power
Switch
on/Standby
Switch
headphone
connector
Source Select
buttons
tuning up/down
button
Stereo mode
button
preset Selector
buttons
Am/fm
button
uSb
port
Video 3
Audio and Video
Input connectors


