background image

AVR 700/AVR 70/AVR 70C

16

Operating Your AVR

Operating Your AVR

now that you have installed your components and completed a basic configuration, you 

are ready to begin enjoying your home theater system.

Controlling the Volume

Adjust the volume either by turning the front-panel Volume knob (clockwise to increase 

volume or counterclockwise to decrease volume) or by pressing the Volume up/down 

buttons on the remote. 

Muting the Sound

to mute all speakers and the headphones, press the mute button on the remote. Any 

recording in progress will not be affected. the mute message will appear in the front-

panel display as a reminder. to restore the sound, press the mute button again, or adjust 

the volume.

Listening Through Headphones

plug the 1/4-inch stereo plug on a pair of headphones into the front-panel phones jack for 

private listening. note: for information about turning off the speakers during headphone 

listening, see 

Additional Setup Menu Items – Speaker On/Off,

 on page 15.

Selecting a Source

there are two different ways to select a source:
•  Press the front-panel Source Select buttons. 
•  Directly select any source by pressing its Source Selector button on the remote. 
the AVr selects the analog audio and video inputs assigned to the source and any other 

settings you made during setup.
the digital audio inputs are not assigned to any specific sets of analog inputs. once you 

select a source device you can use the remote control’s Audio Input Select (dIgItAl) 

button to select the specific audio input connection (hdmI, coaxial digital, optical digital, 

analog) that you want to listen to. (note: you cannot select an audio input connection for 

the fm/Am or uSb source buttons.)
the source name, the selected audio input and the surround mode will appear on the 

front panel. 

Video Troubleshooting Tips

If there is no picture:

• Check the source selection.
• Check all connections for a loose or incorrect connection.
• Check the video-input selection on the TV/display device.

Additional Tips for Troubleshooting HDMI Connections

•  Turn off all devices (including the TV, the AVR and any source components).
•  Unplug the HDMI cables, starting with the cable between the AVR and the TV, and 

continuing with the cables between the AVr and each source device.

•  Carefully reconnect the cables from the source devices to the AVR. Connect the 

cable from the AVr to the tV last.

• Turn on the devices in this order: TV, AVR, source devices.

NOTE: Depending upon the particular components involved, the complexity of 

the required communication between HDMI components may cause delays of 

up to a minute in the completion of some actions, such as input switching or 

switching between SD and HD channels.

Listening to FM and AM Radio

Select the Am/fm source. use the tuning up/down buttons to tune a station, which will 

be shown on the front-panel display and the tV screen.

In the fm Stereo mode, the radio uses automatic tuning, meaning each press of the 

tuning up/down buttons scans until a station with acceptable signal strength is found. In 

the fm mono mode, the radio uses manual tuning, in which each press of a tuning button 

steps through a single frequency increment. (using the fm mono mode may improve the 

reception of weaker stations.) 

Preset Stations

A total of 30 stations (Am and fm combined) may be stored as presets. when the desired 

station has been tuned in, press the memory button and the preset number will flash on 

the front-panel message display. use the remote’s number buttons to enter the desired 

preset number.
to tune a preset station, press the preset up/down buttons or enter the preset number 

using the remote’s number buttons.

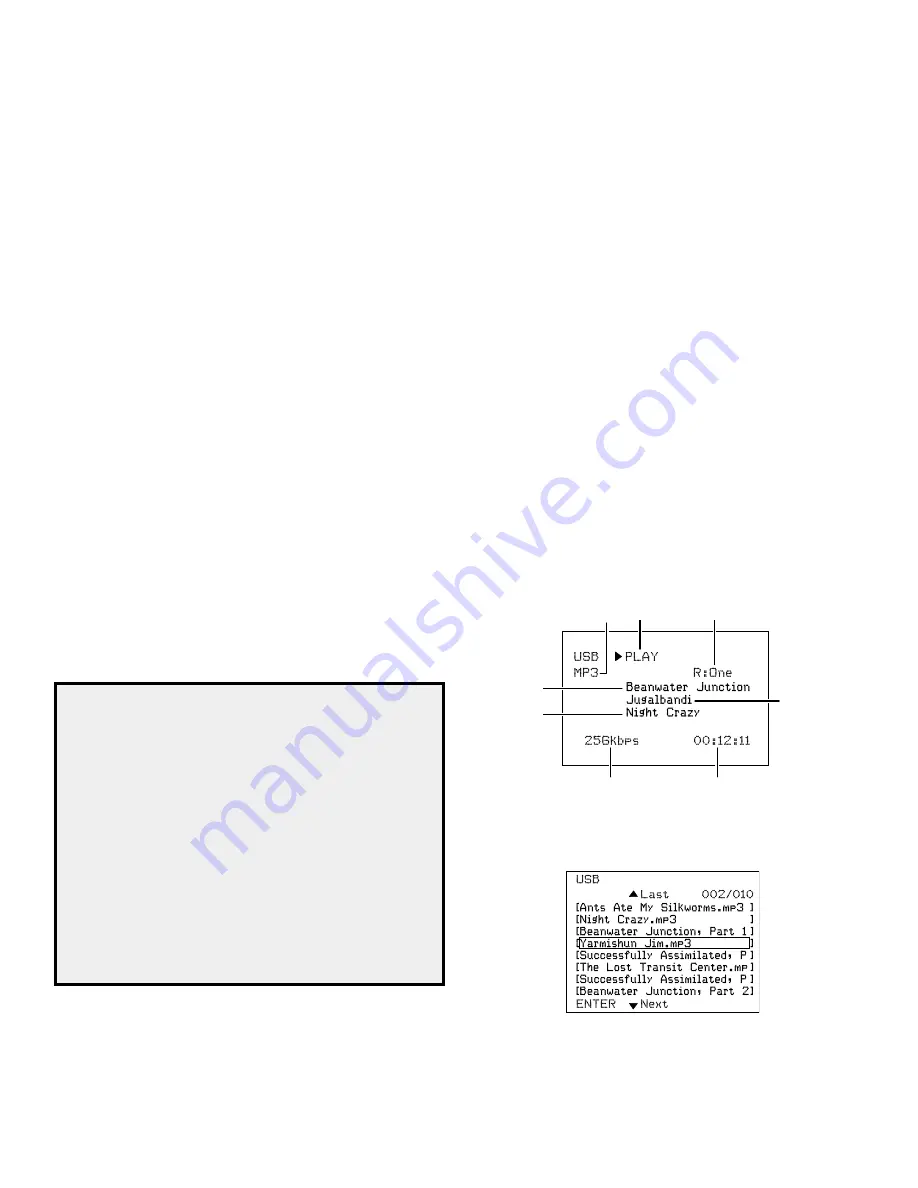
Listening to Media on a USB Device

your AVr is compatible with uSb 2.0 or uSb 1.1 media in the fAt 16 or fAt 32 file format 

and is compatible with the following mp3 and wmA media:

•  MP3:  Bit  rates  between  96  –  320kbps.  Fixed  bit-rates  at  44.1kHz  sampling  is 

recommended. Variable bit-rates (Vbr) are playable, but playing time may be 

displayed incorrectly. files must have a “.mp3” file extension.

•  WMA: Bit rates of 64kbps or higher. NOTE: Bit rates of 80kbps and 256kbps are not 

compatible. files must have a “.wma” file extension.

A maximum number of 65,536 folders and files can be supported.

Playing files on a USB device

1.  Insert the uSb drive into the AVr’s front-panel uSb port. ImportAnt: do not connect a 

personal computer or peripheral to the uSb port. uSb hubs are not supported.

2.  Select uSb as the source device. “uSb” will appear on the front-panel display, and 

after the AVr loads the contents of the current folder the uSb playback screen will 

appear on the oSd.

file 

type

data 

rate

Song title

Album title

Artist name

playback 

mode

repeat 

mode

elapsed 

time

use the remote’s transport control buttons to control playback.
to browse the contents of the current folder, press the remote’s bAck button. the uSb 

folder screen will appear on the oSd for 20 seconds.

use the remote’s up, down and ok buttons to highlight and select tracks.

IMPORTANT:

 to prevent damage or malfunction, press the remote’s Stop (

) transport 

control button before removing the uSb device from the AVr’s uSb port.

Summary of Contents for AVR 700

Page 1: ...Audio video receiver AVR 700 AVR 70 AVR 70C Owner s Manual...

Page 2: ...our Speakers 11 Connect Your Subwoofer 11 Connect Your TV or Video Display 11 Connect Your Source Devices 11 Connect the Radio Antennas 13 Connect to AC Power 13 INSTALL BATTERIES IN the Remote Contro...

Page 3: ...heavy objects on them Damaged power cords should be replaced immediately by an authorized service center with a cord meeting factory specifications Handle the AC Power Cord Gently When disconnecting...

Page 4: ...le short circuit the and conductors touching each other or both touching the same piece of metal If a short circuit is not found bring the unit to an authorized Harman Kardon service center for inspec...

Page 5: ...make any additional audio connections for devices you connect via HDMI connections See Connect Your Source Devices on page 11 for more information Notes on using the HDMI Out connector When connectin...

Page 6: ...u Button OK Button Channel Level Button Number Buttons Memory Button Repeat Random Button Transport Control Buttons Display Dim Button Preset Station Up Down Buttons Left Right Up Down Buttons AVR But...

Page 7: ...owing the currently active source Test Tone sequence button Press this button to activate the test tone for calibrating channel volume levels by ear Audio Input Select button Press this button to sele...

Page 8: ...lby Pro Logic DTS DTS HD High Resolution Audio DTS HD Master Audio DTS DTS 96 24 DTS Neo 6 HARMAN International Analog Surround Modes Theater Hall Stadium Club Arena Stereo Modes 2 channel stereo and...

Page 9: ...red so that only the low frequencies pass through it Don t connect this output to any device other than a subwoofer Source Device Connections Audio and video signals originate in source devices compon...

Page 10: ...each device Digital Video Connections If you have already connected a source device to one of the AVR s HDMI input connectors you have automatically made a video connection for that device since the H...

Page 11: ...the AVR s OSD menus you need to connect its Composite Monitor Out connector to your TV even if you are not connecting any composite video source devices to the AVR Composite Video Cable not supplied T...

Page 12: ...Composite Video Cable not supplied To Composite Video Output Composite Video Equipped Source Device Optical digital audio devices If your source devices have optical digital outputs connect them to th...

Page 13: ...ectors AVR Composite Video Connectors Connect the Radio Antennas Connect the supplied FM antenna to the AVR s FM 75 Radio Antenna connector For the best reception extend the FM antenna as far as possi...

Page 14: ...ss the SETUP button If necessary reread the Making Connections section and the beginning of this section before continuing Configure the AVR for Your Speakers 1 Turn on your TV and select the TV s com...

Page 15: ...Setting Subwoofer Volume Sometimes the ideal subwoofer volume setting for music is too loud for films while the ideal setting for films is too quiet for music When setting the subwoofer volume listen...

Page 16: ...components involved the complexity of the required communication between HDMI components may cause delays of up to a minute in the completion of some actions such as input switching or switching betw...

Page 17: ...Dolby TrueHD 7 1 DTS HD High Resolution Audio 7 1 DTS HD Master Audio 7 1 DTS 5 1 DTS 96 24 5 1 2 channel PCM modes in 44 1kHz 48kHz 88 1kHz 96kHz or 176 4kHz and 5 1 or 7 1 multichannel PCM Your AVR...

Page 18: ...turn the AVR on If this procedure doesn t help reset the AVR s processor as described below NOTE Resetting the processor will erase all user configurations including speaker and level settings and tu...

Page 19: ...ntact your local Harman Kardon service center No sound from center or surround speakers Incorrect surround mode Program material is monophonic Incorrect speaker configuration Program material is stere...

Page 20: ...1 3 V 13 2dBf Signal to noise ratio mono stereo 65dB 62dB Distortion mono stereo 0 2 0 3 Stereo separation 35dB 1kHz Image rejection 80dB IF rejection 80dB AM Tuner Section Frequency range 520 1720kHz...

Page 21: ...3 Input Portable audio device camcorder game console Video 3 Video 3 Analog Audio Input on front panel Video 3 Coaxial Video Iinput on front panel CD player Aux Aux Analog Inputs Any one available co...

Page 22: ...nel Tuner PCM 32kHz 44 1kHz 48kHz 96kHz MP3 WMA Dolby Pro Logic II Music Variant of Dolby Pro Logic II that is optimized for music selections Allows adjustment of sound field presentation in three dim...

Page 23: ...48kHz 96kHz MP3 WMA Stadium Creates an expansive soundfield as heard in stadiums Good for watching sporting events like baseball or soccer Analog two channel AM FM radio PCM 32kHz 44 1kHz 48kHz 96kHz...

Page 24: ...AVR 700 AVR 70 AVR 70C 24 Appendix Refer to the numbered buttons when using the Remote Control Function List...

Page 25: ...play Mode Select Display Mode Select 22 TEST Test Tone On Off Pop Up Menu 23 VOL Volume Down Volume Down 24 DIGITAL Input Type Select Options Menu 25 SETUP Setup Menu On Off Settings BD Setup DVD 26 U...

Page 26: ...the double D symbol and Pro Logic are registered trademarks of Dolby Laboratories MLP Lossless is a trademark of Dolby Laboratories Manufactured under license under U S Patent Nos 5 956 674 5 974 380...

Reviews: