background image

11

ENGLISH

ADVANCED FuNCTIONS

Sharpness Adjustment

Contrary to intuition, the picture will appear sharper and clearer with the 
sharpness backed off from the maximum setting. Reduce the sharpness 
setting on your television, and the setting on the AVR 760/AVR 660, if 
necessary, to minimize the appearance of any white lines between the bars in 
the gray scale portion of the test screen.

Convergence and Edge Focus

The crosshatch pattern that surrounds the test screen may be used to evaluate 
edge focus and convergence in front- or rear-projection video displays. If you 
are unable to improve the picture using the available controls, contact the 
video display manufacturer’s authorized service representative for assistance.

When you have finished making any video adjustments, press the Back/Exit 
Button.

muLtIzone operatIon

With the multizone system in use, you may enjoy an exciting 5.1- or 
5.2-channel home theater presentation in the main listening area, while 
others listen to the same materials or an entirely different presentation in 
another room.

Although installation of a multizone system is not complicated, it requires 
running wires inside walls. Check your local building codes and comply with 
the requirements for in-wall wiring systems, to prevent the possibility of a 
dangerous situation. If you have any questions about installing a multizone 
system, it is strongly recommended that you contact a professional custom 
installer. See Step Eleven of the Installation section on page 22 of the Basic 
Manual for instructions on installing a multizone system.

operating the multizone System

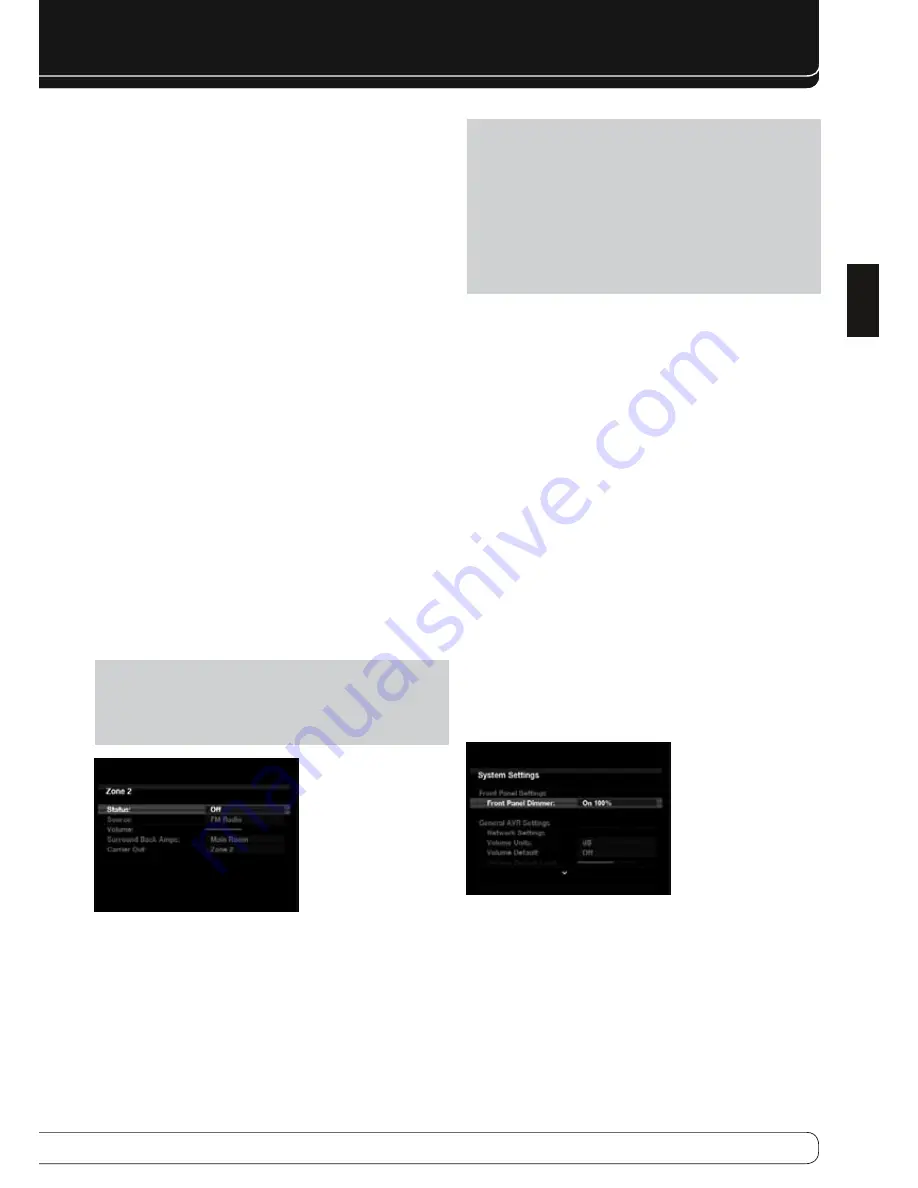
The AVR 760/AVR 660’s multizone system is accessed using the on-screen 
Zone 2 menu. Press the AVR Settings Button, and use the 

KL

 Buttons to 

navigate to the Zone 2 line. Press the OK Button to display the Zone 2 menu. 
See Figure 36.

NOTE

: When the Zone 2 Video Output is connected to a display, a text-

based version of the menu will appear. However, no menus will appear 
when USB, Internet Radio or the Network is selected as the source in either 
the main or remote zone, and a different source is selected for the other 
zone.

Figure 36 – Zone 2 Menu

Status

: Turns the multizone system on or off. When no one is listening in the 

remote room, leave this setting at the default of OFF.

Source

: Indicates the source input for the remote zone. You may select a 

different source from the main listening area. However, if the same source has 
been selected for both the main listening area and the remote zone, listeners 
in both areas will hear the same content.

NOTE

: Only analog audio sources, including The Bridge II, are available 

to the multizone system. The USB, Network and Internet Radio sources are 
also available. To hear digital devices, such as a CD player, in the remote 
zone, follow these steps:

In addition to a digital audio connection, connect the source device’s 

1. 

analog audio outputs to the AVR. Make a note in Table A5 in the 
appendix on which set of inputs was used.

In the Info Settings menu, leave the Audio Input From Source setting 

2. 

at the digital audio input. Scroll down to the Zone 2 Audio setting and 
select the analog audio input.

Volume

: The volume is controlled separately for the remote zone.

Surround Back Amps

: Reassign the surround back channels to the 

multizone system. When this line is set to Zone 2, you may only configure the 
main listening room for up to 5.2 channels. EzSet/EQ II will only configure 
the main system. Use the Manual Setup section of the Speaker Setup menu 
to configure the remote speakers with this setting at Main Room, then return 
this setting to Zone 2.

Carrier Out

: The Carrier IR Output passes the full remote infrared signal, 

rather than a signal stripped of the carrier frequency, as is available at the 
Remote IR Output. This setting determines the source for the Carrier IR 
Output. 

Zone 2


: Uses the Zone 2 IR Input.

Front Panel


: Uses either the front-panel IR receiver or the Remote IR 

Input.

A-BUS


: Uses the A-BUS system.

To operate the multizone system using the main remote, slide the Zone Select 
Switch at the bottom of the remote to the “2” position. To select a zone using 
the Zone 2 remote, press the Zone Selector, and the Zone Indicator will turn 
green when the remote is set to operate Zone 1, or red to operate Zone 2.

SyStem SettInGS

The AVR 760/AVR 660 offers system settings for ease of use. These settings 
may be accessed from the System Settings menu, which is selected by 
pressing the AVR Settings Button and navigating to the System line. Press the 
OK Button to display the System Settings menu. See Figure 37.

Figure 37 – Systems Settings Screen

Front-Panel Dimmer

: Select On 100% for full brightness, dim to 50% or 

25% of full brightness or select Off to fully darken the display. The light inside 
the Volume Control will go out when the display is partly or fully dimmed, 
but the Power Indicator will always remain lit to remind you that the AVR is 
powered on. 

Summary of Contents for AVR 660

Page 1: ...AVR 760 AVR 660 AUDIO VIDEO RECEIVER OWNER S MANUAL Advanced Functions ...

Page 2: ...th arrowhead symbol within an equilateral triangle is intended to alert the user to the presence of uninsulated dangerous voltage within the product s enclosure that may be of sufficient magnitude to constitute a risk of electric shock to persons The exclamation point within an equilateral triangle is intended to alert the user to the presence of important operating and maintenance servicing instr...

Page 3: ...rsion 2 Reference or Wide 2 channel Dolby Headphone Version 2 up to 96kHz DTS HD High Resolution Audio DTS HD Master Audio DTS 5 1 DTS Stereo DTS ES 6 1 Discrete and Matrix DTS 96 24 DTS Stereo DTS Neo 6 Cinema 5 6 or 7 channel Music 5 6 or 7 channel up to 96kHz Logic 7 Movie Music and Game up to 96kHz 5 or 7 Channel Stereo up to 96kHz Surround Off DSP or Analog Bypass ADVANCED FUNCTIONS 4 Audio P...

Page 4: ...raordinarily distortion free especially at high frequencies Surround Modes Surround mode selection is dependent upon the format of the incoming audio signal as well as personal taste Table A13 offers a brief description of each mode and indicates the types of incoming signals or digital bitstreams the mode may be used with Additional information about the Dolby and DTS modes is available on the co...

Page 5: ... Digital DTS Dolby TrueHD or DTS HD Master Audio For 2 channel materials the AVR defaults to Logic 7 Movie mode If you prefer a different surround mode select the surround mode category Virtual Surround Stereo Movie Music or Video Game Press the OK Button to change the mode Each category is set to a default surround mode Virtual Surround Dolby Virtual Speaker Reference Stereo 7 channel stereo Movi...

Page 6: ...er Each loudspeaker in your system performs at its best delivering an enjoyable sound experience STEP TWO Measure Speaker Distances Ideally all of your speakers would be placed in a circle with the listening position at the center However you may have had to place some speakers a little further away from the listening position than others Sounds that are supposed to arrive simultaneously from diff...

Page 7: ...ck or press the Back Exit Button Sub Mode Move the cursor to the Sub Mode line This setting depends upon how you programmed the front left and right speakers If you set the front speakers to a numeric crossover frequency the subwoofer setting will always be LFE All low frequency information will always be sent to the subwoofer If you don t have a subwoofer either upgrade to full range speakers or ...

Page 8: ...he next channel several seconds later as indicated by the highlight bar Adjust the level for any channel when the test tone is paused there using the M N Buttons Use the KL Buttons to move the cursor to another line and the test tone will follow the cursor When this setting reads MANUAL the test tone will not move to the next channel until you use the KL Buttons Individual Channels If you are usin...

Page 9: ... Widescreen 16 9 images are displayed on a full screen 4 3 device in letterbox format Black bars may appear above and below the image When displaying full screen images on a widescreen device black or gray bars may appear to the left and right of the image pillarboxing Plasma and CRT monitors may suffer from burn in when the same image such as the horizontal or vertical bars is left on screen for ...

Page 10: ...om to display the picture settings as shown in Figure 35 Figure 35 Video Modes Custom Processing With a color bar test pattern from a test disc or other source on screen the following adjustments may be made The color intensity setting on your TV Color adjustments using the color bars which may be left to right black white yellow cyan turquoise green magenta red blue black The color transition see...

Page 11: ...fferent source from the main listening area However if the same source has been selected for both the main listening area and the remote zone listeners in both areas will hear the same content NOTE Only analog audio sources including The Bridge II are available to the multizone system The USB Network and Internet Radio sources are also available To hear digital devices such as a CD player in the r...

Page 12: ...ty rating of 88dB 8 ohms 1 watt 1 meter If your loudspeakers have a higher sensitivity rating increase the Dolby Volume Calibration setting by the difference between your speakers sensitivity and 88dB If your speakers have a lower sensitivity decrease the Dolby Volume Calibration setting by the difference between 88dB and your speakers sensitivity Menu Appearance Menu Transparency Select whether v...

Page 13: ... Activities are used to program sequences of up to 20 commands that are executed with a single button press Activities are well suited for power on and off commands to send out a multidigit channel number with one button press or to control another device with more flexibility than the built in punch through controls Up to 11 activities may be programmed NOTE Use caution when programming complicat...

Page 14: ...D player Or while using the remote to control video functions on your TV you may use your cable box to change channels To program punch through control while operating any device Press and hold the AVR Settings Button for 3 seconds The remote will 1 enter Program mode and its Main Menu will be displayed Use the 2 KL Buttons to scroll to the Punch Through option and press the OK Button Use the 3 KL...

Page 15: ...camcorder cassette deck AUX Coax Front Analog Front Composite Front not used for audio only devices Recorder Source D Coaxial 2 input and Coaxial Output Analog 4 inputs and outputs Composite OR S Video 2 input and output iPod The Bridge II None The Bridge II The Bridge II for photo and video capable iPod models Make this connection only when using the TV source for a non display device Do not conn...

Page 16: ...dium Low Medium Medium Medium Medium Low Medium Record Out Analog Analog Analog Analog Analog Analog Analog Analog Video output resolution may vary for HDMI connections Table A2 Source Setting Defaults continued USB Internet Radio Network Source A Source B Source C Source D Surround Modes Auto Select Logic 7 Movie Logic 7 Music Logic 7 Music Logic 7 Movie Logic 7 Movie Logic 7 Movie Logic 7 Movie ...

Page 17: ...t Level 0dB 0dB Surround Right Level 0dB 0dB Surround Back Right Level 0dB 0dB Surround Back Left Level 0dB 0dB Surround Left Level 0dB 0dB Sub Level 0dB 0dB Note When the Tone Mode setting is Off the 6 8 Channel Inputs are direct inputs whose signals are passed directly to the volume control without any bass management processing The speakers remain full range and cannot be adjusted When the Tone...

Page 18: ...ued USB Internet Radio Network Source A Source B Source C Source D Device Type USB Drive N A Surround Modes Video Input USB N A Network Audio Input USB Internet Radio Network Resolution to Display Adjust Lip Sync Change Name Audio Auto Polling N A N A N A Zone 2 Audio USB Internet Radio Network Zone 2 Video N A N A N A Trigger 2 Dolby Volume Record Out Table A6 Audio Effects Settings Default Cable...

Page 19: ...gs continued USB Internet Radio Network Source A Source B Source C Source D Dolby Volume Tone Control Treble Bass LFE Trim EQ Speaker Setup Table A7 Video Modes Settings continued USB Internet Radio Network Source A Source B Source C Source D Video Mode Brightness Contrast Color Sharpness Picture Adjust Overscan Noise Reduction MPEG Noise Reduction Cross Color Suppressor Flesh Tone Enhancement Bla...

Page 20: ...es continued USB Internet Radio Network Source A Source B Source C Source D Auto Select Virtual Surround Stereo Movie Music Game Center Width Dimension Panorama Note These settings are only available when Dolby Pro Logic II or IIx Music mode has been selected Access these settings by selecting the Edit option Table A9 Remote Control Codes Source Input Device Type if changed Product Brand and Code ...

Page 21: ...ansparency Medium Volume Status Messages 3 seconds Menus 1 minute Setup and Slide In Menus 15 minutes Screen Saver 10 minutes Software Version Check your product Table A12 Zone 2 Settings Source Input Default Your Settings Status Off Source FM Radio Volume 25dB Surround Back Amps Main Room Carrier Out Zone 2 Table A11 Network Settings Setting Your Settings ID Network Settings IP Address Subnet Mas...

Page 22: ...hile delivering fully lossless audio that is a true reproduction of the studio master recording Blu ray Disc or HD DVD encoded with Dolby TrueHD delivered via HDMI Dolby Digital Stereo Delivers a 2 channel downmix of Dolby Digital materials Dolby Digital 1 0 0 or 1 2 0 0 or 1 3 0 0 or 1 2 1 0 or 1 2 2 0 or 1 3 2 0 or 1 Dolby Digital EX Dolby Pro Logic II Mode Group Analog decoder that derives five...

Page 23: ...Dolby Virtual Speaker Wide When only two main speakers are present the Reference mode virtualizes a full surround presentation with accurate localization Dolby Digital uses only two speaker mode when signal does not contain center channel information Analog 2 channel Tuner PCM 32kHz 44 1kHz or 48kHz DTS Digital Using a different encoding decoding method than Dolby Digital it also provides up to fi...

Page 24: ...e See below Logic 7 Movie Especially suited to 2 channel sources containing Dolby Surround or matrix encoding Logic 7 Movie mode increases center channel intelligibility Analog 2 channel Tuner PCM 32kHz 44 1kHz 48kHz 96kHz Logic 7 Music The AVR 760 AVR 660 is programmed at the factory to default to this mode for 2 channel signals Logic 7 Music mode is well suited to conventional 2 channel music re...

Page 25: ... 39 40 41 42 28 29 32 37 33 34 35 5 10 11 12 13 14 6 7 9 8 15 16 17 43 45 44 46 47 48 49 50 52 53 54 55 56 57 58 51 ENGLISH APPENDIX Refer to the numbered buttons in Figure 38 when using the Function List Figure 38 Remote Control Function List Reference ...

Page 26: ...7 Last Last Last Last Prev Ch Last Prev Ch 28 0 0 0 0 0 0 0 0 0 29 Activity Activity Activity Activity Activity Activity Activity Activity Activity 30 Back Exit Back Exit Back Exit Back Exit Clear Back Back Exit Bypass 31 Menu Menu Menu Menu Menu Menu Menu Menu Menu 32 Up Up Tune Up Tune Up Up Up Up Up Up 33 Left Left Preset Down Preset Down Left Left Left Left Left 34 OK OK OK OK Enter Enter OK O...

Page 27: ...Activity Activity Activity Activity Activity Activity Activity Activity Activity 30 Back Exit Clear Exit Cancel Exit Exit Cancel Back Exit Back Exit 31 Menu Start Menu Menu Menu Menu Menu Menu 32 Up Up Up Up Up Up Up Up 33 Left Left Left Left Left Left Left Left 34 OK Select Enter Setup Select Enter OK OK 35 Right Right Right Right Right Right Right Right 36 Light Light Light Light Light Light Lig...

Page 28: ...8500 Balboa Blvd Northridge CA 91329 www harmankardon com 2009 Harman International Industries Incorporated All rights reserved Part No CQX1A1308Z A ...

Reviews: